So you’re facing a frustrating issue with your WordPress website – the dreaded 403 Forbidden Error. Don’t worry, you’re not alone! In this comprehensive guide, we’ll dive into the nitty-gritty of this error and show you how to fix it like a pro.
First things first, let’s understand what exactly the 403 Forbidden Error is all about. Essentially, it’s a response your website server gives when it refuses to grant access to a particular resource or specific web page. It’s like being told, “Sorry, you’re not allowed to go there!”
Now, you might be wondering, “Why is my website being so strict?” Well, there are a few common reasons behind this error, which we’ll explore in detail. By knowing the causes, you’ll be better equipped to tackle them head-on.
Contents
ToggleWhat Causes the 403 Forbidden Error in WordPress?
Before we dive into troubleshooting the 403 Forbidden Error in WordPress, it’s essential to understand the common causes behind this frustrating issue. By gaining insight into these causes, you’ll be better equipped to identify and resolve the problem effectively.
Insufficient File and Folder Permissions: One of the primary culprits behind the 403 Forbidden Error is incorrect file and folder permissions. When the server restricts access due to insufficient permissions, it leads to the error. This can happen when the site’s file permissions are set too restrictively or when there are conflicts between different files and folders.
Learn More: Fix DNS_PROBE_FINISHED_NXDOMAIN Error
Plugin or Theme Conflicts: Conflicts with plugins and themes can also trigger the 403 Forbidden Error. Sometimes, a specific plugin or theme may contain code that interferes with the server’s access permissions, resulting in the error. Incompatibility issues or outdated versions of plugins and themes can contribute to this conflict.
Read More: What Is A Crawl Error?
Corrupt .htaccess File: The .htaccess file is a powerful configuration file that controls various aspects of your website. If this file becomes corrupted due to improper modifications, it can cause the web server to deny access, leading to the 403 Forbidden Error.
Security Plugins and Firewall Settings: While security measures are essential for protecting your website, they can sometimes become too strict and block legitimate access. Security plugins or firewall settings may have rules or configurations that mistakenly label certain requests as suspicious, triggering the 403 Forbidden Error.
Related: Best WordPress Security Checklist 2023
Now that you’re armed with this knowledge, let’s move on to the troubleshooting steps to fix the 403 Forbidden Error in WordPress and regain control of your website.
Sail Smoothly with Seahawk’s Expert WordPress Support!
Experience seamless WordPress operations and leave 403 Forbidden Errors behind.
Preparing for fixing the 403 forbidden error code
Before you dive into resolving the 403 Forbidden Error in WordPress, it’s crucial to take some preparatory steps to ensure a smooth troubleshooting process. These actions will help you safeguard your website and make it easier to identify and fix the underlying issue.
A. Backing Up Your Website
Before making any changes to your website, it’s essential to create a backup. This ensures that if anything goes wrong during the troubleshooting process, you have a recent version of your website to restore. Here’s how you can create a backup:
- Using a Plugin: There are several reliable plugins available that make the backup process seamless. Popular options include UpdraftPlus, BackupBuddy, and Duplicator.
- Manual Backup: If you prefer not to use a plugin, you can manually back up your website through your hosting provider’s control panel or using an FTP client to download all your files.
B. Accessing WordPress Admin Dashboard
To effectively troubleshoot the 403 Forbidden Error, you’ll need access to your WordPress Admin Dashboard. Follow these steps to log in:
- Open your preferred web browser.
- In the address bar, type your website’s URL followed by “/wp-admin” (e.g., “www.yourwebsite.com/wp-admin“).
- Enter your username and password to log in.
C. Checking Server Logs
Server logs can provide valuable insights into what might be causing the 403 Forbidden Error. Here’s how you can access them:
- cPanel: If your hosting provider uses cPanel, log in and navigate to the “Metrics” section. Look for “Raw Access” or “Raw Access Logs” to view server logs.
- FTP: You can also access server logs via FTP. Connect to your server using an FTP client, navigate to the log directory, and download the relevant log files for analysis.
By taking these preparatory steps, you’ll be well-equipped to troubleshoot the 403 Forbidden Error effectively. Remember, having a backup of your website is a crucial safety net, and accessing your WordPress Admin Dashboard and server logs will provide you with the necessary information to pinpoint the issue.
Troubleshooting the 403 Forbidden Error
Troubleshooting the 403 Forbidden Error can be a frustrating endeavor, but fear not! We’re here to help you navigate through the maze of potential solutions.
Check it out: WordPress Debugging Tools For Troubleshooting
Here, we’ll walk you through step-by-step troubleshooting techniques to resolve the error and get your WordPress website back on track. From clearing browser cache to examining security settings, we’ll cover various approaches to tackle the 403 Forbidden Error head-on.
Wondering where to find reliable WordPress help online? Don’t worry, Seahawk is here to help but before that, llet’s roll up our sleeves and dive into the troubleshooting process to reclaim access to your website.
Fixing the 403 Error by Clearing Browser Cache and Cookies

Alright, let’s start with a quick and easy fix that often does the trick: clearing your browser cache and cookies. Think of your browser cache as a storage space where it keeps copies of all the files of websites you visit to load them faster next time. Sometimes, this cache can cause conflicts and lead to the 403 Forbidden Error.
Learn More: Is your website down? Here’s How To Check
So, here’s what you need to do:
- Open up your browser settings.
- Look for the “History” or “Privacy” section.
- Now, find the option to clear your browsing data or cache. It might be labeled as “Clear browsing data,” “Clear cache,” or something similar.
- Make sure to select the option to clear both cache and cookies. These little cookies are like crumbs that websites leave on your computer, and they can sometimes cause conflicts too.
- Once you’ve selected the appropriate options, click on that magical “Clear” or “Delete”
If this quick fix didn’t do the trick, don’t worry. We have more troubleshooting steps up our sleeves. Let’s move on to the next one.
Fixing the 403 Error by Resolving File and Folder Permissions Issues
Now, let’s dig a bit deeper into another potential culprit behind the 403 Forbidden Error – file and folder permissions. Every file and folder on your WordPress website has certain permissions assigned to it, determining who can access or modify them.
Sometimes, incorrect permissions can trigger the dreaded 403 error. But fear not, we’ll guide you through the process of checking and fixing these unique file permissions.
- Open your FTP client and connect it to your WordPress website using the provided credentials. If you’re not sure where to find these, reach out to your WordPress hosting provider.
Learn More: 20 Best Cloud Hosting Services Of 2023
- Once connected, you’ll see a list of files and folders on your website. Locate the folder or file that’s generating the 403 Forbidden Error.
- Right-click on the file or folder, and select “File Permissions” or “Change Permissions” from the context menu. This will open a dialog box showing the current permissions.
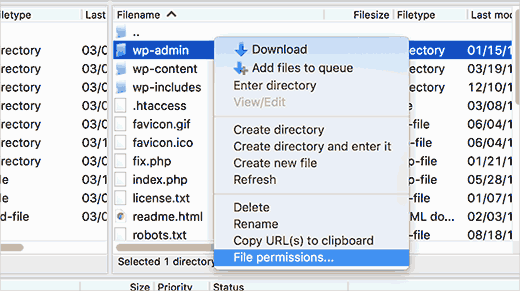
- Now, we need to ensure that the permissions are set correctly. In most cases, folders should have a permission of 755, while files should have a permission of 644. You can modify the permissions by entering the numerical value or checking the appropriate boxes.
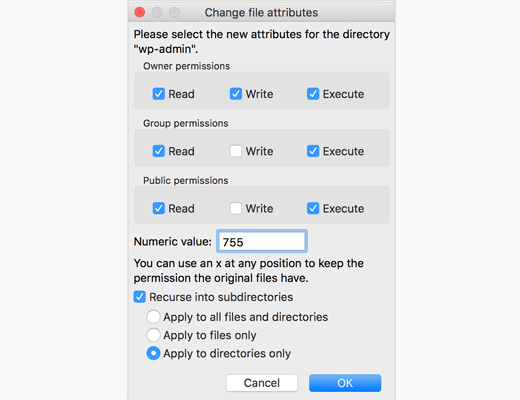
- After adjusting the permissions, click on the “Apply” or “Save” button to save your changes.
- Repeat this process for any other files or folders that might be causing the 403 Forbidden Error.
Fixing the 403 Error by Disabling Plugins and Themes
Sometimes, conflicts with plugins and themes can trigger the 403 Forbidden Error on your WordPress website. Here is a solution that might just save the day.
- Open your WordPress admin dashboard.
- Navigate to the “Plugins” section in the sidebar. Here, you’ll find a list of all the plugins installed on your website.
- Start by deactivating all the plugins at once. Look for the option to select all plugins or use a bulk action to deactivate them. This step temporarily disables all plugins, allowing you to identify if any of them are causing the 403 Forbidden Error.
Read More: How To Fix Slow WordPress Backend?
- Now, visit your website to see if the error is gone. If it is, then you know one of the plugins was the culprit. Proceed to the next step to identify which plugin it is.
- Return to the WordPress admin dashboard and reactivate your plugins one by one, testing your website after each reactivation. This way, you can pinpoint the exact plugin that triggers the 403 Forbidden Error.
Might Interest You: Here’s a list of 15 Best WooCommerce Plugins [Free+Paid]
- When you find the problematic plugin, delete it and look for another alternative for that plugin if its functionalities are essential for your website.
- In some cases, themes can also cause conflicts leading to the 403 error. To test this, go to the “Appearance” section in the WordPress dashboard and switch to a default WordPress theme. Check if the error persists with the default theme enabled.
Fixing the 403 Forbidden Error Caused by Corrupt .htaccess File
The .htaccess file – a tiny but powerful configuration file that can sometimes wreak havoc and trigger the 403 Forbidden Error on your WordPress website. Let’s look at how to resolve this.
- To start, you’ll need access to your website’s files again. You can use an FTP client or a file manager provided by your hosting provider.
Learn How to Fix ‘Deceptive Site Ahead’ Warning
- Locate the root folder of your WordPress installation. This is where you’ll find the .htaccess file. It’s often in the same directory as your wp-admin and wp-content folders.
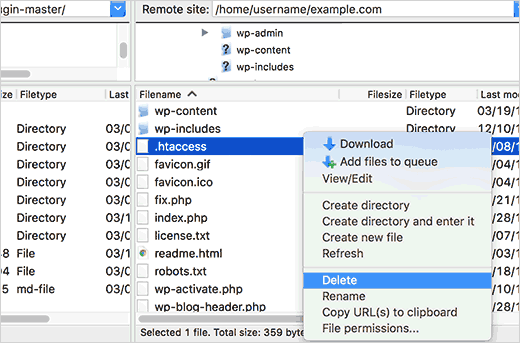
- Before making any changes, it’s essential to create a backup of your .htaccess file. Right-click on the file and choose the “Download” or “Save” option to save a copy to your computer. This backup ensures that you can revert back in case anything goes awry.
- Once you’ve created a backup, you can go ahead and delete the existing .htaccess file from your server. Don’t worry; we’ll regenerate it later with the correct settings.
Related: Best WordPress Backup Plugins 2023
- Now, visit your WordPress admin dashboard. Head over to the “Settings” section and click on “Permalinks.”
- Without making any changes, simply click on the “Save Changes” button. This action generates a new .htaccess file with the proper configuration for your permalinks.
- Finally, revisit your WordPress website to check if the 403 Forbidden Error has bid farewell. With a fresh .htaccess file, your website should be back in action.
Here, you’re essentially resetting its configuration and allowing your website to function properly. If the error is still holding on tight, don’t despair. We have more troubleshooting techniques up our sleeve. Let’s move on to the next step and conquer this last error message together!
Fixing the 403 Forbidden Error by Examining Security Plugins and Firewall Settings
When it comes to website security, sometimes our protectors can be a bit overzealous. Security plugins and firewall settings designed to safeguard your WordPress website can sometimes go overboard and trigger the 403 Forbidden Error.
Compare: Malware Removal Services vs. Website Security Services
But fear not! We’ll help you navigate through this obstacle and restore access to your site.
- Start by accessing your WordPress admin dashboard. From there, navigate to the “Plugins” section and locate your security plugin. If you’re not sure which plugin is responsible, look for those with names like “security,” “firewall,” or similar terms.
- Temporarily disable your security plugin by clicking on the “Deactivate” or “Disable” button. This action will help us determine if the plugin is causing the 403 Forbidden Error.
Learn More: How To Protect Your WordPress Site From Malware?
- After disabling the security plugin, visit your website and see if the error persists. If the error disappears, it’s likely that the security plugin was the culprit. In that case, proceed to the next step.
- Re-enable the security plugin, but this time, we’ll need to review and adjust its settings. Look for options related to IP blocking, access restrictions, or firewall rules. Carefully review these settings, ensuring they don’t inadvertently block access to your website.
- If you identify any overly restrictive settings, consider whitelisting your IP address. This action ensures that your own access to the website is not blocked. Look for an option to add your IP address to the whitelist or trusted list within the security plugin’s settings.
- Save the changes and visit your website once again to check if the error has been resolved. With the appropriate security plugin and firewall settings in place, your website should be accessible without triggering the 403 Forbidden Error.
By examining and adjusting your security plugins and firewall settings, you strike a balance between protection and accessibility. It’s like having your website guarded by a reliable bouncer who allows legitimate access while keeping the troublemakers at bay.
Verifying 403 Forbidden Error Resolution
After implementing the necessary steps to fix the 403 Forbidden Error in WordPress, it’s essential to verify that the issue has been successfully resolved. This confirmation ensures that your website is now accessible without any restrictions. Follow these steps to verify the error resolution:
A. Testing Website Accessibility
- Clear Browser Cache: Before testing, clear your browser’s cache to ensure that you are not viewing a cached version of your website that may still have the error.
- Visit Your Website: Open your web browser and enter your website’s URL. Navigate through different pages and functionalities to ensure everything is working as expected.
- Submit Forms and Interact: If your website has forms, submit them to confirm they are functioning correctly. Interact with any interactive elements to ensure they respond as intended.
- Check Media and Files: Verify that images, videos, and downloadable files are loading and accessible.
B. Monitoring Server Logs
Even after resolving the error, it’s a good practice to continue monitoring your server logs for any unusual activity. This can help identify and address any potential security concerns or other issues that may arise in the future.
- Regularly Review Logs: Set a schedule to periodically review your server logs. Look for any unusual or repeated patterns of activity.
- Monitor Security Alerts: Stay informed about security alerts and updates related to your server environment and WordPress installation.
- Take Prompt Action: If you notice any suspicious activity or errors in the logs, take prompt action to investigate and address them.
Preventing Future 403 Forbidden Error Occurrences
While resolving the 403 Forbidden Error is crucial, it’s equally important to take proactive steps to prevent it from happening again in the future. Implementing these preventive measures will help maintain the security and accessibility of your WordPress website:
A. Regularly Monitoring File Permissions
- Scheduled Audits: Set up a regular schedule to audit and review the file permissions on your server. This ensures that no unauthorized changes have been made.
- Use Strong Passwords: Ensure that all user accounts, including administrators, have strong, unique passwords. Consider using a password manager to generate and store complex passwords.
B. Using Trusted Security Plugins
- Select Reliable Plugins: Choose security plugins from reputable sources with a track record of providing effective protection. Look for plugins that are regularly updated and have positive user reviews.
- Configure Security Settings: Properly configure the settings of your chosen security plugin to provide maximum protection against potential threats.
C. Keeping WordPress and Plugins Updated
- Enable Automatic Updates: Enable automatic updates for WordPress core, themes, and plugins whenever possible. This ensures that you are always running the latest, most secure versions.
- Regularly Check for Updates: If automatic updates are not available for certain themes or plugins, make it a habit to check for updates manually and apply them promptly.
Conclusion
In conclusion, the 403 Forbidden Error in WordPress can be a frustrating roadblock, but with the right knowledge and troubleshooting steps, it can be overcome. By addressing potential causes such as file and folder permissions, plugin and theme conflicts, corrupt .htaccess files, and security settings, you can gradually eliminate the factors contributing to the error.
Remember, troubleshooting requires patience and persistence. It may take a few attempts to pinpoint the exact cause and find the appropriate solution. Don’t hesitate to seek assistance from professional WordPress experts to get it right in the first place.


