Does your WordPress login page appear dull and outdated? First impressions go a long way, and an unimpressive login screen can potentially turn visitors away before they even get into your site. Creating WordPress custom login and registration page enhances UX and visual appeal and flawlessly blends the login and registration process into your site’s user flow.
In this guide, we will show you how to create eye-catching custom login and registration pages. Coding is not required! You’ll add your logo, custom colors, background images, and more with a few clicks. Get ready to wow new visitors and give your regulars a consistent, on-brand experience from the moment they log in. Alternatively, ask your WordPress development partner to create the necessary pages for you!
Contents
ToggleSteps to Creating a Custom Login & Registration Page on WordPress
A custom login and registration page on WordPress can be your ticket to fostering deeper connections with your audience. Let’s embark on this journey together and discover how to elevate your website into a tailored and interactive online hub.
Create Custom Login
WordPress custom design carries out a bespoke login page to provide a gateway for users to input their credentials to access their accounts. Unlike standard login pages, custom ones are crafted to match the website’s style and branding, providing a seamless user experience. They may also incorporate additional features, such as enhanced web security measures or fields to collect specific user information during registration. It’s a personalized approach for users to log in and securely engage with a WordPress website.
Read More: How to Add WordPress reCAPTCHA for Website Security?
Here is how you should go about creating one with WP Forms –
Step 1: Install the WPForms Plugin
First off, you’ll have to install and activate the WPForms plugin.
Remember, if you want to use the user registration and login features, you’ll need WPForms Pro or a higher version. The Pro version comes with the User Registration add-on, making it super easy to create custom login pages.
After you’ve installed WPForms, simply head over to WPForms » Addons.
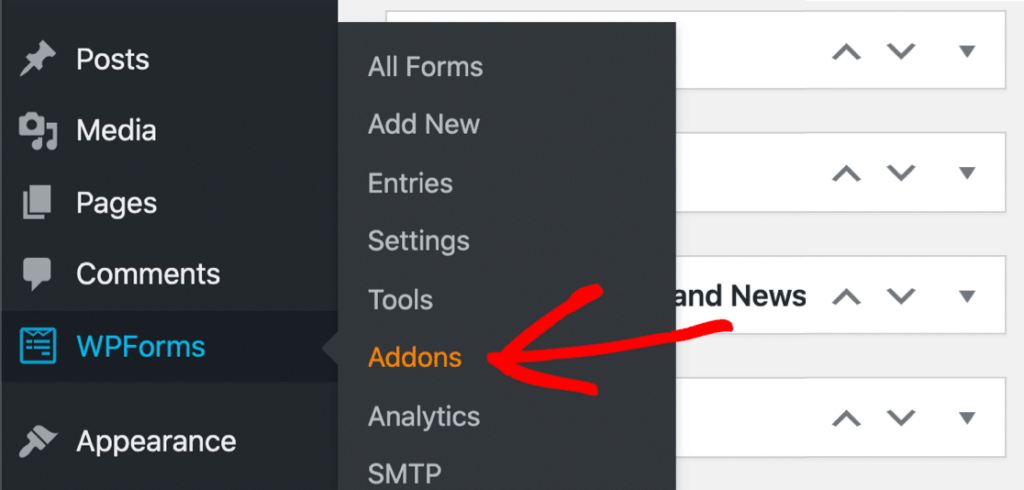
Keep scrolling down until you spot the User Registration Add-on. Click on the button to install it and unlock the next step.

Turn WordPress Maintenance Mode on to keep visitors at bay while you navigate through the entire process without interruption.
Learn More: Outsourcing WordPress Maintenance Tasks to Maximize Efficiency
Ready to roll! Let’s craft our brand new custom login form.
Hitting a Dead End in Client Site Improvement?
We can simplify the task with quick and easy white-label wordpress solutions covering design, maintenance, and support functions.
Step 2: Create a Custom WordPress Login Form
With the WPForms installation complete, it’s time to create a new WordPress login form that reflects our website’s unique look and feel.
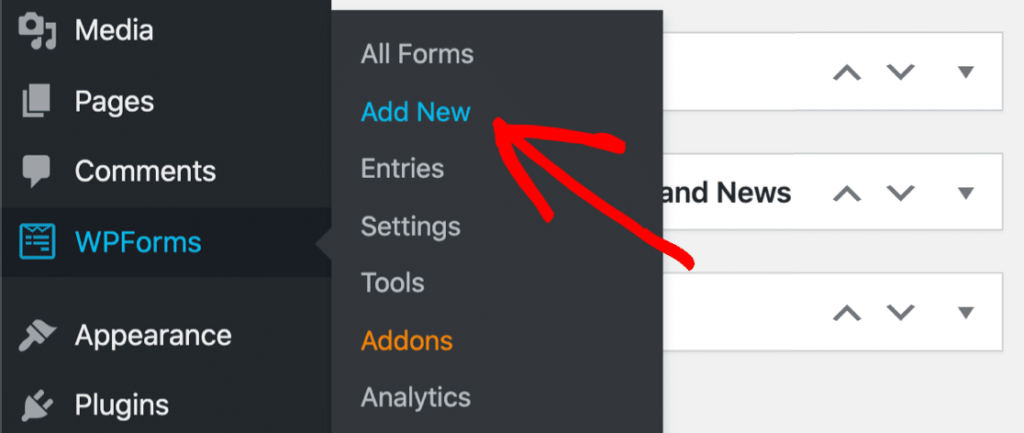
Go to WPForms » Click Add New to start
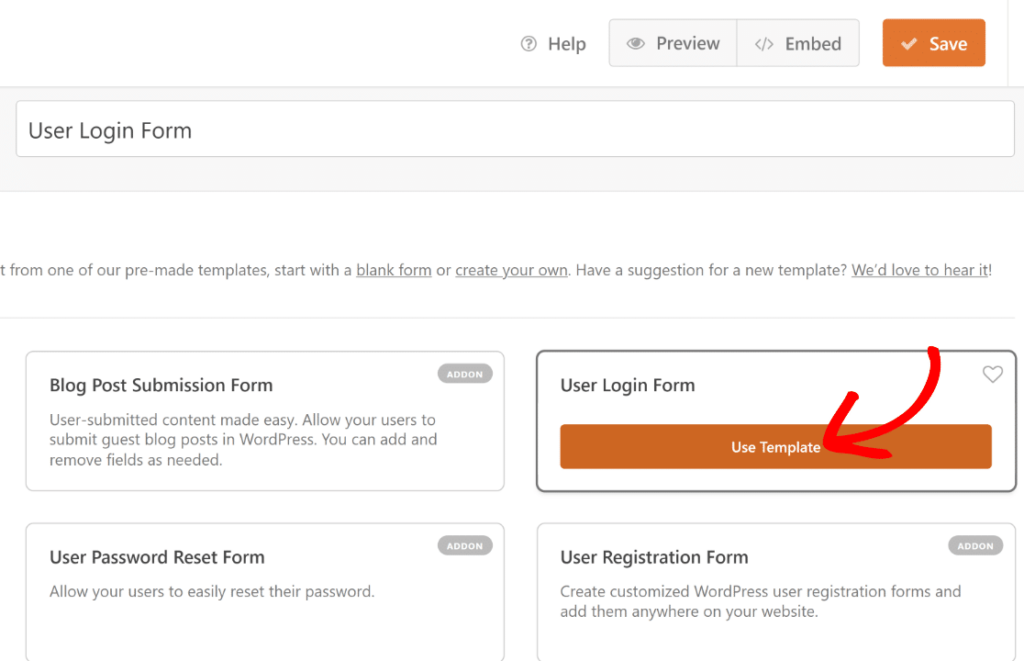
Next, you’ll land on the WPForms template selection screen. Thanks to the User Registration Addon, you can access several specialized templates with unique features, as illustrated below.
As the form opens in the form builder, you’ll notice it includes fields for Username, Password, and Remember Me, making it quite a comprehensive custom login solution.
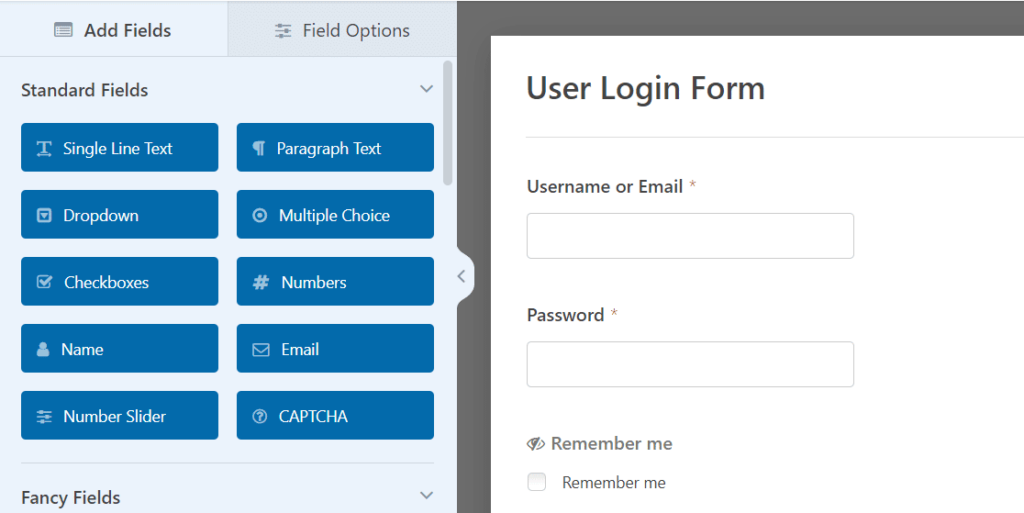
The Remember Me field is unique and only available in this template. It lets users automatically log in whenever they return to your website after using this form. You can keep the template as it is or add more stuff.
We’ll walk you through how to do that in the next step.
Interesting Read: Top 5 Must-Have Form Plugins for WordPress
Step 3: Add a Branding Image to Your Login Form
WPForms lets you edit templates easily or create new forms. For example, we can add branding to our login form to make it unique.
One way is to insert a header image that represents our brand. To do so, drag and drop the Content field to the top of your form, right under the title.
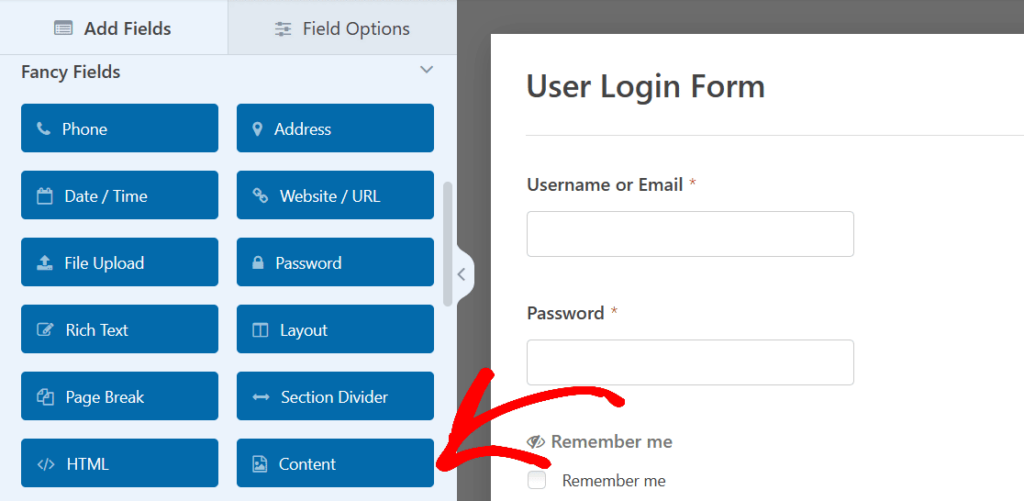
After adding the Content field to your form, click on it to access its Field Options.
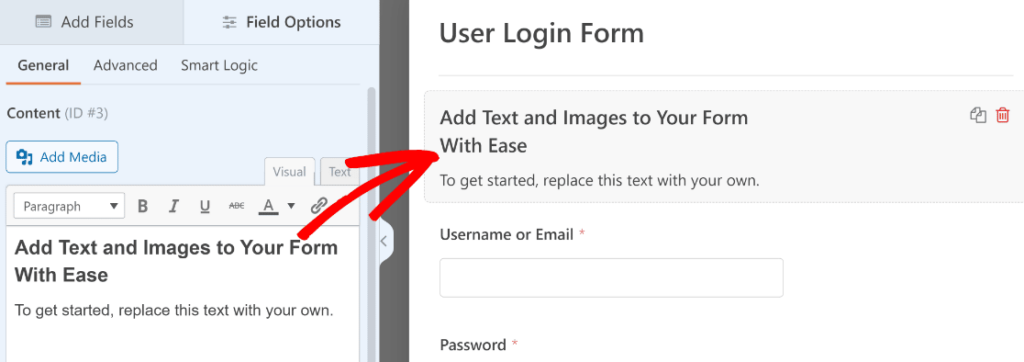
Time to get creative! Head to the WYSIWYG editor on the left side and start adding images or crafting custom text for your form.
Let’s spice up our WordPress login form with some brand flair. Simply hit the Add Media button to upload a snazzy custom image.
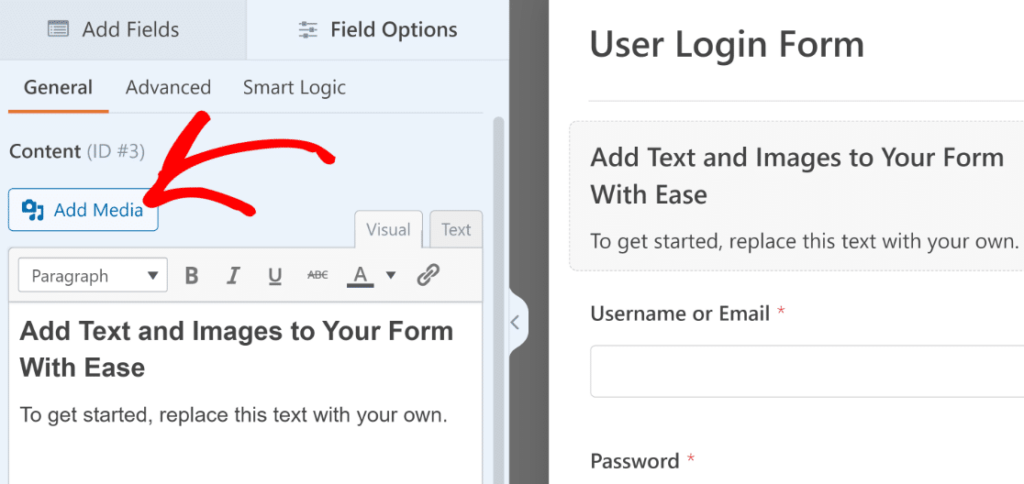
Get ready for some media pizzazz. Clicking the Add Media button will conjure up the WordPress Media Gallery modal window. It is your cue for uploading images, just like you normally do in WordPress.
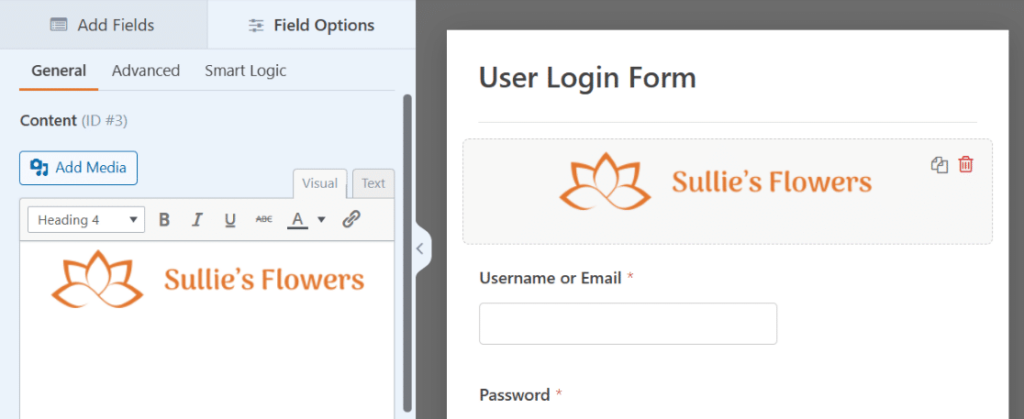
Remember to hit the Save button to seal the deal!

Further Reading: Best WordPress Contact Form Plugins
Step 4: Customize Your Custom Login Form Settings
Now, let’s dive into the login form settings. This allows us to manage the form’s button and the page where our visitors will go after submitting it.
To begin, click on Settings located on the left side of the form builder.
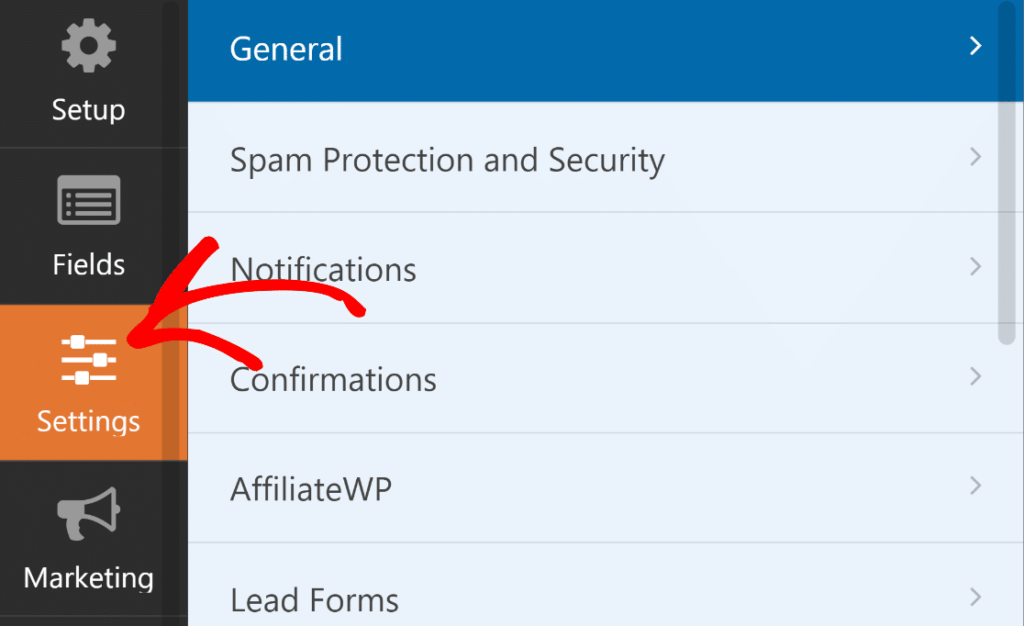
When you enter the settings, the General tab is already selected, which is exactly where we need to be.
Within the General settings, simply scroll down to the Submit Button Text and update it to read Log In.
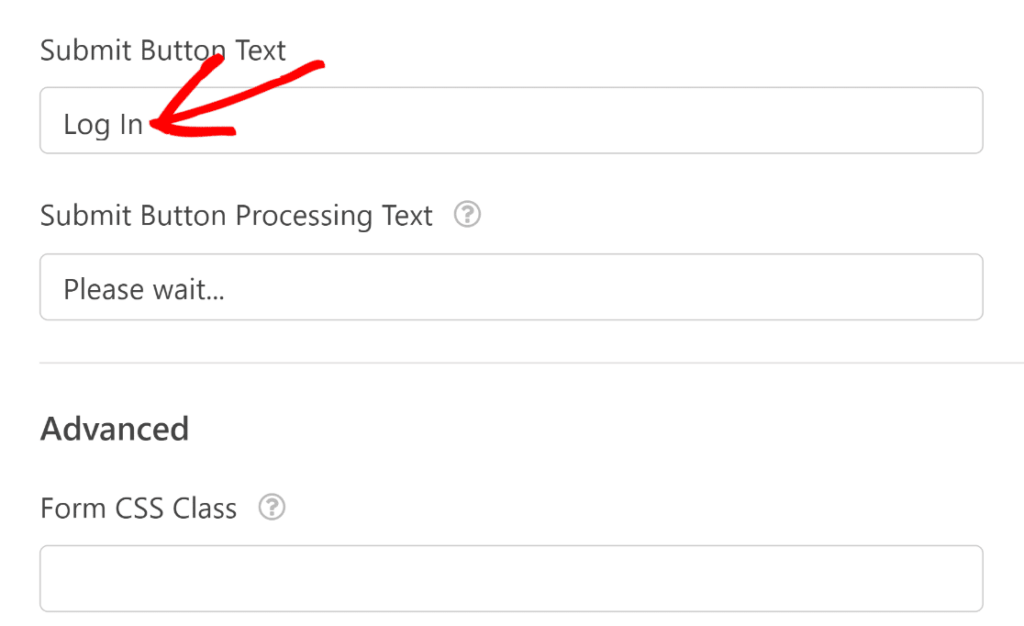
Additionally, we’ve adjusted the Submit Button Processing Text to let users know the login is underway. Feel free to customize this message.
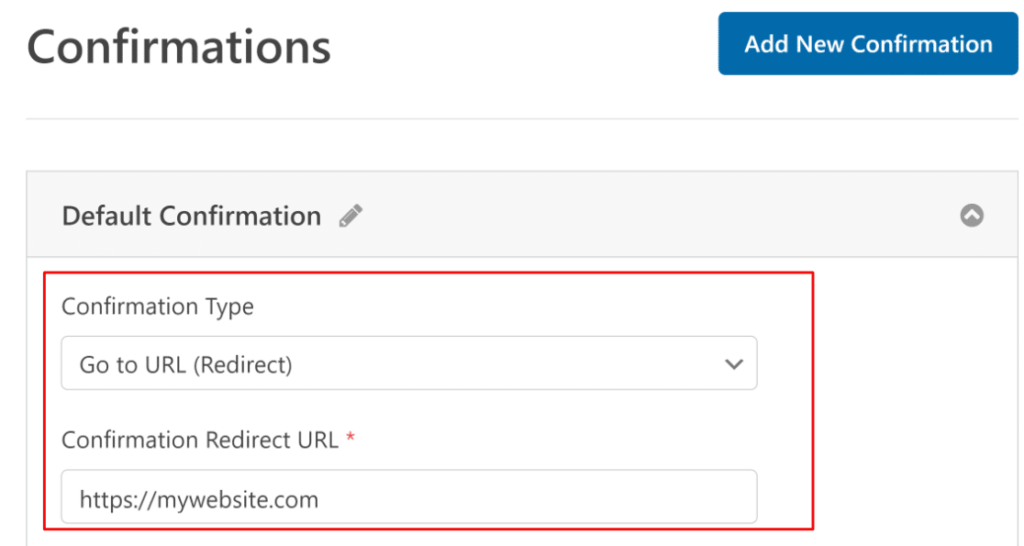
Now, let’s navigate to the Confirmations section.
Here, you can select the action after the login form is submitted. You can direct users to the WordPress admin area, but sending them back to the front end is more logical for many sites.
In this instance, we’ll redirect users to the homepage.
Before we move forward, there’s one more setting to review.
Scroll down the Settings tab in the form builder, and you will see the User Registration menu. Click on it to reveal its options.
You can hide this form from users already logged in by toggling the button to the “on” position. Customize the message to display instead of the form when a user is already logged in using the text box provided.

Now, it’s time for some exploration! Feel free to check out the other settings and tweak anything you fancy. Once you’re satisfied, simply hit the Save button at the top of the form builder to lock in your changes.
Also Check: How to Install WordPress Locally on Mac
Step 5: Publish Your Custom Login Form
Exciting times! Your freshly minted login form is primed and ready for the world.
Where to place it? The options are as boundless as your imagination:
- Grace the pages with its presence.
- Embed it seamlessly within your posts.
- Let it shine in the sidebar.
- Or nestle it snugly in the footer.
Next, we will embark on creating a custom WordPress login page. Ready to dive in? Just give that Embed button at the top of the form builder a hearty click!

Here is what is about to come next –
- A modal will appear asking where you want to embed your form. For this example, we’ll create a new page. Click on Create New Page.
- Now, give your page a name. Once that’s done, click Let’s Go.
- This action will take you to the WordPress block editor with the embedded login form.
- This is a great spot to utilize the form styling options in the WPForms block to easily customize the appearance of your fields, labels, and buttons.
- When you’re satisfied with the appearance of your custom login form, simply click the Publish button to publish your custom login page.
That’s it! Your custom WordPress login page is now live and ready to use.
Pro Tip: If you’ve utilized the Hide if Logged In option, remember that you’ll need to log out of WordPress to view your finished form. Otherwise, the login screen won’t be visible while logged in. It’s a little trick to ensure everything looks right before visitors arrive!
Did You Know? – New CF7 Blocks Plugin Brings Blocks To Contact Form 7
Step 6: Add the Login Form to Your Navigation Menu
Ah, you’ve just put the finishing touches on your custom-branded login form. Excellent work!
Now, let’s ensure it’s effortlessly accessible for your visitors. The key? Adding it to your website’s navigation menu.
To get started, glide over to your WordPress dashboard and click Appearance then select Menus.
Appearance » Menus

In a clean sweep, we follow the next steps –
- If your theme already has a navigation menu, go to Appearance then Menus in your WordPress dashboard. Checkmark your login page from the column on the left and click Add to Menu.
- Your login page will now appear on the right side, along with other menu items. Rearrange their order by dragging and dropping if needed.
- Next, choose where you want the menu to appear. Most themes offer up to 5 display locations, like the header or footer. For this example, we’ll add it to the header, often labeled as the primary menu.
- Click on Primary Menu, then hit Save Menu at the bottom to update it.
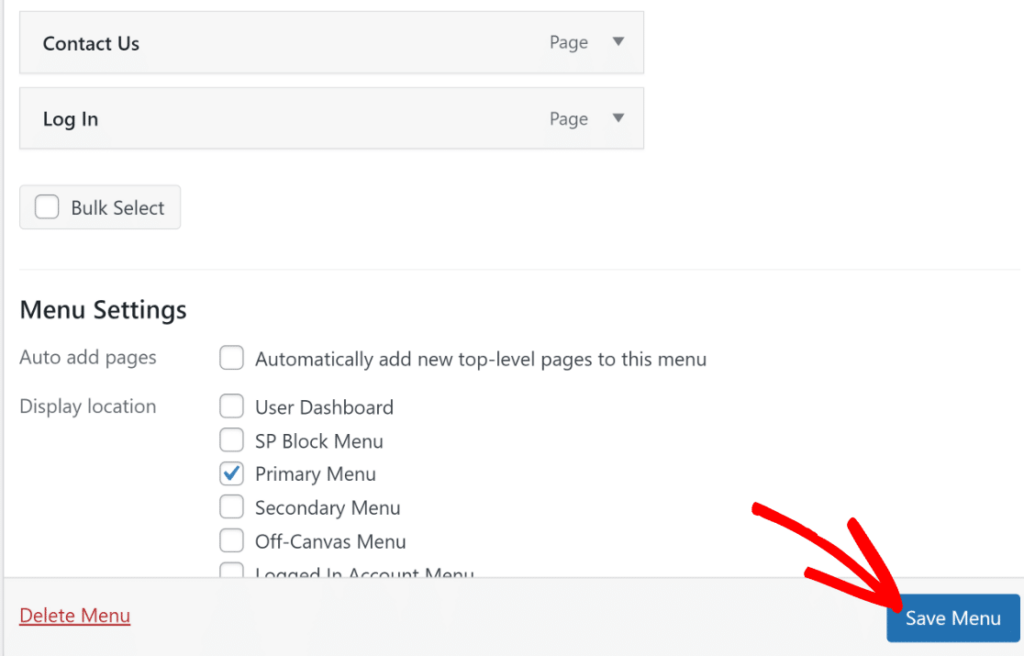
Your navigation menu will now include the new login page. After updating or creating the menu, make sure to visit your homepage to check if everything looks good.
- If your website still needs to have a menu, creating one is similar. Start by giving your new menu a name under Menu Structure.
Follow the same steps as above to add the login page to your navigation. If you’ve also created a custom password reset form, consider adding it to the menu too.
Another How-to Guide: How to Create a One-Page Website in WordPress? (3 Simple Steps)
Step 7: Redirect the WordPress Login Page to Your Custom Login Page
At this stage, you got to ensure that anyone trying to use the usual WordPress login page is sent to your new custom one instead.
To make this happen, we’ll need a plugin called WPCode and a tinsy bit of coding knowledge thrown in.
WPCode is a handy plugin that allows you to add your own code to your WordPress site for free. Once you’ve installed and activated it, go to Code Snippets, click + Add Snippet, and select Add Your Custom Code to create a new snippet.
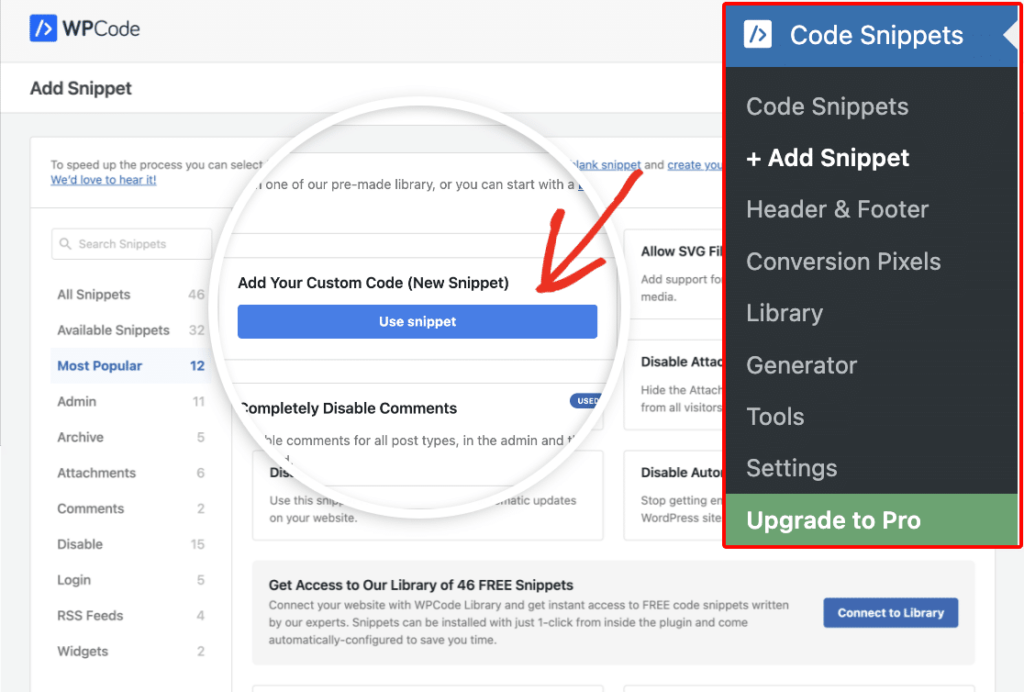
Next, on the following screen, give your snippet a clear and memorable name. For instance, we’ve named it Login Page Redirect.
Then, paste the provided code into the designated area:
| add_filter( ‘login_url’, function( $login_url, $redirect, $force_reauth ){ // Change here your login page url $login_url = ‘https://sulliesflowers.com/login/’; if ( ! empty( $redirect ) ) { $login_url = add_query_arg( ‘redirect_to’, urlencode( $redirect ), $login_url ); } if ( $force_reauth ) { $login_url = add_query_arg( ‘reauth’, ‘1’, $login_url ); } return $login_url;}, 10, 3); |
Ensure you replace https://sulliesflowers.com/login/ with the URL of your custom login page. Then, click on the Save Snippet button to store your changes.
You’ll receive a success message once your redirect is saved and applied. Lastly, activate the setting at the top of the screen to make your snippet active.
From now, when users attempt to log in, they will be directed to your custom page.
Create User Registration
A custom user registration form is a personalized web page where visitors can sign up to create accounts on a website. Unlike the login page, which is for seasoned regulars, this form is all about welcoming fresh faces and gathering their details for a tailor-made experience. With WP registration forms, you can sprinkle some extra accents by adding customized fields and making it a seamless part of your site’s vibe.
Another How-to Guide: How To Customize The WordPress Reset Password Page?
Step 1: Install the WPForms Plugin
Installing the plugin is the first step. Be sure to invest in the WPForms Pro plan, as it provides access to the User Registration add-on, which we’ll utilize to effortlessly craft dynamic registration forms for your website’s users.
What’s excellent about WPForms is that you don’t require any HTML, PHP, or CSS knowledge to design your WordPress registration form. With its intuitive drag-and-drop form builder, anyone can effortlessly create a custom form tailored to their needs.
What’s Holding You Back From Creating a User-Oriented Website?
Consult our highly skilled designers on adding custom form, plug-in solutions, themes and integrations for optimized viewer relevancy.
Step 2: Activate the User Registration Addon
Activating the add-on is straightforward as it integrates well and proper with your WordPress site.
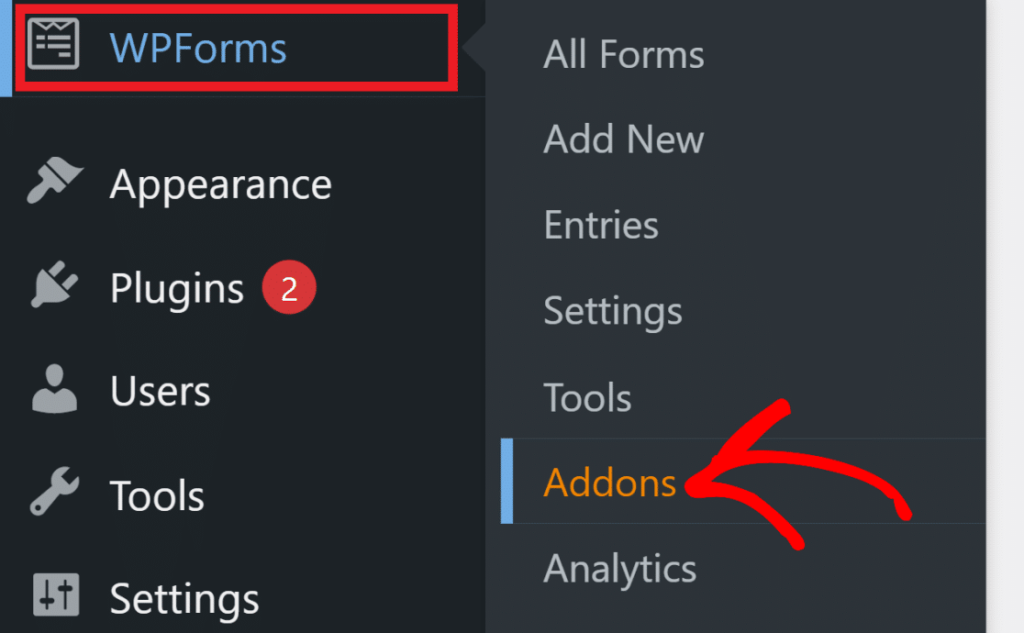
- Head over to WPForms » Add-ons from your WordPress admin area.
- Scroll through the list of addons or type user registration in the search field to locate the User Registration addon.
- Click on Install Add-on to begin the installation process.
- Once installed, the status under the User Registration add-on will change to Active. Congratulations! You’ve successfully activated the User Registration add-on.
- With the User Registration add-on ready, you can start creating WordPress user registration forms effortlessly using WPForms.
Step 3: Create WordPress User Registration Form
This step essentially allows you to seamlessly collect user information and streamline the registration process on your WordPress site.
Keep following –
- To create a new registration form, navigate to WPForms » Add New.
- You’ll be directed to the form setup screen where you can name your form and select a template.
- In this instance, we’ll craft the WordPress sign-up form from scratch, but for a quicker option, you can also start with a template. Click on Create Blank Form.
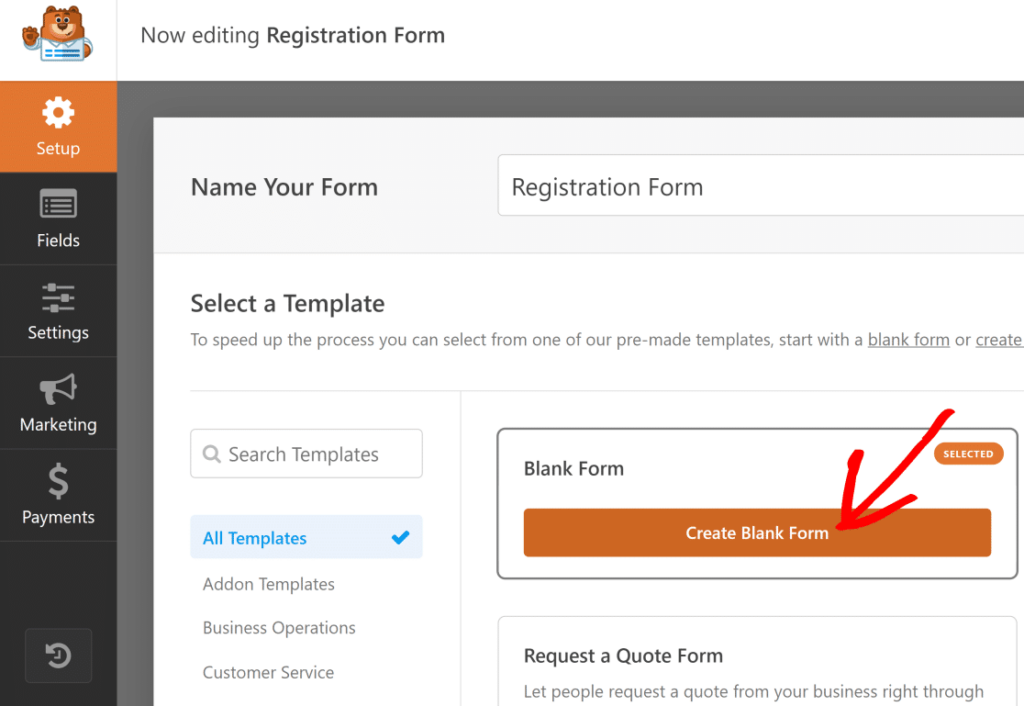
- You will find yourself in the form builder screen, with the form empty since we opted for a blank form.
- WPForms offers extensive customization options, including various custom fields you can add as needed. In the upcoming steps, we will explore these registration features.
Step 4: Customize User Registration Form Fields
Let’s whip up a sleek registration form, keeping it lean and mean with only the must-have fields to gather user info swiftly. Shorter forms mean less chance of user drop-off. However, in our experience, with WPForms’ Form Abandonment add-on, you can still snag those leads.
Now, let’s add field flair to our form using the drag-and-drop builder. Simply pluck a field from the menu on the left and drop it onto your form on the right.
Rinse and repeat until all your desired fields are in place.
For our form, we’ve thrown in:
- Name
- Single Line Text (for that sweet username input)
- Password
Feel free to sprinkle more details to your form fields. See how we have personalized our Single Line Text field to say Username, set a max character limit, and even added an input mask to control allowed characters for the username.
To tweak any field, click on it to unveil the Field Options. Under the General tab, you can tweak the label, add a description, and even mark the field as required.
Get crafting!
Further Learning: Umbraco vs WordPress: Making the Right Choice for Your Content Management
Step 5: Configure WordPress User Registration Form Settings
User Activation Method
In this step, we configure our WordPress user registration form settings to suit the user flow to your preference:
- Start by clicking on Settings » User Registration.
- Next, click on the button beside Enable User Registration to activate it.
- Here, you can:
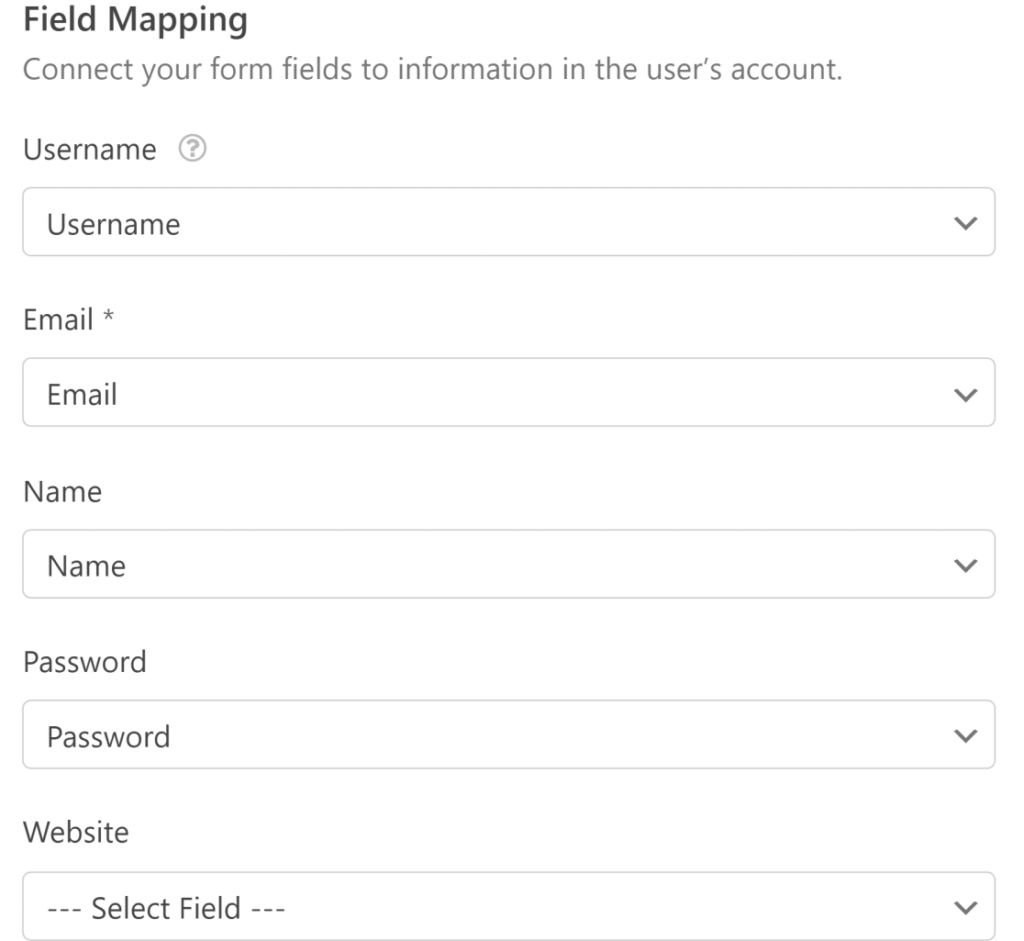
- Map each form field to its corresponding user profile field.
- Select default user roles for new users.
- Enable notifications for new registrations.
- Choose a confirmation page to redirect users after registration.
- Use the dropdown menus to match each form field with the appropriate user profile field for field mapping.
- Scroll down to the User Roles section to assign one of your WordPress site’s predefined user roles to new users.

Changing New User Registration Settings
Keep scrolling down past the settings mentioned earlier, and you’ll come across the Email Notifications section. Here, you can tweak the notifications for new user registrations.
Options include:
- Sending an email to the admin when a new user signs up
- Sending account information to the user, and
- Notifying the user once their account is activated

If you wish to customize the header and content of these emails, just click on the “Edit Template” button next to each notification type.
Another Guide: How To Delete Invisible WordPress Admin Users?
Edit Registration Form
In addition to sending notification emails, WPForms also shows users a confirmation message after they submit the form.
There are three types of confirmations to choose from:
- Message: A simple message appears confirming that the form was submitted.
- Show Page: Users are taken to a specific webpage on your site to thank them for registering.
- Go to URL (Redirect): Users are redirected to a different website, like an affiliate eCommerce site.
You can customize these confirmations by going to Settings » Confirmations. In our example, we used the default message type but added user instructions. If you want new users to be automatically logged into their new WordPress account instead of seeing a thank you message after registering on your website, save your changes.
Next, we’ll embed and publish the form on your site.
Step 6: Add the User Registration Form to Your Site
Once you’ve created your WordPress user registration and login form, it’s time to add it to your WordPress website.
- Embedding the Form:
- Click on the Embed button at the top-right of the form builder screen.
- Select Create New Page and give your new page a name. Then, click Let’s Go.
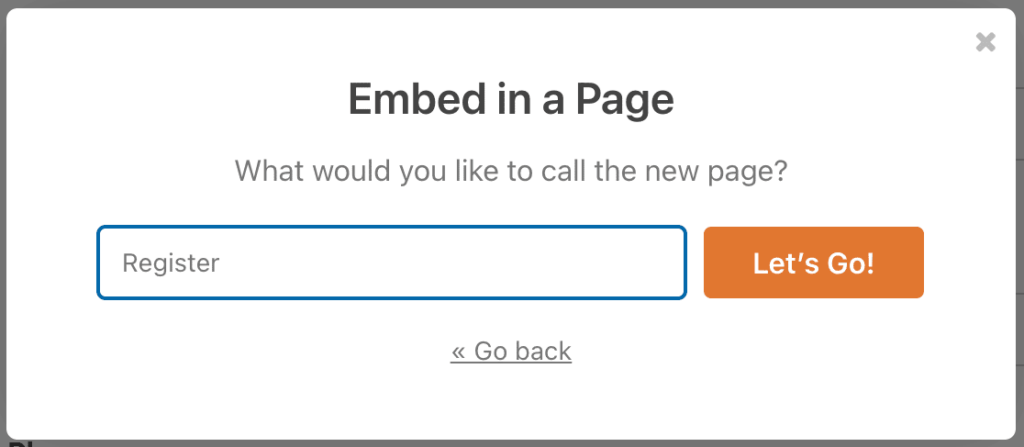
- WPForms will take you to your WordPress editor with your new registration form already embedded.
- Click Publish when you’re ready. That’s it! Your registration page is now live on your WordPress site.
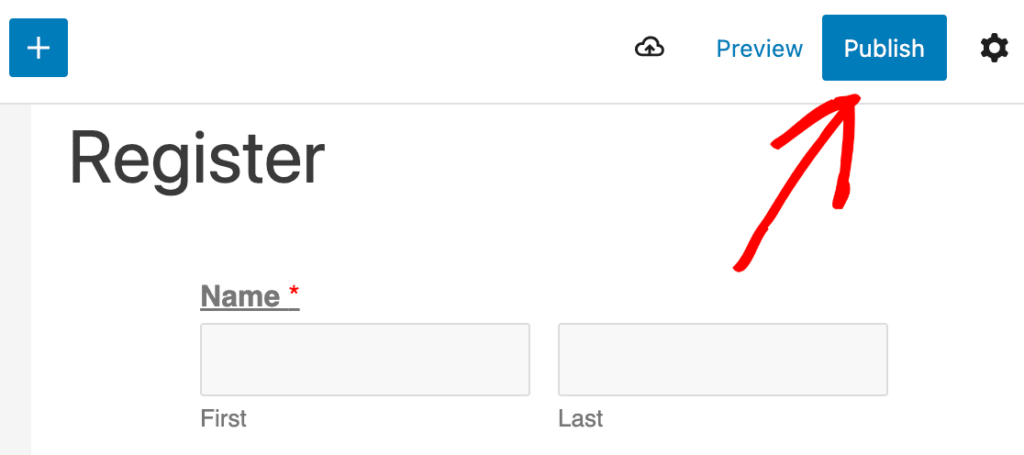
- Redirecting the Default WordPress Registration URL:
- Consider redirecting your default WordPress registration URL to your new custom login page.
- The default WordPress login page may seem out of place on your site because it is too plain and doesn’t match your site’s theme.
Now, users can register on your site using your custom registration form. After registration, you can modify their roles or other settings from each user’s default WordPress profile page.
Step 7: Add Your Registration Page to Your Website’s Menu
Once you’ve published your new user registration form, you should make sure people can find it easily. One way to do this is to add it to the main menu of your WordPress site.
Here’s how:
- Go to Appearance » Menus in your WordPress dashboard.
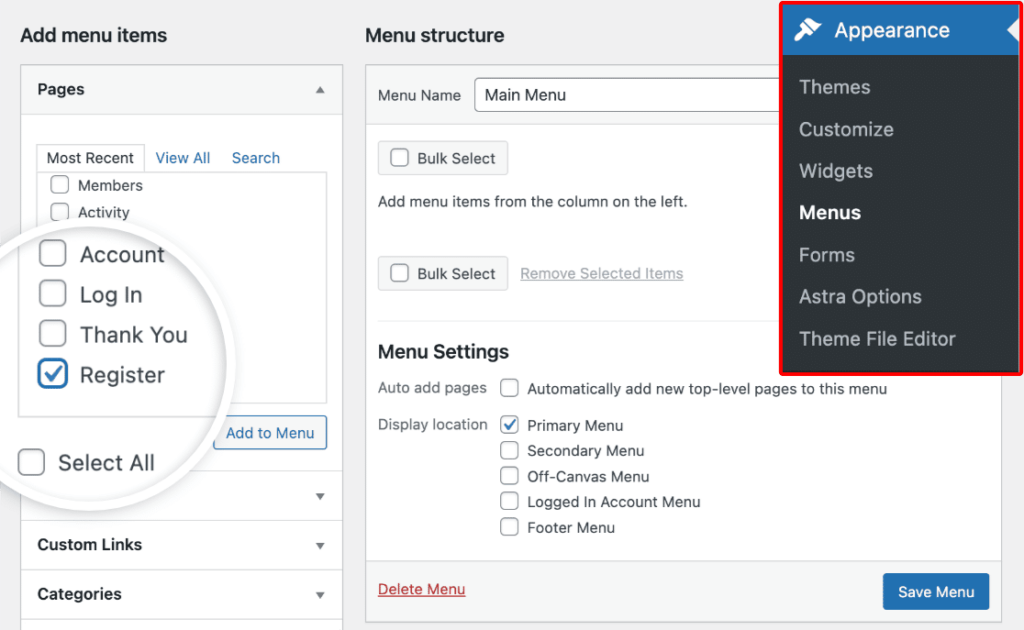
- Look for your new registration page in the options listed on the left, and add it to your menu.
- If your WordPress theme has an old registration page in the menu, you might need to remove it. Remember to save your changes.
- If you need help, check out a WordPress menu tutorial for guidance.
And there you have it! You’ve learned how to create a WordPress registration form, making it easy for new users to sign up on your site.
Keep Reading: Top 10 Reasons to Use WordPress for Your Website
Benefits of Creating a WordPress Custom Login & Registration Page
Creating custom login and registration pages for your WordPress website is a smart move that can provide numerous advantages for you and your users. Taking control of this crucial aspect of your website can enhance the overall user experience, strengthen your brand identity, and even improve security measures.
Branding
Customizing your login and registration pages is like giving your virtual front door a much-needed makeover. With creative flair, you can seamlessly integrate your brand’s dazzling logo, signature color scheme, and trendy typography immediately. This consistent branding instantly reinforces your website’s unique identity, creating a cohesive and memorable experience for every visitor who walks through that door.
Tips to make the most of it:
- Incorporate your brand’s logo and color scheme
- Maintain a consistent look and feel across all pages
- Reinforce your brand identity and build trust
Read More: 5 Tips For Branding With A Low Budget
Improved User Experience
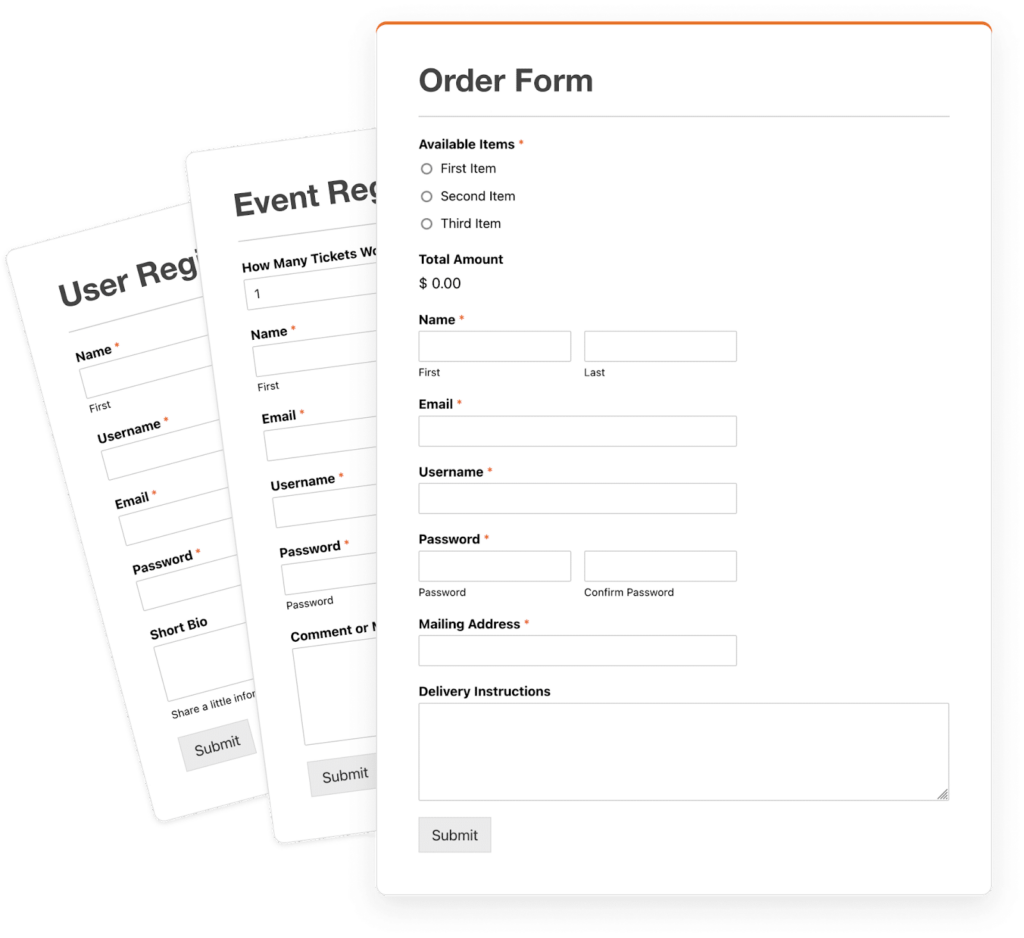
The default WordPress login and registration pages are basic and lack visual appeal. By customizing these pages, you can create a more engaging and user-friendly experience for your visitors.
Tips to make the most of it:
- Design a visually appealing and intuitive interface
- Enhance the overall aesthetics and usability
- Provide a seamless and enjoyable experience for your users
Read More: Why is Bad UX a Nightmare for Your Business?
Increased Security
Custom login and registration pages allow you to implement additional security measures, such as two-factor authentication, captcha verification, or password strength indicators. This extra layer of protection can help mitigate potential security risks and safeguard your website from unauthorized access.
Tips to make the most of it:
- Add extra security features like two-factor authentication
- Implement captcha verification to prevent bot attacks
- Enforce more robust password requirements for enhanced security
Read More: 10 Best WordPress Malware & Security Scanners
Integration with Third-party Tools

Custom login and registration pages can be seamlessly integrated with third-party tools and services, such as social media logins, email marketing platforms, or customer relationship management (CRM) systems. This integration can streamline user onboarding and data management processes.
Tips to make the most of it:
- Enable social media login options for convenience
- Integrate with email marketing platforms for seamless campaigns
- Connect with CRM systems for efficient data management
Read More: Top 10 Project Management Tools For Web Agency
Conclusion
It’s time to upgrade those boring default login and registration pages on your WordPress site. Creating custom versions allows you to make a powerful first impression that resonates with your brand. Follow the steps outlined to design eye-catching login pages that provide a seamless on-brand experience immediately. Keep new visitors from being underwhelmed—captivate them immediately with a stunning branded registration process.


