It is a well-known fact, and a survey has proven that WordPress powers more than 40% of the websites on the internet. And you may find yourself contemplating transitioning from a static HTML site to a vibrant and dynamic WordPress theme.
While HTML5 has remained a great choice for websites, WordPress offers a more user-friendly and feature-rich solution. The charm of WordPress sites lies in their extensive collection of themes, plugins, and widgets, empowering website owners towards enhanced WordPress development.
This platform provides a versatile array of design options and simplifies content management.
However, it can be difficult on an HTML-based site, especially for those who need coding expertise.
So, today, we will take a sneak peek into the complexities of converting static HTML to a dynamic WordPress theme and try to make it easy for you.
So let’s get started!
Contents
ToggleThings To Consider Before Converting HTML To WordPress Theme

We know you are more than excited about the process of converting HTML to WordPress theme. But wait a second; there’s something you need to take note of before starting the process.
Here is what you need to consider:
Choosing the Right Code Editor
Selecting a relevant code editor is crucial in the conversion process. Whether it’s Notepad++, Atom, Sublime, or another tool, having the right editor streamlines the adjustment of your HTML code to suit WordPress requirements.
Hosting Service Selection
Your choice of hosting services is everything! Hosting for your WordPress site is significant and can be different from HTML. So, consider choosing a good hosting service, or you can also choose local hosting for your website and transition to a live environment at a later stage.
Evaluation of Time and Budget
You must evaluate your time and budget before starting anything new. Reflect on the commitment of time and financial resources required for the conversion. If you’re prepared to learn, our tutorial is a perfect guide. Alternatively, you can also hire developers or employ WordPress conversion services, which offer expertise and convenience.
Looking To Convert Your Static HTML To Dynamic WordPress Theme?
Check out our expert WordPress conversion services for seamless migration from different platforms to WordPress
Method 1: Discarding Old HTML Website Design While Retaining the Content
If you’re prepared to leave behind your old HTML website design and embrace a new theme, this method is ideal for you. It simplifies the process of importing content, making it more straightforward and efficient.
Step 1: Back Up Your WordPress Site
Before making any changes, it is crucial to back up your WordPress site to avoid losing any important data.
Step 2: Installing the Import 2 Plugin
To start, you need to install the Import 2 Plugin. Navigate to Plugins -> Add New and search for it by name. Although it’s an older plugin, it remains highly effective. Find it, click Install, and then activate it.
More to Do with HTML: How to Convert Figma to HTML Website (3 Simple Methods)
Step 3: Preparing for the Import
Once the plugin is installed, go to WordPress Settings -> HTML Import. This plugin allows you to import multiple pages simultaneously or one at a time.
Uploading HTML Files
The plugin will specify a path like html-files-to-import. You need to upload your HTML files to this directory on the same server as your WordPress installation. If you require additional guidance, refer to the official user guide.
Configuring the Import Settings
In this guide, we will focus on importing the content. Select the HTML tag at the top and configure the necessary fields. After setting your preferences, click Save Settings.
Step 4: Initiating the Content Import
After saving your settings, the Import Files button will appear. If you miss this, you can also access it through Tools -> Import and click Run Importer under the HTML options.
Importing Your Content
Choose whether you want to import a directory of files or a single file, then click Submit. Once the import is complete, all your existing content will be accessible on your new WordPress site.
Also Check – Best WordPress Import Plugins 2024
Method 2: Using WordPress Child Theme
If the prospect of completely redesigning your website feels overwhelming, but you still want to retain elements of your old site’s design, utilizing a child theme can be an excellent alternative. This method allows you to build on top of existing themes (parent themes) on WordPress, enabling you to customize your site while preserving the core design and functionality of the parent theme.

Understanding the Benefits of Child Themes
Child themes offer the flexibility to customize the appearance of your site without altering the core code of the parent theme. This ensures that any modifications you make will not be lost when the parent theme is updated.
Step 1: Backup Your WordPress Site
Before making any changes, always ensure that you back up your WordPress site. This precaution prevents data loss and makes recovery easier if anything goes wrong during the process.
Step 2: Selecting a Suitable Parent Theme
To begin, you need to choose a suitable parent theme that closely resembles your old website’s design. This minimizes the changes you need to make later. Browse the WordPress theme directory to find an appropriate theme. For this tutorial, we’ll use the Twenty Seventeen theme as our starting point.
Also See: Premium & Feature-rich WordPress Themes for Your Agency
Step 3: Installing the Childify Me Plugin
Next, navigate to Plugins -> Add New and search for the Childify Me plugin. Install and activate it.
Pro Tip: The Childify Me plugin automatically creates style.css and functions.php files for your child theme. If you need to add custom functions or upload new files, you can use an FTP client.
Step 4: Customizing the Parent Theme
Go to Appearance -> Themes and ensure that your selected parent theme is activated. Click Customize to open the customization panel of your active theme. Here, you can make preliminary adjustments to your site’s appearance.
Step 5: Creating and Activating the Child Theme
Once you’ve customized the parent theme to your liking, click the Childify Me button. Give your child theme a name that reflects the parent theme, then click Create. After creation, click Activate and Preview to apply your new child theme.
Step 6: Importing Your Content
With your new WordPress site mirroring the old static HTML version, the final step is to import your content. You can follow the previous method for content importation, ensuring a seamless transition.
More Reading: How to Migrate Your Website to WordPress?
Method 3: Completely Converting HTML Site to WordPress Theme

Now, without delaying it any further, let’s get into the process and see how you can convert HTLM to a highly functional WordPress theme:
Step 1: Establishing Prerequisites
To kickstart the process of converting your HTML site to a WordPress theme, it’s crucial to ensure you have the necessary prerequisites in place.
Also, make sure to install WordPress on your computer for a smooth transition from static HTML to a dynamic WordPress theme. Let’s proceed with the next steps once WordPress is up and running locally.
Step 2: Create Theme Folder
The second step involves creating a dedicated theme folder. Here’s how:
- Navigate to your XAMPP folder on your local server.
- Inside the XAMPP folder, locate the ‘htdocs’ directory.
- Within ‘htdocs,’ find your WordPress installation folder
- Further, navigate to ‘wp-content’ and then proceed to the ‘themes’ folder.
In this Themes directory, you’ll encounter all the installed WordPress themes. Generate a new folder within the ‘themes’ directory and provide a unique name for your theme.
Step 3: Develop PHP Files for Your Theme
With your theme folder ready, the next step involves setting it with essential PHP files to structure into your WordPress theme. Here’s a how-to-do it using your chosen code editor, like VS Code:
- Open Your Code Editor: Launch your preferred code editor (e.g., VS Code).
- Access WordPress Theme Folder: Open the entire WordPress theme folder in your code editor
- Create Vital WordPress Files: Within your theme folder, create the following crucial PHP files using your code editor:
- style.css: Contains theme details and CSS files.
- index.php: Serves as the main content file without other optional files.
- header.php: Encompasses the header elements of your theme.
- footer.php: Houses the footer elements of your theme.
- functions.php: Holds functions essential for your WordPress theme.
Related: How To Update WordPress PHP Version?
Step 4: Transfer CSS, Images, and JavaScript (JS) Folders

The next step to converting HTLM to WordPress theme involves transferring essential assets such as CSS, JavaScript (JS), and images from your existing HTML theme. Follow these steps for a smooth transfer:
- Open the HTML theme folder that you previously downloaded and wish to convert.
- Identify the ‘assets’ folder containing CSS, JS, and images within your HTML theme.
- Copy the entire ‘assets’ folder from your HTML theme.
- Navigate to your newly created WordPress theme folder.
- Paste the ‘assets’ folder into the root of your WordPress theme directory.
Step 5: Activate Your Fresh WordPress Theme

As you’ve successfully added the essential folders to your WordPress theme, it’s time to bring your creation to life by activating it on your WordPress site.
- Login and access your WordPress dashboard
- Navigate to Appearance > Themes and select a new theme’
- Your newly created theme should now be visible among the listed themes in this section.
- Initially, the theme may appear empty. To add information and a banner, proceed to the next steps.
- Customize Style.css; open the ‘style.css’ file (created earlier) in your code editor.
- Paste the provided code for information and banner settings and save the file (Ctrl+S).
- Add a banner image file named ‘Screenshot’ (PNG format) in your theme folder. Ensure the size is 800 by 600 pixels.
- Refresh your WordPress admin dashboard. The image banner will now appear.
- Click on ‘Activate’ to make your theme live on your WordPress site.
Also Read: Figma to WordPress – Ultimate Conversion Methods for 2024
Step 6: Transform HTML Code into Header, Index, and Footer
The focus now shifts to seamlessly integrating header, footer, other main body elements for custom web design. Follow these steps to ensure an easy transition of code:
Mark HTML Sections
Identify the header, footer, and main body sections marked with HTML comments within your HTML code. These comments serve as anchor points for code extraction and conversion.
Copy Header Code to header.php
Copy the header code from the ‘index.html’ of your downloaded theme. Paste the copied code into your WordPress theme folder’s ‘header.php’ file. Select the code from <!DOCTYPE html> to </header> and save the file.
Transfer Footer Code to footer.php
Copy the footer code from ‘index.html’ of your theme. Paste the footer code into your WordPress theme folder’s ‘footer.php’ file. Select the code from <footer> to </html> and save the file.
Copy Main Body Code to index.php
Copy the main body elements from ‘index.html’ into your WordPress theme’s ‘index.php’ file. Paste the code after the </header> tag and before the <footer> tag. Save the ‘index.php’ file.
Integrate WordPress Functions
Add the WordPress function get_header() at the top of the ‘index.php’ file. Add the function get_footer() at the end of the ‘index.php’ file. Save the ‘index.php’ file.
Read more: Vital Elements of a Custom WordPress Design
Step 7: Configure CSS for Your WordPress Theme

As your WordPress theme begins to take shape, it’s time to address the appearance discrepancies caused by unapplied CSS files.
Follow these detailed steps to seamlessly configure CSS and achieve a cohesive website design for your WordPress theme:
Locate CSS Files in header.php
- Open the ‘header.php’ file within your WordPress theme folder.
- Search for “rel=”stylesheet”” using CTRL+F to locate CSS stylesheet references.
Remove Unnecessary Google Font Stylesheets
- Eliminate Google font stylesheets if present, as they are unnecessary for your WordPress theme.
Register CSS Stylesheet in functions.php
- Open the ‘functions.php‘ file in your WordPress theme folder.
Add Registration Code
- Use the wp_register_style function to register your CSS stylesheet.
- Employ get_template_directory_uri() . ‘/href’ to specify the location of your CSS file.
- Define the path of your CSS file, for example, get_template_directory_uri(). ‘/assets/css/style-starter.css’.
Replace Stylesheet Link in header.php
- Remove the CSS stylesheet link from ‘header.php.’
- Replace it with the code registered in ‘functions.php.’
- Save the ‘header.php’ file.
Understand wp_head()
- Ensure that the wp_head() function is included in the <head> section of ‘header.php.’
- This function is a crucial WordPress hook that facilitates properly rendering stylesheets.
Learn: How To Remove Unused CSS In WordPress?
Step 8: Configure JavaScript for Your WordPress Theme
To ensure the seamless functionality of JavaScript in your WordPress theme, follow these comprehensive steps. This will not only register and enqueue your JavaScript files but also enhance the overall performance of your dynamic theme:
- Identify JavaScript Files in footer.php: Open the ‘footer.php’ file in your WordPress theme folder. Search for “<script src=” using CTRL+F to locate JS file references.
- Register and Enqueue JS Files in functions.php: Open the ‘functions.php’ file in your WordPress theme folder.
- Paste Registration Code: Use the wp_register_script function to register each JS file. Enqueue each JS file in the same function.
- Remove JS Script Links from footer.php: Eliminate all JS script links from the ‘footer.php’ file. Replace them with the code registered in ‘functions.php.’
- Insert Enqueued Code: Place the code at the end of ‘footer.php,’ just above the </body> tag. Save the ‘footer.php’ file.
Also Read: What Is JavaScript Blocking?
The final result will be a dynamic and fully functional website. Ready to address any missing images and conclude the conversion process? Let’s proceed to the next steps of refining your WordPress theme.
Step 9: Configure Images for Your WordPress Theme
In the final stages of converting your HTML site to a WordPress theme, configuring images is crucial to achieving visual cohesion.
- Identify Image Files in index.php: Open the ‘index.php’ file in your WordPress theme folder. Search for “<img src=” using CTRL+F to locate image file references.
- Define Image Paths: In the ‘index.php’ file, identify and define the path for each image used. Ensure that the image paths align with the structure of your WordPress theme.
Learn: How To Optimize Images And Improve Website Speed?
With the above steps, you can ensure that the WordPress theme seamlessly fetches and displays image files. Including WordPress features, such as changing site titles and incorporating navigation menus, will add the final touches to your dynamic theme.
Step 10: Enable Custom Title in WordPress
For the WordPress theme to dynamically reflect changes made to the website’s Title in the admin panel, follow these steps to integrate the necessary WordPress functions.
This ensures that your theme adapts to modifications made through Settings -> General -> Site Title in the WP-admin panel:
Modify Title in header.php
- Open the ‘header.php’ file within your WordPress theme folder.
- Between the <title> tags, use the WordPress built-in function blog info (‘name’) to fetch and display the site title dynamically.
- Save the ‘header.php’ file.
Adjust Heading in header.php
- In the ‘header.php’ file, locate the <h1> tags.
- Insert the same WordPress function bloginfo(‘name’) between the <h1> tags to ensure consistency.
- Save the ‘header.php’ file.
Read: Header Tags: What Are They And How To Use Them?
Step 11: Add WordPress Navigation Menu in Your WordPress Theme
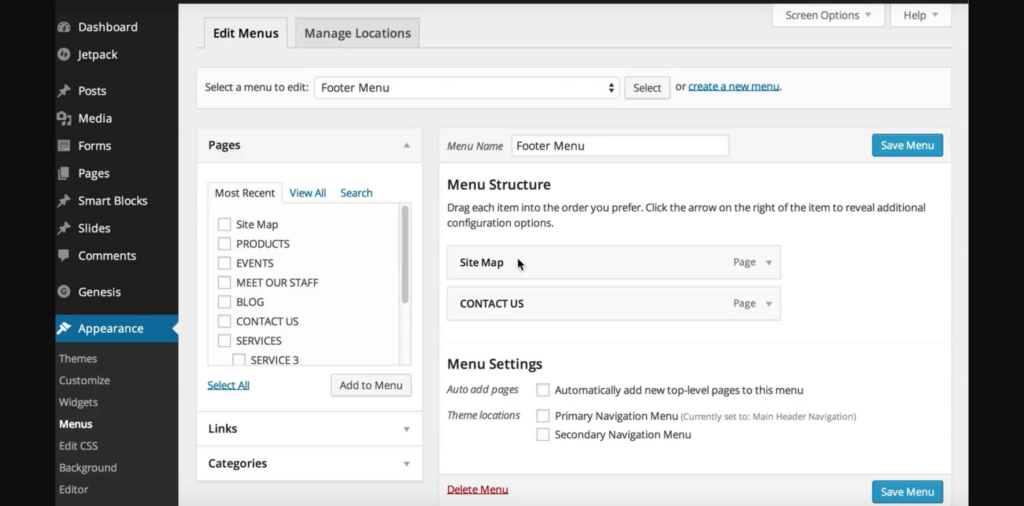
To enhance the functionality of your WordPress theme by including navigation menus, follow these steps.
Enable Menu in functions.php
- Open the ‘functions.php’ file in your WordPress theme folder.
- Add the following line of code to enable the Menu functionality in your theme: “add_theme_support(‘menus’).”
Identify Navigation Menu in header.php:
- Locate the navigation menu code within your WordPress theme’s ‘header.php’ file.
Replace with WordPress Function
- Replace the existing navigation menu code with the WordPress built-in function wp_nav_menu().
- Configure the function according to your menu structure and requirements.
Configure Menus in the WP Dashboard
- Visit the WordPress admin panel and navigate to Appearance > Menus.
- Configure and manage your menus as needed.
Bring Your Vision To Life
Try our Custom Web Design Services for seamless functionality and user-friendly interfaces
Conclusion
In wrapping up our guide on converting HTML to WordPress, you’ve gained the tools to seamlessly transform static web content into a dynamic, user-friendly experience. Following eleven straightforward steps, we navigated through fundamental configurations, enabling your WordPress theme to shine.
From CSS and JavaScript integration to custom titles and navigation menus, each step helps you make a smooth conversion. Whether you’re a developer honing your skills or a business owner seeking a vibrant online presence, this tutorial enables you to convert your static HTML to a dynamic WordPress theme.
Happy coding and WordPress success awaits!
Frequently Asked Questions
Why should I convert my HTML site to a WordPress theme?
Converting HTML to WordPress enhances your site’s dynamic features, enabling easy content management, SEO optimization, and access to a wide range of plugins for added functionality.
Is it necessary to have coding skills to convert HTML to a WordPress theme?
While coding skills are beneficial, there are user-friendly tools and tutorials available. Basic HTML and PHP knowledge can help, but even beginners can successfully convert HTML to WordPress with step-by-step guidance.
How does converting HTML to WordPress impact SEO?
WordPress inherently offers SEO-friendly features. By converting HTML to WordPress, you can leverage these built-in capabilities, such as clean URL structures, customizable meta tags, and mobile responsiveness, to enhance your site’s search engine visibility.
Can I use any HTML template for WordPress, or are there specific requirements?
While many HTML templates can be converted, it’s essential to choose one that adheres to WordPress coding standards. Clean and well-structured HTML templates ensure a smoother conversion process and better compatibility with WordPress features
Are there any performance benefits of converting to a WordPress theme?
Yes, converting to a WordPress theme often results in improved performance. With optimized coding, efficient caching, and the use of plugins, your site can benefit from faster load times, contributing to a better user experience and potentially higher search engine rankings.


