Want to keep your website visitors coming back? Push notifications are a great way to do that!
Think of push notifications as little pings that tell your customers about cool stuff like new products, sales, or updates on their phone or computer. They’re super handy for keeping people interested in what’s happening on your WordPress site.
And don’t worry; setting them up is easy, especially with a tool like PushEngage. It’s perfect for anyone, even if you’re not a tech expert.
Ready to get started? Let’s show you how to set up push notifications on your WordPress store using PushEngage. It’s going to be fun!
Contents
ToggleWhat Are Push Notifications?
Push notifications are small messages that pop up on someone’s phone or computer. They let people know about new updates or offers from a website, even if they’re not on that website. It’s a handy way to share quick bits of info.
Know: Easy Steps To Set-Up A Small Business Website With WordPress
Components of Push Notifications
- Title: A brief headline that captures the essence of the notification.
- Message: The main content delivering the notification’s message.
- Image (Optional): This can be included to make the notification more visually appealing.
- Call to Action (CTA): A button that prompts the user to take a specific action, such as purchasing or visiting a webpage.
- Destination URL: Users are directed to the link when interacting with the notification.
Ready to Boost Engagement with Push Notifications?
Our team can help you integrate powerful push notifications into your WordPress site.
Benefits of Push Notifications for E-commerce Sites
Here are some fantastic reasons to use push notifications for your WordPress site:
Instant Communication
Push notifications offer the advantage of real-time communication with your customers. This immediacy is perfect for sharing time-sensitive information like flash sales or product launches, ensuring your audience receives the message immediately.
Explore: Best WordPress Live Chat Plugins
High Visibility
The direct nature of push notifications means they’re seen immediately, appearing right on the device’s screen. This visibility is far more effective than traditional methods like email, which can easily be overlooked or lost in a crowded inbox.
Compare: Difference Between A Mobile Site And A Responsive Site
Increased Engagement
By keeping your audience updated with the latest news, offers, and content from your store, push notifications play a significant role in maintaining high levels of engagement. This continuous engagement can lead to increased site visits and higher conversion rates.
Explore: How To Increase Pageviews And Reduce Bounce Rate In WordPress?
Cart Recovery
E-commerce sites often need help with cart abandonment. Push notifications gently remind customers, nudging them to revisit their carts and complete their purchases, thereby reducing lost sales.
Targeted Marketing
One of the most powerful features of push notifications is the ability to segment your audience and tailor messages to specific groups. This targeted approach ensures that each notification is relevant to its recipients, making it more likely to resonate and result in action.
Find: 35+ Best White-label Marketing Agencies
How to Send Push Notifications from WordPress With PushEngage?
Sending push notifications from your WordPress site using PushEngage is a straightforward process. Here’s a step-by-step guide to get you started:
Register with PushEngage
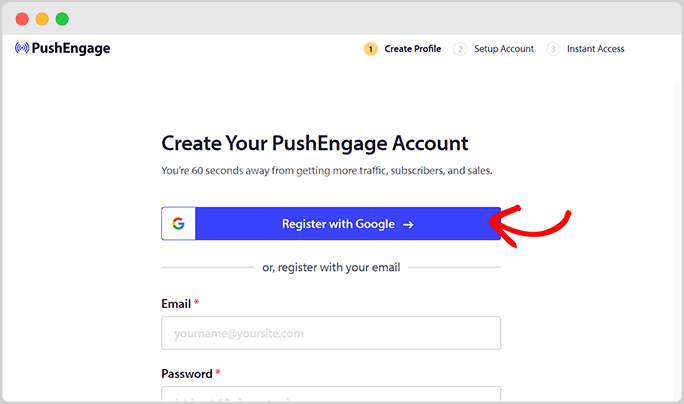
- Start: Go to the PushEngage website and hit the “Get Started” button. You’ll see options for both free and paid plans. Pick one that fits your needs.
- Sign Up: Follow the prompts to create your account.
- Setup: Once signed up, you can add your site to PushEngage. Fill in your website details in the “Site Settings » Site Details” section, including your site name, URL, and icon.
- Save: Click “Save and Continue” to finish this initial setup.
Integrate PushEngage with Your WordPress Site
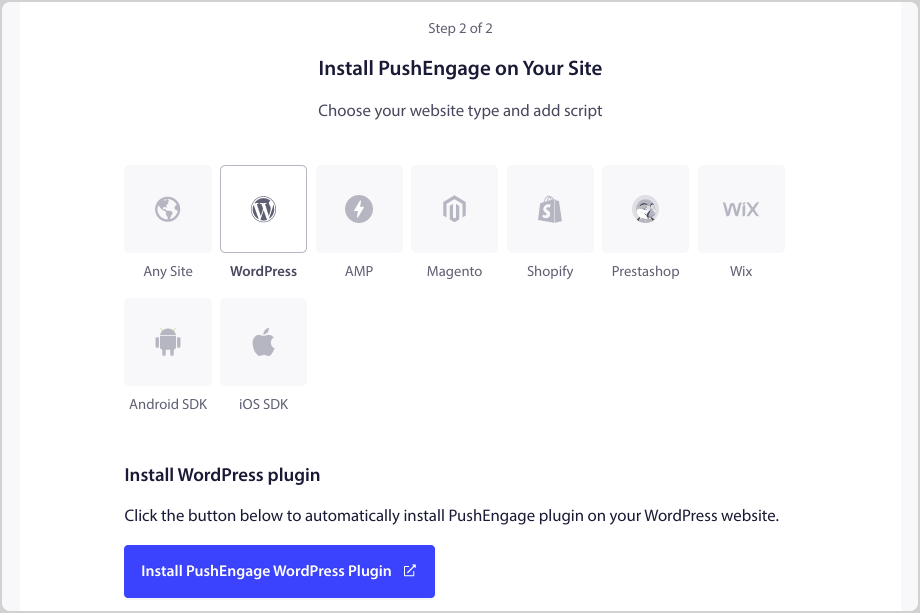
- Plugin Installation: In your WordPress dashboard, look for the PushEngage plugin and install it.
- Activation: After installation, activate the plugin. You’ll then see options to connect your PushEngage account.
- Connect: Choose your site from the dropdown and click “Let’s Get Started”. Follow the prompts to finalize the connection between WordPress and PushEngage.
Create Your Push Notification
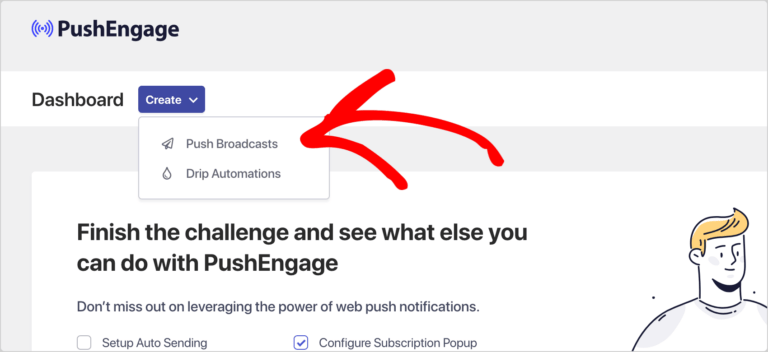
- Access Dashboard: In your WordPress dashboard, go to “PushEngage » Dashboard” and start a new push broadcast.
- Customize: Fill in the details of your notification, like the title, message, and the URL you want to direct your users to. You can preview how it looks across different devices.
- Enhance: Add an image or change the icon to make the notification more appealing. Use emojis in your title or message to grab attention.
- Save Audience: Once you’re happy with your notification, save it and select your audience. You might need a premium account for more advanced segmentation.
Schedule & Send Push Notifications
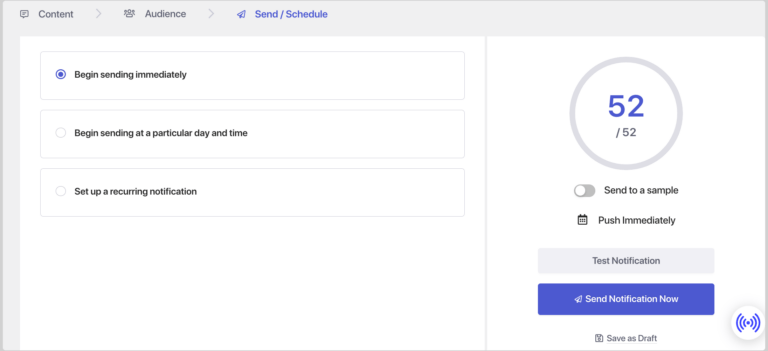
- Timing: Choose the best time to send your notifications. PushEngage allows scheduling, so you can pick when your audience will most likely engage.
- Send or Schedule: Decide whether to send your notification immediately or later. You can also adjust for different time zones.
Configure PushEngage + EDD Settings
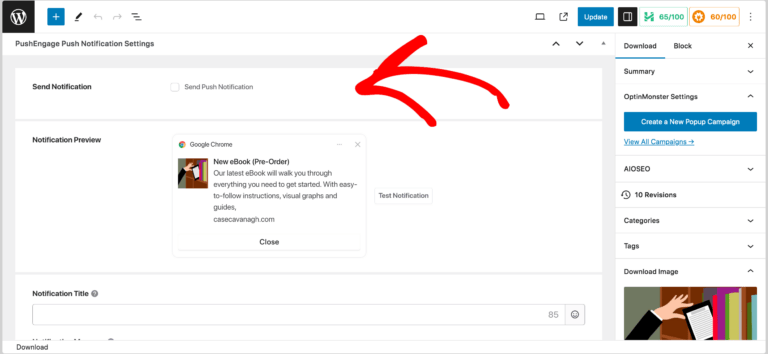
- Product Notifications: If you’re running an e-commerce site, you can set notifications for new products or offers. Go to the product editor in EDD and scroll down to find PushEngage settings.
- Automatic Notifications: In “PushEngage » Settings,» Auto Push Settings” enable automatic notifications for new posts or product listings. Specify which types of posts or products should trigger these notifications.
Following these steps, you can effectively communicate with your WordPress site visitors and keep them engaged with timely and relevant push notifications.
Best Practices for Push Notifications
When it comes to push notifications, especially for e-commerce sites, following best practices is critical to ensuring that your audience’s messages are practical and well-received. Here are some guidelines to help you make the most out of your push notifications:
Timing is Everything
Timing plays a crucial role in the success of push notifications. It’s essential to send them when users are most likely attentive and engaged. This often means avoiding early or late-night notifications unless your audience data suggests otherwise. For a global audience, adjusting notifications to suit local time zones can significantly affect their effectiveness.
Explore: Top Lead Generation Plugins For WordPress
Keep it Short and Sweet.
The content of your push notifications should be concise and to the point. Users typically glance at these messages, so the main point needs to be immediately clear. Including a compelling call-to-action (CTA) is also vital, as it guides users on what to do next, whether it’s making a purchase, reading a blog post, or exploring a new product.
Related: Creative Ways To Give Your Content Efforts A Boost
Personalize Your Messages
Personalization can significantly enhance the impact of your notifications. By segmenting your audience based on their preferences, past behavior, and interactions with your site, you can tailor your messages to be more relevant and engaging. This relevance is critical; notifications that don’t resonate with the recipient are more likely to be ignored or lead to opt-outs.
Related: Best WordPress CRM Plugins
Use Visuals Wisely
Incorporating visuals, such as relevant images, into your notifications can also boost engagement. These should align with your brand’s visual identity to ensure consistency and aid in brand recognition. However, using images wisely is essential and ensuring they complement the message rather than distract from it.
Know: 8 Logo Design Trends To Boost Your Brand
Test and Optimize
Regular testing and optimization of your push notifications can help refine your strategy. A/B testing different elements, such as the message, timing, and visuals, can reveal what resonates best with your audience. Monitoring metrics like open rates and click-through rates is crucial for understanding the performance of your notifications and making informed adjustments.
Find: 8 Tools To Test WordPress Performance And Speed
Respect User Preferences
Respecting user preferences is another critical aspect. Providing clear options for users to opt in or opt out of notifications and controlling the frequency of messages can prevent user annoyance and maintain a positive perception of your brand. Bombarding users with too many notifications can lead to fatigue and disengagement.
Leverage Automation
Leveraging automation for event-triggered notifications, such as cart abandonment reminders or welcome messages for new subscribers, can enhance user engagement at critical moments. Integrating push notifications into a broader lifecycle marketing strategy can also help nurture leads and build customer loyalty over time.
Read: Uncanny Automator Review
FAQs About WordPress Push Notifications
What are WordPress push notifications, and how do they work?
WordPress push notifications are brief messages sent from a WordPress site to a user’s device, such as a smartphone or desktop computer, to provide updates, offers, or other valuable information. They use a push notification service or plugin integrated with WordPress, which allows website owners to compose and send messages directly to subscribers who have opted in to receive notifications. These messages can appear on the device’s screen even when the user is not actively browsing the website, offering a direct communication channel.
Can push notifications to boost engagement on my WordPress site?
Absolutely! Push notifications are a powerful tool for increasing user engagement on your WordPress site. By sending timely and relevant updates, special offers, or reminders, you can encourage users to revisit your site, interact with your content, or complete a purchase. This direct communication keeps your audience connected and engaged with your brand, potentially leading to increased website traffic, higher conversion rates, and improved customer retention.
Are WordPress push notifications compatible with all browsers and devices?
WordPress push notifications are broadly compatible with major browsers and devices, including Google Chrome, Mozilla Firefox, Safari, Android, and iOS platforms. However, the level of support and functionality can vary depending on the browser, device, and the push notification service or plugin you choose to use. Selecting a push notification solution that offers broad compatibility is essential to ensure your messages reach as much of your audience as possible.
How can I set up push notifications on my WordPress site?
Setting up push notifications on your WordPress site typically involves choosing a push notification service or plugin, such as PushEngage, OneSignal, or others specifically designed for WordPress. After selecting your preferred service, you must install and activate the corresponding WordPress plugin, configure the service settings, and obtain any necessary API keys. Once set up, you can create and send push notifications directly from your WordPress dashboard, tailoring messages to your audience’s interests and behaviors.
Wrap Up
To summarize our discussion on WordPress push notifications, they are a potent tool for boosting engagement and sales on your e-commerce site. By sending timely and relevant messages, you can keep your audience connected and encourage repeat visits to your site.
Setting up push notifications, particularly with platforms like PushEngage, is straightforward, allowing you to engage with your users immediately. Remember, the effectiveness of your notifications hinges on best practices like sending them at the right time, personalizing messages, and not overloading your users.
Push notifications can significantly enhance your WordPress site’s user experience and business outcomes when used thoughtfully and strategically.


