


Highlights
- Comprehensive guide to migrating your website to WordPress, step-by-step.
- Critical tips for ensuring a smooth transition while preserving your website’s design and content.
- Solutions to common challenges you may face during the migration process.
- Best practices for maintaining SEO and website performance during and after the migration.
Introduction
Are you thinking about migrating your website to WordPress? You’re in the right place!
Switching your site to WordPress might seem challenging, but it can be a smooth and rewarding process with the proper guidance. WordPress offers unmatched flexibility, robust customization options, and superior SEO capabilities, making it a top choice for many website owners.
Many CMS platforms are out there, but you might find them limiting over time. Whether you’re using Wix, Magento, BigCommerce, or another CMS, moving to WordPress can provide the robust functionality and scalability you need to grow your online presence.
In this guide, we’ll walk you through the entire migration process step by step. We’ve covered everything from choosing the right WordPress hosting to ensuring your content and design are seamlessly transferred.
Ready to make the switch to WordPress and unlock its full potential? Let’s dive in!
How to Migrate Your Website to WordPress in 4 Easy Methods
Migrating your site to WordPress doesn’t just involve moving data. It’s about ensuring every content, every image, and every design element is transferred seamlessly. Here are four methods to help you migrate your website to WordPress efficiently:
Method 1: Manual Migration

Manual migration involves exporting your content from your current CMS and importing it into WordPress. This method gives you complete control over the migration process but requires more effort and technical know-how.
Steps for Manual Migration:
1. Export Content from Your Current CMS
- Access the export tool in your current CMS (e.g., Wix, Weebly, Magento).
- Export your content as an XML or CSV file. Ensure you include all necessary data, such as posts, pages, and media files.
2. Set Up Your WordPress Site
- Choose a WordPress hosting provider and set up your hosting account.
- Install WordPress using the one-click installation feature provided by most hosting services.
3. Import Content into WordPress
- In your WordPress dashboard, go to `Tools → Import.`
- Select the appropriate import tool based on the file type you exported.
- Upload the exported file and follow the prompts to import your content.
4. Verify and Adjust Content
- Check all your pages and posts to ensure they are imported correctly.
- Manually adjust any formatting issues and ensure all images and media files are correctly linked.
5. Set Up Permalinks and Themes
- Go to `Settings → Permalinks` to set your URL structure.
- Choose a theme that matches your original design or customize a new theme to your liking.
- Install the necessary plugins to replicate the functionality of your old CMS.
⚡ Know More: Best WordPress Website Migration Agencies
Method 2: Using a Migration Plugin
Migration plugins can simplify the migration process by automating much of the work. They are particularly useful if you’re not very tech-savvy.
Steps for Using a Migration Plugin:
1. Choose a Migration Plugin
- Some popular migration plugins include All-in-One WP Migration, Duplicator, and WP Migrate DB.
- Install and activate your chosen plugin in your WordPress dashboard.
2. Export Your Site Using the Plugin
- Follow the plugin’s instructions to export your content from your current CMS.
- Typically, you’ll generate an export file that includes your entire site’s content, themes, and plugins.
3. Set Up Your WordPress Site
- Choose a WordPress hosting provider and set up your hosting account.
- Install WordPress using the one-click installation feature provided by most hosting services.
4. Import Your Site Using the Plugin
- In your WordPress dashboard, go to the plugin’s import section.
- Upload the export file generated earlier and follow the plugin’s instructions to import your site.
5. Verify and Adjust Content
- Check all your pages and posts to ensure they are imported correctly.
- Manually adjust any formatting issues and ensure all images and media files are correctly linked.
Method 3: Using a CMS-Specific Migration Tool
Some CMS platforms offer specific tools or plugins to assist with migrating to WordPress. These tools can streamline the process, especially for popular CMS platforms.
Steps for Using a CMS-Specific Migration Tool
1. Find a Migration Tool for Your CMS
- Popular tools include the FG Joomla to WordPress plugin, the WP All Import plugin for Shopify, and more.
- Install and activate the relevant plugin in your WordPress dashboard.
Read: Best WordPress Import Plugins
2. Export Content from Your Current CMS
Follow the tool’s instructions to export your content. This often involves generating an export file or connecting the plugin directly to your current CMS.
3. Set Up Your WordPress Site
- Choose a WordPress hosting provider and set up your hosting account.
- Install WordPress using the one-click installation feature provided by most hosting services.
4. Import Content into WordPress
- Use the CMS-specific migration tool to import your content. This typically involves uploading the export file or syncing the plugin with your current CMS.
- Follow the tool’s prompts to complete the migration.
5. Verify and Adjust Content
- Check all your pages and posts to ensure they are imported correctly.
- Manually adjust any formatting issues and ensure all images and media files are correctly linked.
Method 4: Hiring a Professional Migration Service
Hiring a professional service can be a great option if you’re uncomfortable handling the migration or have a complex site. Professionals can ensure everything is migrated correctly without any downtime or data loss.
Steps for Hiring a Professional Migration Service
1. Research and Choose a Reputable Service
- Look for services with good reviews and a track record of successful migrations.
- Some popular services include Seahawk Media, BlogVault, and Migrate Guru, etc.
Why Trust Seahawk Media for Your WordPress Migration?
Experience seamless migration with Seahawk Media’s expert guidance and proven track record. Discover why we’re your trusted partner in transitioning to WordPress.
2. Consult with the Service
- Discuss your site’s specifics, including the current CMS, your size, and any special requirements you have.
- Get a detailed quote and timeline for the migration.
3. Provide Necessary Access and Information
- Grant the migration service access to your current site and hosting account.
- Provide any necessary information they might need to complete the migration.
4. Monitor the Migration Process
- Stay in communication with the service to get updates on the migration progress.
- Ensure they are addressing any issues that arise during the process.
5. Verify and Adjust Content
- Once the migration is complete, thoroughly check your new WordPress site.
- Verify that all content, images, and functionalities are intact and working correctly.
Each method offers a different approach to migrating your site to WordPress. Choose the one that best fits your technical skills, the complexity of your site, and your personal preferences. With careful planning and execution, you can ensure a smooth transition to WordPress.
Migrating to WordPress From Any CMS – 4 Steps to Follow
Migrating your site to WordPress involves more than just transferring information. It requires several steps to ensure you don’t lose any critical content. Here are the general steps you should follow to migrate your site from any other CMS platform to WordPress:
- Choose a WordPress Hosting
- Install WordPress and Select a Theme
- Export Your Existing Website
- Import the Website Into WordPress
Important Note: Before you begin, create a complete backup of your current website. This includes both the files and the database. You can use the built-in tools of your current CMS, if available, or third-party backup plugins or services.
After securing the backup, let’s dive into the steps below:
Step 1: Choose a WordPress Hosting
First, select a reliable WordPress hosting provider that suits your needs. Many hosting providers offer specialized WordPress hosting plans.
To build a WordPress site, you’ll need two things:
- A domain name: This is the name of your website (e.g., example.com).
- A web hosting account: This is where your website lives on the internet.
Related: Tips For Choosing a Domain Name
You must sign up for a web hosting account and register a domain name. When choosing a hosting provider, consider factors like:
- Performance: Ensure the host provides fast loading times and reliable uptime.
- Security: Look for features like SSL certificates, firewalls, and regular backups.
- Customer Support: Choose a host with 24/7 support to help with any issues.
- Scalability: Ensure the host can accommodate your website’s growth.
Recommended Hosting Providers:
Cost Consideration: Though WordPress is free, you must pay for the domain and web hosting. Typically, a domain costs around $14.99 annually, and web hosting costs around $7.99 monthly.
Domain Transfer: Many CMS platforms offer custom domain names and hosting on their servers; it’s time to transfer that domain to your new web host.
If you need more options, check out our guide on the best WooCommerce hosting. It helps you make informed decisions that will be beneficial for your site.
Read: Figma Vs WebFlow
Step 2: Install WordPress and Configure the Design
Once you’ve set up your hosting, the next step is to install WordPress. Fortunately, many website hosting providers offer one-click installation options, which make this process quick and easy.
Steps to Install WordPress
1: Log in to Your Hosting Account: Access your hosting control panel (often referred to as cPanel).
2: Find the One-Click WordPress Installation Option: Look for “WordPress Installer,” “Softaculous,” or similar tools.
3: Follow the Installation Prompts:
- Select your domain name.
- Enter your site details, including your name, description, and admin credentials.
- Click the install button and wait for the installation to complete.
For detailed instructions, refer to our step-by-step guide on how to install WordPress.
Configure Basic Settings
After installing WordPress, you need to set up some basic settings from the WordPress dashboard to ensure your site is configured correctly.
Basic Settings to Configure:
- Site Title and Tagline: Go to Settings → General. Enter your site title and tagline.
- Time Zone and Date Format: In the Settings → General section, select the appropriate time zone. Choose your preferred date and time formats.
- Other General Settings:Configure your site language. Set up the email address for admin notifications.
Shape Your Website’s Look
Choosing a suitable theme ensures your site looks good and functions well. WordPress offers thousands of free and premium themes.
Selecting and Installing a Theme:
Browse Available Themes: Go to Appearance → Themes in your WordPress dashboard. Click on Add New to browse the WordPress Theme Repository.
Search for Themes: Use the search bar to find themes related to your niche by entering keywords. You can filter themes by features, layout, and more.
Install and Activate a Theme: Once you find a theme you like, click Install. After installation, click Activate to apply the theme to your site.
Read: Premium & Feature-rich WordPress Themes for Your Agency
Install Essential Plugins
Plugins extend the functionality of your WordPress site. Installing essential plugins ensures your site operates smoothly and meets your specific needs.
Must-Have Plugins:
SEO Plugin:
- Recommended options: Yoast SEO or All in One SEO Pack.
- It helps optimize your site for search engines.
Caching Plugins:
- Recommended caching plugins: WP Super Cache or W3 Total Cache.
- It improves site speed and performance by caching static content.
Other Essential Plugins:
- Depending on your site’s needs, you might also install plugins for security(e.g., Wordfence), backup (e.g., UpdraftPlus), and more.
Change Permalink Settings
Setting up the correct permalink structure is vital for maintaining your SEO rankings and ensuring a smooth user experience.
Steps to Change Permalink Settings:
Navigate to Permalink Settings: Go to Settings → Permalinks in your WordPress dashboard.
Select a Permalink Structure: WordPress offers permalink structures such as Plain, Day and name, Month and name, Numeric, and Post name. The Post name option (e.g., example.com/sample-post/) is the most common and SEO-friendly choice.
Create Custom Permalinks if Needed: If your old CMS used a specific URL structure that isn’t replicated by the default options, you might need to create custom permalinks. WordPress allows you to create a custom structure using placeholders like %postname%, %post_id%, %category%, etc..
Save Your Changes: After choosing the desired permalink structure, click the “Save Changes” button at the bottom of the page.
These steps will ensure your WordPress site is well-configured, looks excellent, and retains its SEO rankings from your previous CMS. Now, you’re ready to move on to exporting your existing website content and importing it into WordPress.
Read here: Top 10 Reasons to Use WordPress for Your Website
Step 3: Export Your Current Website Content
Exporting content from various Content Management Systems (CMS) involves different procedures due to each platform’s unique structures and functionalities. Below, we’ll detail the steps for exporting content from popular CMS platforms, starting with Wix.
Migrating Content from Wix
Wix websites can’t be directly exported due to the closed nature of their platform. While manually copying content is an option, it’s very time-consuming. Instead, you can use the Wix RSS feed to obtain a file for your website content and then import it into WordPress.
Steps to Export Content from Wix:
- Locate RSS Feed:

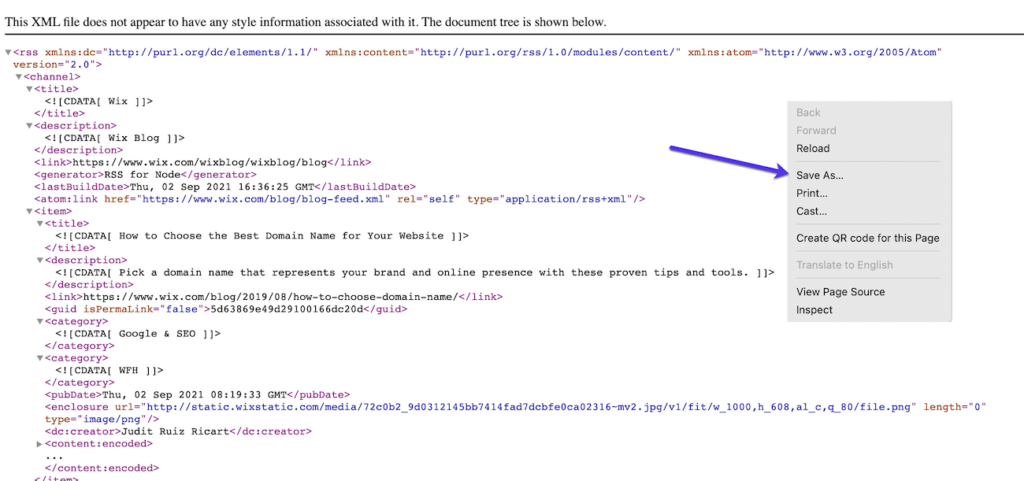
Visit your Wix site and add /feed.xml to the end of the URL. Save the generated XML file to your computer.
In Chrome, you’ll see a page full of code. Right-click on the page and save the file to your device (it’ll be saved as feed.xml by default). For Firefox, right-click and select “View page source,” then save the file to your computer.
Important Note: This method works for older Wix blogs. New Wix blogs do not have RSS feeds.
- Import to WordPress:
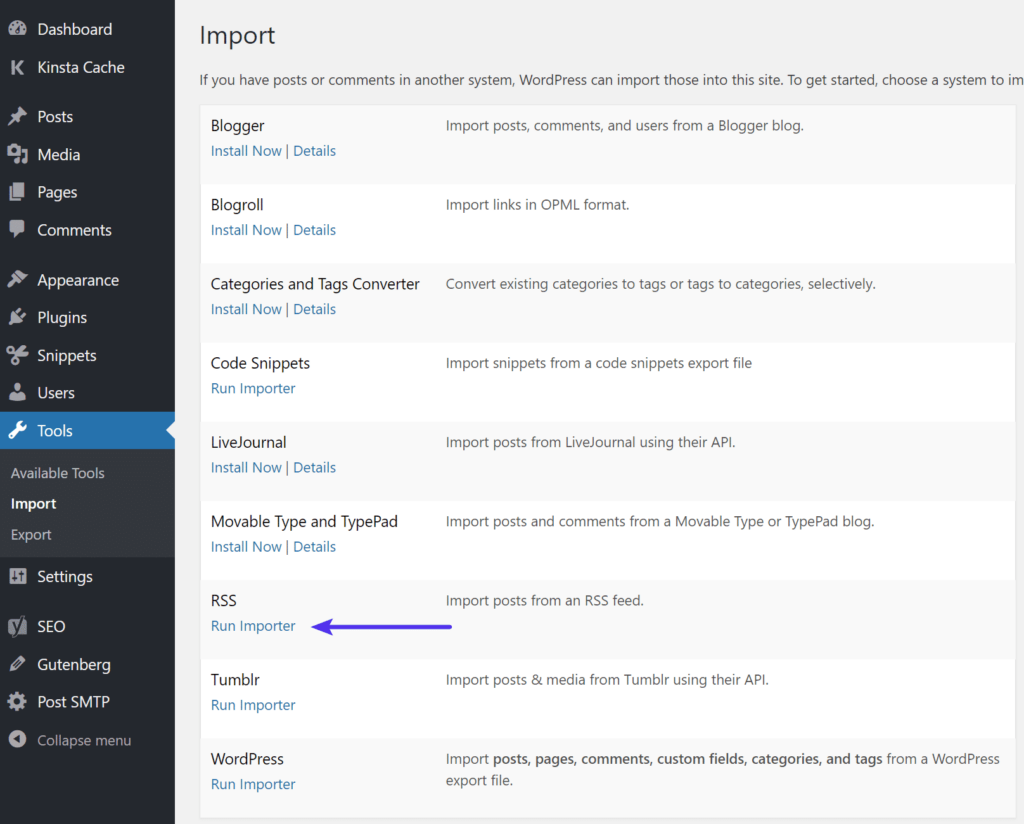
In your WordPress dashboard, go to Tools → Import.b Choose the RSS option and run the importer. Upload the feed.xml file you saved earlier. Click the Run Importer button. (You may need to install the importer first.)
- Check Imported Posts:
Verify that all posts have been imported correctly by navigating to Posts → All Posts in your WordPress dashboard. If some posts didn’t import, edit the XML file to remove successfully imported posts and repeat the process.
- Handle Images:
Images are still hosted with Wix. You can manually save pictures to your computer and upload them to the WordPress Media Library or use the “Import External Images” plugin to streamline the process.
To use the plugin, install and activate it, then go to Media → Import Images and click the Import Images Now button.
- Move Wix Pages to WordPress:
There is no automated way to transfer pages. Copy the content from each Wix page and create a new page in WordPress by navigating to Admin Dashboard → Pages → Add New. Customize the page and publish it.
Comparison: Wix vs WordPress
Exporting Content from Other Popular CMS Platforms
1. Weebly:
Weebly allows you to export some content via its settings.
- Log in to your Weebly account.
- Go to Settings and click on Export Site.
- Save the generated ZIP file containing HTML, CSS, and image files.
Comparison Resource: Weebly vs WordPress
2. BigCommerce:
To export data from BigCommerce, follow these steps:
- Log in to your BigCommerce control panel.
- Go to Server Settings → Export Data.
- Download CSV files for products, customers, orders, and other data.
Comparison Resource: BigCommerce vs WooCommerce
3. Magento:
Magento offers data export functionality through its admin panel.
- Log in to your Magento admin.
- Go to System → Export.
- Select the type of data to export (products, customers, orders, etc.).
Comparison Resource: Magento vs WordPress
4. Joomla:
In Joomla, content can be exported using extensions like “J2XML” or “SP Transfer.”
- Install the desired extension.
- Follow the instructions to export articles, categories, users, and other content in XML or other compatible formats.
5. Drupal:
The “Views” module allows data to be exported in various formats for Drupal.
- Install and enable the “Views” module.
- Create a view for the content you want to export.
- Use the export option to generate a CSV, XML, or other format.
Comparison Resource: Drupal vs WordPress
Ready To Upgrade Your Drupal Website To WordPress?
Seamlessly migrate from Drupal to WordPress and elevate your website’s performance and usability with our worry-free Drupal to WordPress migration service!
Final Steps
Remember that these steps might vary based on the version of the CMS, installed plugins, and specific configurations. Some platforms might require additional tools or extensions for exporting content, while others might have limitations for exporting certain elements.
Ensure Compatibility: Always ensure that the exported content is compatible with WordPress, the new platform where you intend to import it. This will help maintain the integrity of your content and ensure a smooth transition.
Following these steps, you can effectively export your website content from various CMS platforms and prepare it for import into WordPress. Now, you’re ready to move on to the final step: importing your content into WordPress.
Step 4: Import Your Website Into WordPress
Now that you’ve successfully exported the necessary files from your existing CMS platform, it’s time to import all that data into your new WordPress site. This step ensures that your website’s content, images, and other critical elements are seamlessly transferred to WordPress.
Several methods to migrate your website to WordPress include manual and specialized plugins. Let’s explore the detailed steps to get your data onto your WordPress site.
Using WordPress Import Tools
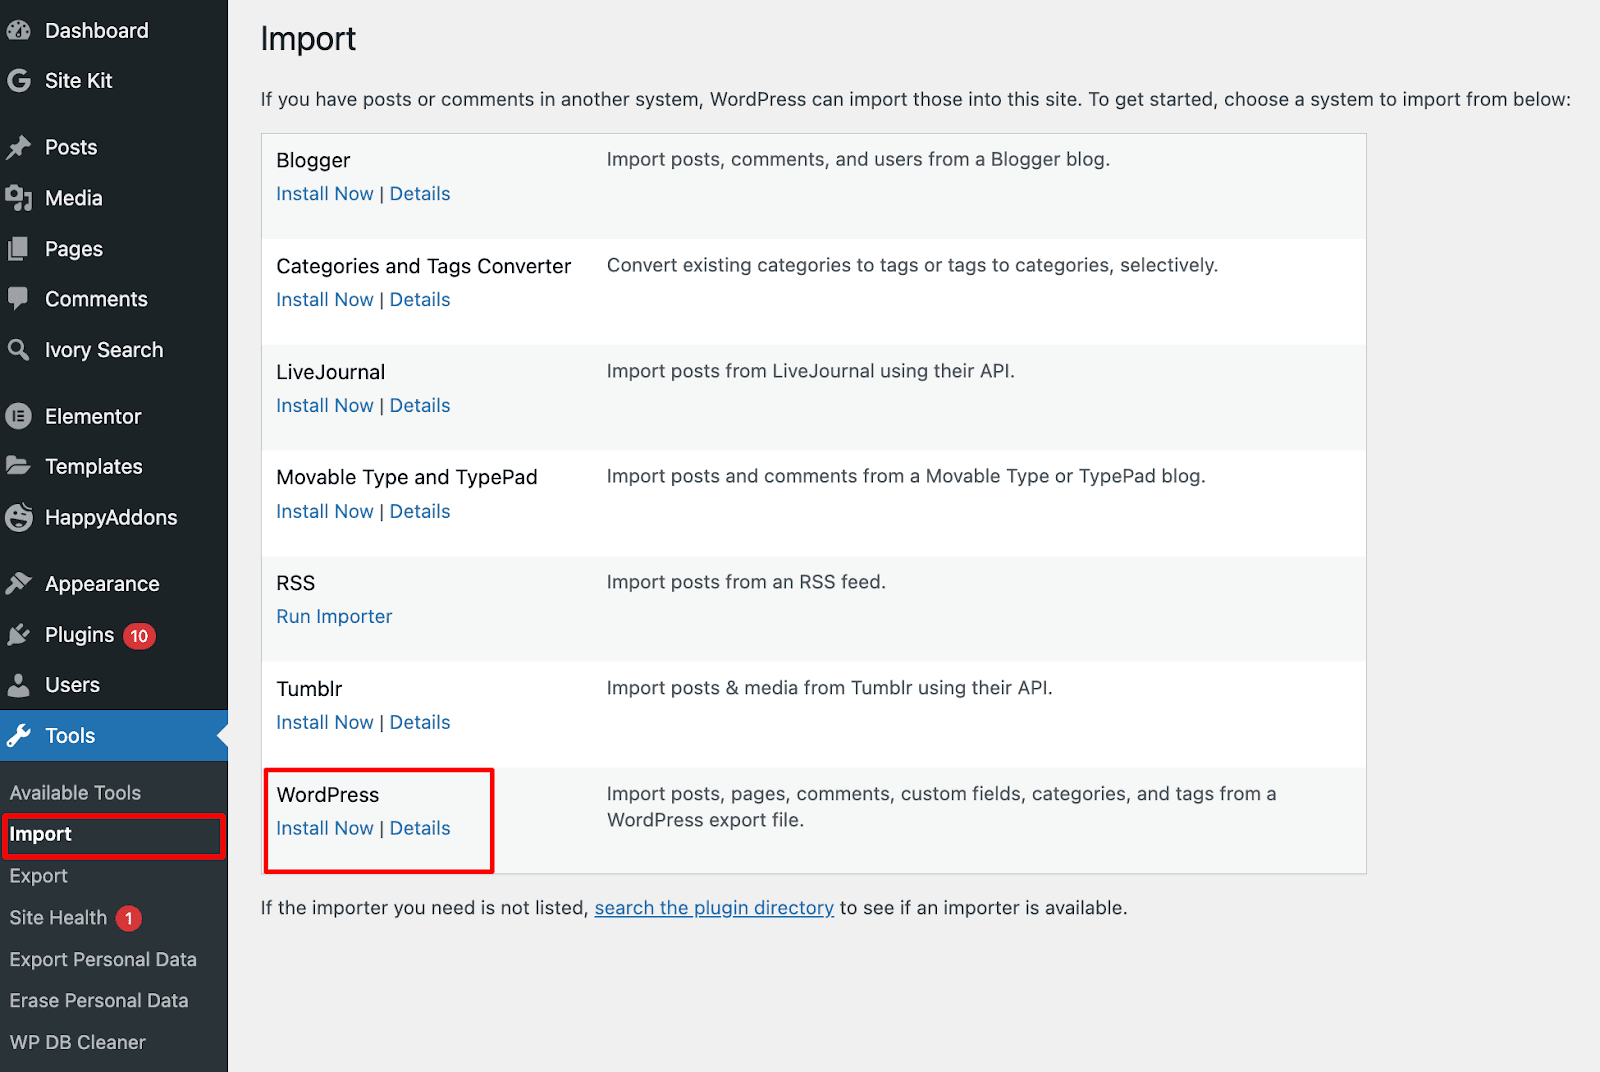
WordPress provides built-in import tools that facilitate the migration process from various CMS platforms. Here’s a step-by-step guide on how to use these tools:
- Access the Import Page: From your WordPress dashboard, navigate to Tools → Import.
- Select the Appropriate Importer: You will see a list of importers available for different platforms. For example, you will use the RSS feed importer for a Wix to WordPress migration since Wix exports content in an RSS format.
- Install the Importer: Find the importer that matches your file format. Click the Install Now link for a Wix RSS file under the RSS heading.
- Run the Importer: After installation, a new link will appear at the top of the page to “Run Importer.” Click this link to proceed.
- Upload the Exported File: You’ll be directed to a page where you can upload the XML file you saved from your Wix site (or other CMS). Click the Choose File button. Select the feed.xml file from your computer. Click the Upload file and import button.
- Complete the Import Process:The import process may take a few minutes, depending on the file size. Once the import is complete, you will see a confirmation message.
What If Your Required File Format Isn’t Listed?
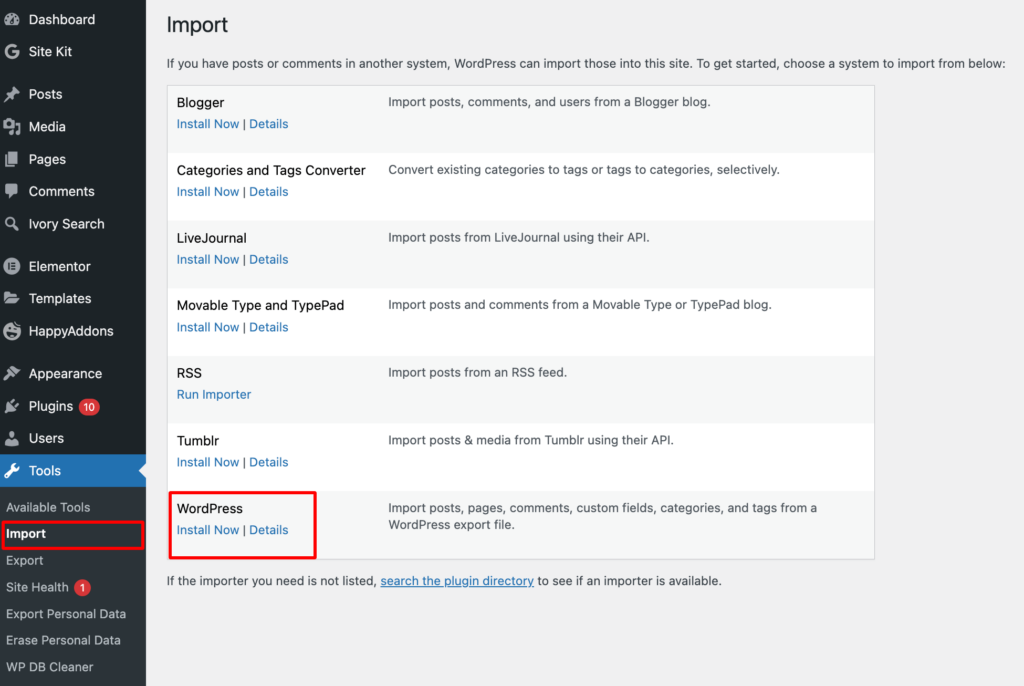
If you can’t find the required file format in the list of importers, you can use the generic WordPress importer:
- Install the Generic WordPress Importer: Scroll down to the WordPress section and click on the Install Now link.
- Run the Generic Importer: After installation, click “Run Importer.”
- Upload Your Exported File: On the WordPress importer page, click on the Choose File button. Select the file that you downloaded earlier from your previous CMS platform. Click the Upload file and import button.
- Map Authors and Assign Content: During import, you can map the authors from your old site to existing or new users in WordPress. Assign the imported content to specific users. Click the “Submit” button to finalize the import process.
Handling Images and Media Files
Some CMS platforms may not export all data, particularly images and media files. In such cases, you may need to handle these separately:
Manual Image Upload:
- Save images from your old site to your computer.
- Upload these images manually to the WordPress Media Library by going to Media → Add New.
Using the Auto Upload Images Plugin:
- Install and activate the Auto Upload Images plugin.
- This plugin can help streamline the process of importing external images directly into your WordPress media library.
- After activation, go to Media → Import Images and click the Import Images Now button to upload and link images in your content automatically.
Specialized Migration Plugins
For some CMS platforms, there are specific plugins designed to assist with the migration process:
- FG Joomla to WordPress: Facilitates the migration from Joomla to WordPress.
- FG Drupal to WordPress: Assists in migrating from Drupal to WordPress.
- WP All Import: A powerful plugin that can import any XML or CSV file to WordPress.
Steps for Using Specialized Plugins
Install and Activate the Plugin:From your WordPress dashboard, go to Plugins → Add New.Search for the specific migration plugin you need.Install and activate the plugin.
Follow Plugin Instructions: Each plugin will have detailed instructions on exporting content from your old CMS and importing it into WordPress. Follow these instructions carefully to ensure a smooth migration.
Final Verification and Adjustments
After importing all your content, take some time to verify everything:
Check All Pages and Posts: Ensure that all your pages and posts have been imported correctly and that the formatting is intact.
Verify Media Files: Make sure all images and media files are correctly linked and displayed.
Test Your Site:Navigate through your site to check for broken links or missing content. Test the functionality of any interactive elements or plugins.
Set Up SEO and Permalinks: Go to Settings → Permalinks and ensure your URL structure is SEO-friendly.
Install SEO plugins like Yoast SEO to optimize your content for search engines.
Following these steps, you can efficiently import your website into WordPress, ensuring a smooth transition with minimal downtime and data loss. Welcome to the flexibility and power of your new WordPress site!
Know: How To Migrate From Joomla To WordPress
Post-Migration Checklist: Essential Steps After Moving Your WordPress Site
Successfully migrating your WordPress site is a significant achievement, but the process doesn’t end there. To ensure everything runs smoothly on your new setup, follow this comprehensive post-migration checklist:
1. Verify Your Site’s Functionality
After the migration, ensuring your site functions correctly is crucial. Thoroughly check all pages, posts, and media files.
Check All Pages and Posts:
- Navigate through your website to ensure all pages and posts have been transferred correctly.
- Look out for missing content, broken links, and formatting issues.
Test Forms and Interactive Elements:
- Verify that all forms (contact, subscription, etc.) work correctly.
- Ensure that interactive elements like sliders, pop-ups, and galleries function as expected.
2. Update Your DNS Settings
You must update your DNS settings to point your domain to the new hosting provider.
Access Your Domain Registrar:
- Log in to your domain registrar’s control panel.
- Find the DNS settings or name server settings.
Update Name Servers:
- Replace the old name servers with the new ones provided by your hosting provider.
- Save the changes and allow up to 48 hours for the DNS propagation to complete.
3. Configure Permalinks
Ensure your URL structure remains consistent to avoid SEO issues and broken links.
Set Up Permalinks:
- Go to Settings → Permalinks in your WordPress dashboard.
- Choose the same permalink structure you had on your previous site (e.g., Post name: example.com/sample-post/).
- Save the changes to apply the new settings.
4. Install and Configure Essential Plugins
Ensure all necessary plugins are installed and configured correctly to maintain your site’s functionality and performance.
SEO Plugins:
- Install and configure with the best SEO plugins like Yoast SEO or All in One SEO Pack.
- Ensure all SEO settings are correctly set up to maintain your search engine rankings.
Caching and Performance Plugins:
- Install caching plugins such as WP Super Cache or W3 Total Cache to improve site speed.
- Configure the settings to optimize performance.
Security Plugins:
- Install a security plugin like Wordfence or Sucuri to protect your site from threats.
- Run a security scan to identify and fix any vulnerabilities.
5. Test Site Speed and Performance
After migration, it’s essential to test your site’s speed and performance to ensure it meets the required standards.
Use Speed Testing Tools:
- Speed Testing Tools like Seahawk’s Free Website Speed Test, Google PageSpeed Insights, GTmetrix, and Pingdom can help you measure your site’s performance.
- Identify any issues slowing down your site and address them accordingly.
6. Update Your XML Sitemap
An updated XML sitemap ensures that search engines can efficiently crawl and index your site.
Generate a New Sitemap:
- If you’re using an SEO plugin, it will usually generate an XML sitemap automatically.
- Submit the new sitemap to Google Search Console and Bing Webmaster Tools.
7. Check and Update Internal Links
Ensure that all internal links point to the correct URLs on your new site.
Use a Link Checker Plugin:
- Plugins like Broken Link Checker can help you identify and fix broken internal links.
- Update any old URLs to new ones to maintain a seamless user experience.
8. Set Up 301 Redirects
If you’ve changed any URLs during the migration, set up 301 redirects to guide visitors and search engines from the old URLs to the new ones.
Use a Redirect Plugin:
- Install a plugin like Redirection to manage 301 redirects.
- Create redirects for all changed URLs to preserve your SEO rankings and avoid 404 errors.
9. Monitor Your Site’s Performance and Traffic
Keep an eye on your site’s performance and traffic to ensure everything is running smoothly post-migration.
Use Analytics Tools:
- Set up Google Analytics to monitor your site’s traffic and user behavior.
- Track key metrics like page views, bounce rate, and average session duration to identify issues.
Read: Simple Google Analytics Alternatives for Your WordPress Site
10. Backup Your New Site
After ensuring everything works correctly, create a backup of your new WordPress site. Use reliable backup plugins and schedule regular backups to protect your site from data loss.
Ready to Migrate Your Website to WordPress?
Migrating your website to WordPress can be a transformative step for your online presence. WordPress offers enhanced functionality, superior design options, and better performance, whether moving from a different CMS or switching from a static site.
Why Migrate Your Website to WordPress?
Enhanced Functionality: WordPress provides a wide range of plugins and themes that allow you to add advanced features and customize your site easily.
Improved Design: With thousands of themes available, both free and premium, you can find the perfect look for your website and make it stand out.
Better Performance: WordPress is optimized for speed and performance, ensuring your site runs smoothly and efficiently.
Important Precautions
Migrating your site can sometimes result in errors, especially when moving elements from your old website to WordPress. Always take a full site backup before migrating to prevent data loss or other issues. This backup acts as a safety net, allowing you to restore your site if anything goes wrong.
Tailored Migration Paths
Each CMS platform has its unique migration process. However, once you’ve completed your migration, WordPress provides all the tools and support you need to run any website smoothly. With its built-in features and extensive plugin ecosystem, WordPress makes managing and growing your site easier.
We’re Here to Help!
Migrating to WordPress can revolutionize your online presence by providing enhanced functionality, improved design options, and better performance. The migration process can be smooth and efficient with proper precautions and tools. If you need assistance at any step, our team of WordPress experts is ready to help. Let’s take your website to the next level with WordPress!


