A WordPress favicon is a small icon displayed in browser tabs or bookmarks. They serve as website visual identifiers and enhance brand recognition and user experience.
Despite their diminutive size, favicons are significant in establishing a site’s identity. One common assumption is that favicons are purely decorative elements. However, they serve practical purposes in WordPress development beyond aesthetics, aiding site navigation and reinforcing brand association. As we navigate further, we will consider what untapped potential lies within favicons and how they can optimize the user’s browsing journey.
Contents
Toggle5 Steps to Creating a WordPress Favicon
Creating a custom favicon can enhance your brand’s recognition and professionalism. A unique favicon helps visitors quickly identify your site’s tabs and bookmarks, improving user experience.
It also adds a professional touch, making your site appear more established and trustworthy. Consistently using your brand’s icon or logo as the favicon reinforces brand identity across all digital touchpoints.
Read More: How to Rebrand Your WordPress Website: 8 Simple Ways
Follow these 5 easy steps to add a favicon to your WordPress site:
Choose or Create Your Favicon Image: Select a square image representing your brand, preferably a logo or icon. The ideal size is 512×512 pixels, but you can use a smaller image, and it will be resized and optimized.
Read More: Understanding Image Resolution
Use an Online Favicon Generator: Visit a free online favicon generator like RealFaviconGenerator or Favicon. cc. Upload your image and follow the instructions to generate the necessary favicon files.
Download the Favicon Files: Once the generator has processed your image, download the resulting favicon package, which typically includes multiple sizes in .ico, .png, and other formats.
Read More: WebP Vs. PNG: Which Image Format is Right for Your Website?
All Set to Finetune Branding and Use Experience for Your Site?
Get our creative thinking WordPress developers to add WordPress favicons to your site, ensuring instant brand recognition in browser tabs!
Install the Favicon Plugin: Install and activate the “Favicon by RealFaviconGenerator” plugin on your WordPress site. This plugin will enable you to upload and set your custom favicon easily.
Upload and Activate Your Favicon: In the plugin settings, click “Select Favicon” and upload the favicon package you downloaded earlier. Once uploaded, the plugin will automatically configure and activate your new favicon across your WordPress site.
Read More: How to Promote Your WordPress Plugin or Theme to Increase Sales
Valuable Tips for WordPress Favicon Creation

When creating a favicon for your WordPress site, prioritising professionalism is essential. While the task may seem straightforward, some nuances can significantly impact its effectiveness.
Seeking assistance from professionals who provide WordPress development and support ensures that your favicon aligns seamlessly with your site’s branding and functionality. Here are five valuable tips derived from design principles and technical specifications to guide your favicon creation process:
- Optimal Size and Format: Aim for a favicon size of 512×512 pixels for high-quality resolution. While a square format is standard, WordPress allows for rectangular images, with built-in cropping functionality to tailor them accordingly.
- Design for Scale: Despite ultimately displaying as a 16×16 px square, ensure your favicon maintains clarity and visual appeal when scaled down. Choose an image that translates well to smaller dimensions while retaining its essence.
- Prioritize Visual Cohesion: Your favicon should seamlessly integrate with your site’s overall design aesthetic and branding. Consistency in color palette, typography, and imagery fosters a cohesive user experience across all touchpoints.
- Review Google Guidelines: Familiarize yourself with Google’s recommendations for creating and using favicons to optimize their appearance in search engine results and browser tabs. Adhering to these guidelines enhances your site visitors’ visibility and usability.
- Test Across Platforms: Before finalizing your favicon, test its display across various browsers and devices to ensure uniformity and legibility. Conducting thorough cross-platform testing guarantees a seamless user experience regardless of the viewing environment.
Read More: Responsive WordPress Web Design: The Key to Converting Mobile Visitors
3 Ways to Add a WordPress Favicon to Your Site
After obtaining your favicon, the next step is to incorporate it into your WordPress website. Let’s explore three different approaches to accomplishing this task seamlessly:
Uploading WordPress Favicon through Customizer
Since WordPress version 4.3, every WordPress site has a built-in site icon feature, simplifying uploading and cropping an image to serve as a favicon. This feature offers users a straightforward and efficient method for incorporating a favicon into their WordPress site.
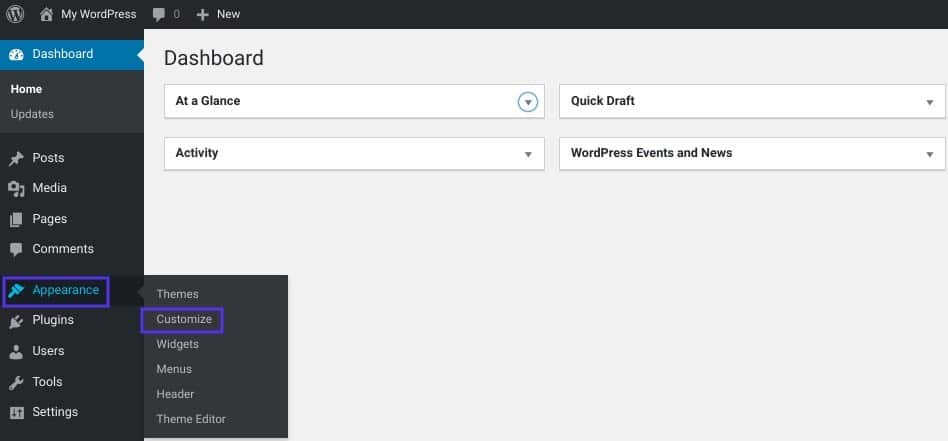
All you need is an image with dimensions of at least 512×512 pixels, and WordPress will take care of the rest, handling the upload and cropping process seamlessly. To begin, navigate to
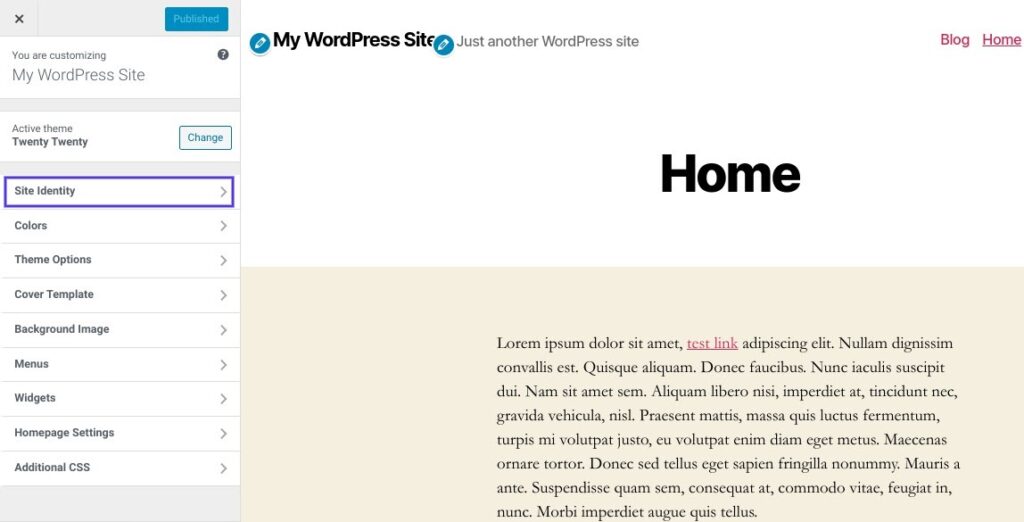
Appearance → Customize within your WordPress dashboard.
Learn More: Image Cropping In Web Design: Techniques & Tools
Next, proceed to the Site Identity tab:
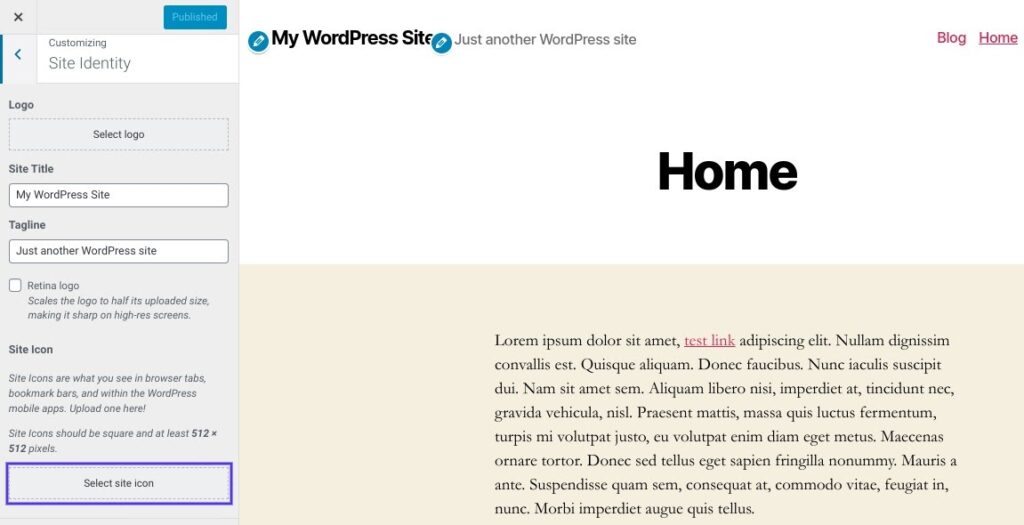
Afterwards, scroll down to the bottom to find the Site Icon section, then click on the “Select site icon” button:
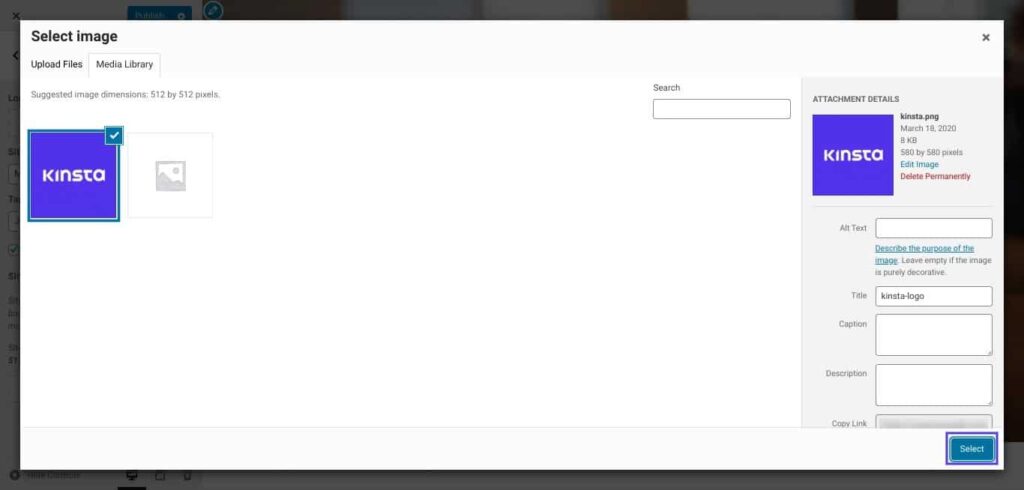
The standard WordPress Media Library interface will appear. You can select an image from your existing Media Library or upload a new one. If you’ve generated your favicon using RealFaviconGenerator, ensure the downloaded package is uncompressed.
Further Reading: How To Fix The WordPress Upload Limit?
Once you’ve selected an image you prefer, click on it and then choose “Select” in the bottom-right corner:
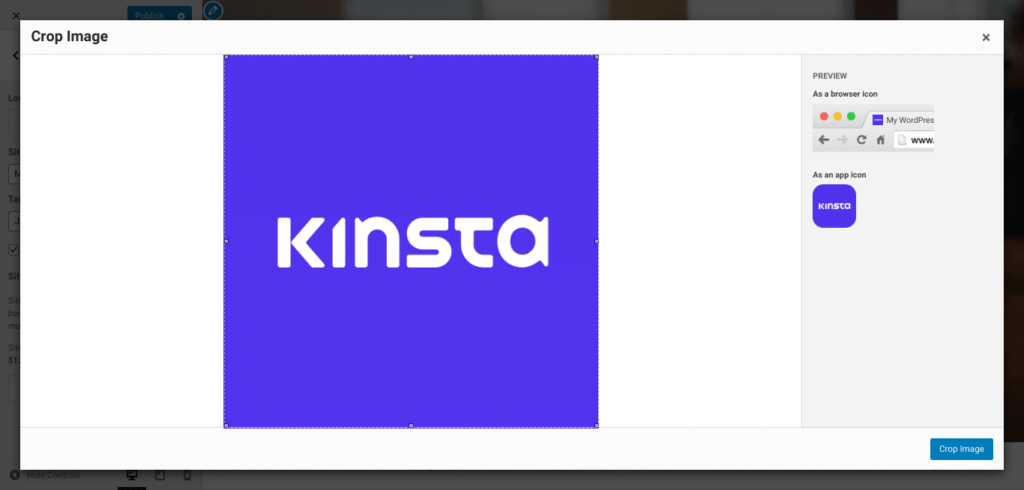
If your image doesn’t match the required dimensions of a perfect square (e.g., 512×512 px), WordPress will provide an opportunity to crop it on the following screen.
Utilize the box to outline the section of the image you wish to use for your icon. A preview of the cropped photo will be visible on the right side of the interface.
When satisfied with the appearance, click on “Crop Image” to confirm your selection:
That’s all there is to it! Simply choose “Save & Publish” to activate your favicon. If you decide to update your favicon later on, you can always return to this interface.
Know More: Fix WordPress “Publishing Failed. The Response Is Not A Valid JSON Response.” Issue
Adding WordPress Favicon with a Plugin
If you favor a plugin-based approach over the built-in WordPress site icon feature, you can opt for a widely-used free plugin called Favicon by RealFaviconGenerator (the same tool we mentioned earlier).
This plugin is equally user-friendly compared to the native WordPress Customizer. However, it provides extra compatibility features for different devices and app icons. To utilize it, simply install and activate the free plugin through your WordPress dashboard:
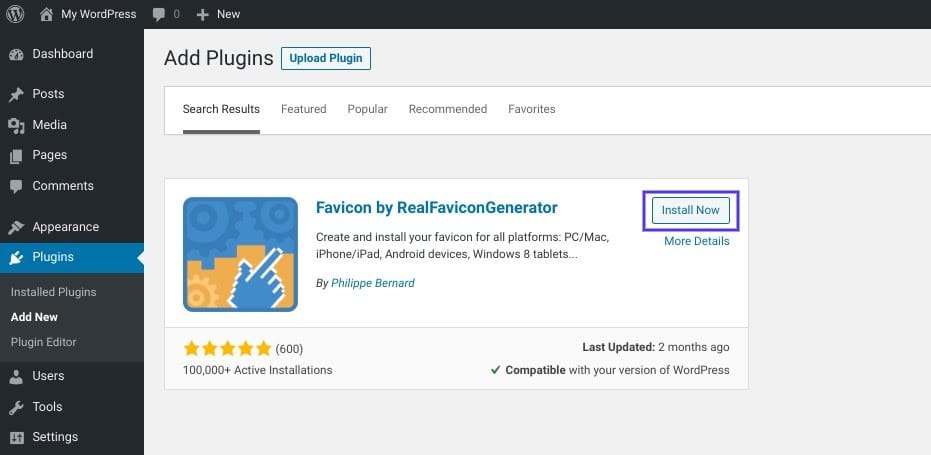
After enabling the plugin, navigate to Appearance → Favicon to generate your favicon set. Simply choose an image from your selection or upload one with dimensions of at least 70×70 px (preferably 260×260 px):
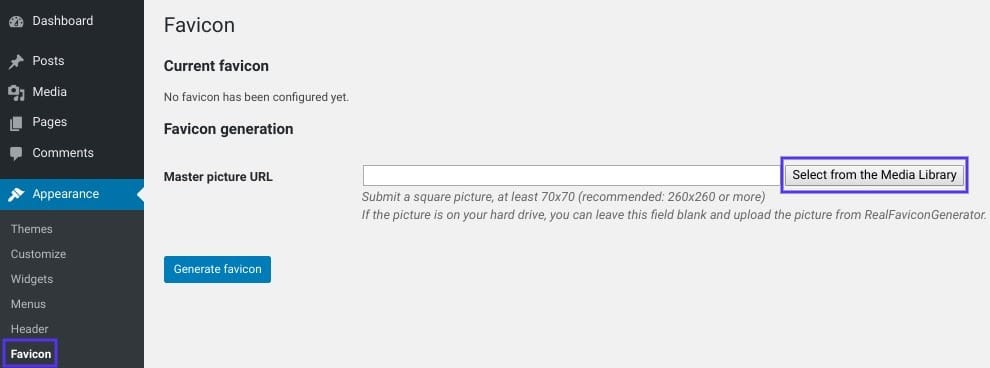
Once you’ve chosen your image, click on “Generate favicon.” Clicking this button will redirect you outside of your WordPress site to the RealFaviconGenerator website.
Also Read: Why are Niche WordPress Plugins Essential for Your Business?
Scroll down to the bottom of the page to select “Generate your Favicons and HTML code” (as described in the previous section). While the tool is running, RealFaviconGenerator will eventually return you to your WordPress dashboard:
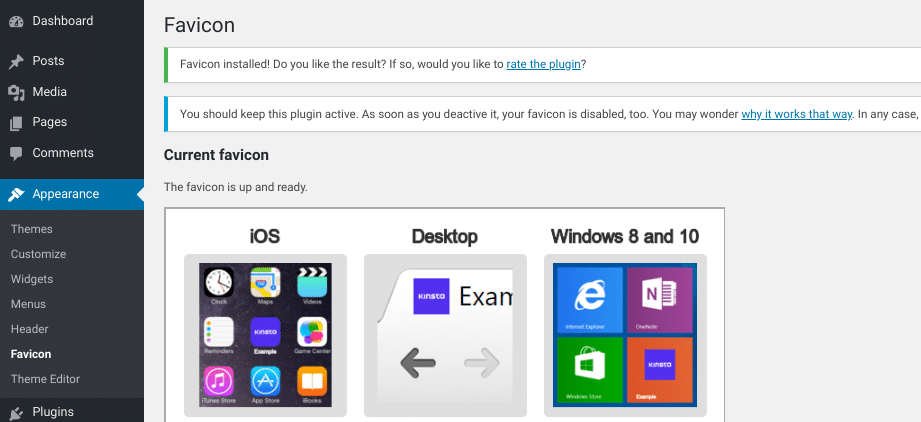
Following these steps, your favicon will be configured and prepared for use. Within the plugin’s interface, you can preview how it will appear on various devices:
Adding WordPress Favicon with FTP
If you prefer a manual approach, add a favicon to your WordPress site via File Transfer Protocol (FTP) or the File Manager in your hosting cPanel.
To proceed manually, you’ll also need to create your favicon image, following the steps outlined earlier in this post. We’ll use the package generated and downloaded from RealFaviconGenerator for this demonstration, but these instructions apply regardless of the tool you used.
To manually add a WordPress favicon:
- Access your site’s files using an FTP client or the File Manager in your hosting cPanel.
- Locate your site’s root directory and upload the contents of your favicon package (favicons.zip). Ensure they are placed alongside your wp-admin and wp-content folders.
- Next, take the code provided by RealFaviconGenerator and either:
- Use a plugin like Insert Headers and Footers to add it to your theme’s header.
- Paste it directly into your theme’s <head> section by editing your theme’s header.php file.
You should use the Insert Headers and Footers plugin to safeguard your favicon in case you switch WordPress themes later. Install and activate the plugin. Then, navigate to Settings → Insert Headers and Footers and paste your code into the Scripts in the Header section.
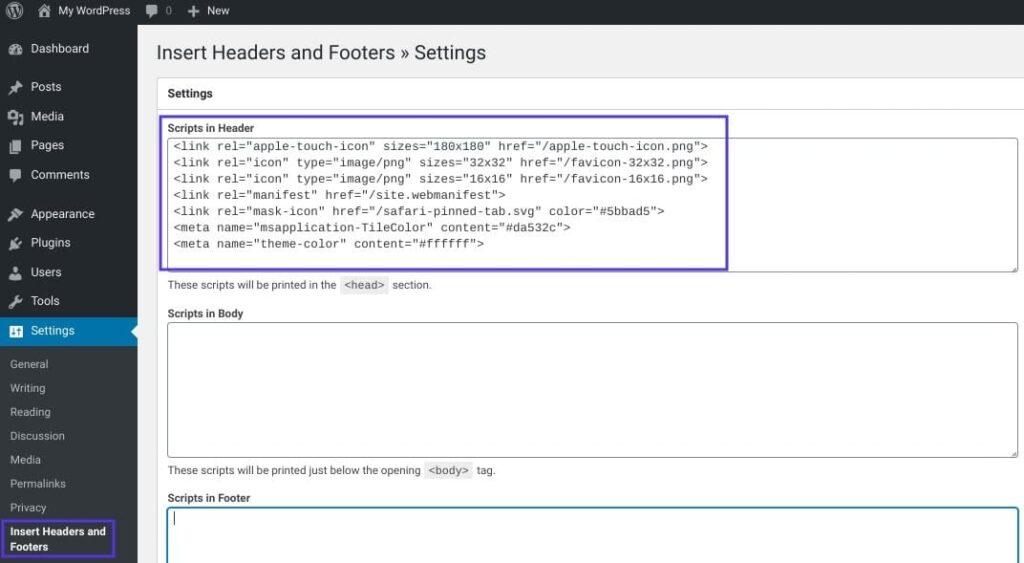
Ensure to save your modifications. Then, your setup is complete!
Conclusion
As highlighted earlier, the most straightforward approach is to utilize a favicon plugin to ensure each site within your multisite network has a distinctive favicon. While modifying your theme’s files to enable unique favicons for each network site is feasible, this process is considerably more complex than a plugin.
Additionally, you may contemplate employing a Content Delivery Network (CDN) to deliver your favicon images. The three methods discussed in this post store favicon images on your server. However, leveraging a CDN can further optimize your site’s performance.
By installing Cloudflare or a similar service like KeyCDN, visitors’ browsers will fetch your favicon from the CDN instead of your site’s server. If you’re utilizing a plugin like CDN Enabler, it should automatically reconfigure your WordPress favicon URL to align with the aforementioned methods.


