WordPress is undeniably one of the most popular content management systems (CMS) in the digital realm. It offers users myriad features, ensuring everyone, from seasoned developers to blogging newbies, can easily design and manage their sites. But sometimes, as with all software, you might bump into certain restrictions. One common hiccup users face is the WordPress upload limit. If you’ve ever tried uploading large files or media and received an error message like “The uploaded file exceeds the upload_max_filesize directive in php.ini,” you’ve encountered this file size limit.
Before you throw your hands up in frustration, take a deep breath. Addressing this issue is more straightforward than it seems. Whether you’re a seasoned webmaster or just someone looking to share their latest vacation video, this guide is designed for you. Let’s learn how to fix the WordPress upload limit!
Contents
Toggle7 Best Methods to Increase Media File Upload Size in WordPress
Here are seven top methods to quickly increase the maximum media file upload size, ensuring smoother website management and richer content delivery.
Update Through the Media Uploader
When you’re in the WordPress admin dashboard and navigate to the media uploader, you might notice an “upload limit” mentioned. If it’s too small, here’s what to do:
Adjust from WordPress Dashboard: Sometimes, there’s an option right within the Media → Add New section in your dashboard. If available, you can increase the maximum file upload size directly there.
Related: Fix “An Error Occurred In The Upload…” In WordPress
Tweak the php.ini File
The php.ini file is a configuration file for PHP settings.
1. Access your website via FTP or your hosting panel.
2. Look for the php.ini file. If it’s not there, create one.
3. Add or modify the following lines:
upload_max_filesize = 64M
post_max_size = 64M
max_execution_time = 300
4. Save and close the file.
Related: Why Is Your WordPress Slow
Contact Your Hosting Provider for Help
If you encounter issues with your WordPress website, reaching out to your hosting provider is often the best course of action. First, gather essential information: account details, domain name, and error messages. Log into your hosting account and navigate to the “Support” or “Help” section. Providers typically offer support channels like live chat, ticket systems, or even phone support. Clearly describe your problem; the more specific you are, the better assistance you’ll receive. Response times may vary, but the support team can quickly address your concerns with accurate information.
Read: How To Update WordPress PHP Version?
Change PHP Options via cPanel
Managing your website’s backend might seem daunting, but with tools like cPanel, it’s more intuitive than you think. If your hosting provider equips you with cPanel, you can effortlessly tweak your PHP settings, including the maximum file size upload limit. Let’s delve into how:
- Access cPanel: Log in to your hosting account and navigate to the cPanel dashboard.
- Select PHP Version: You’ll find the ‘Select PHP Version’ option under the’ Software’ section. This is your gateway to changing PHP settings.
- Navigate to PHP Options: Inside the PHP Version interface, there’s an ‘Options’ link in the navigation menu. Click on it to reach the PHP Options panel.
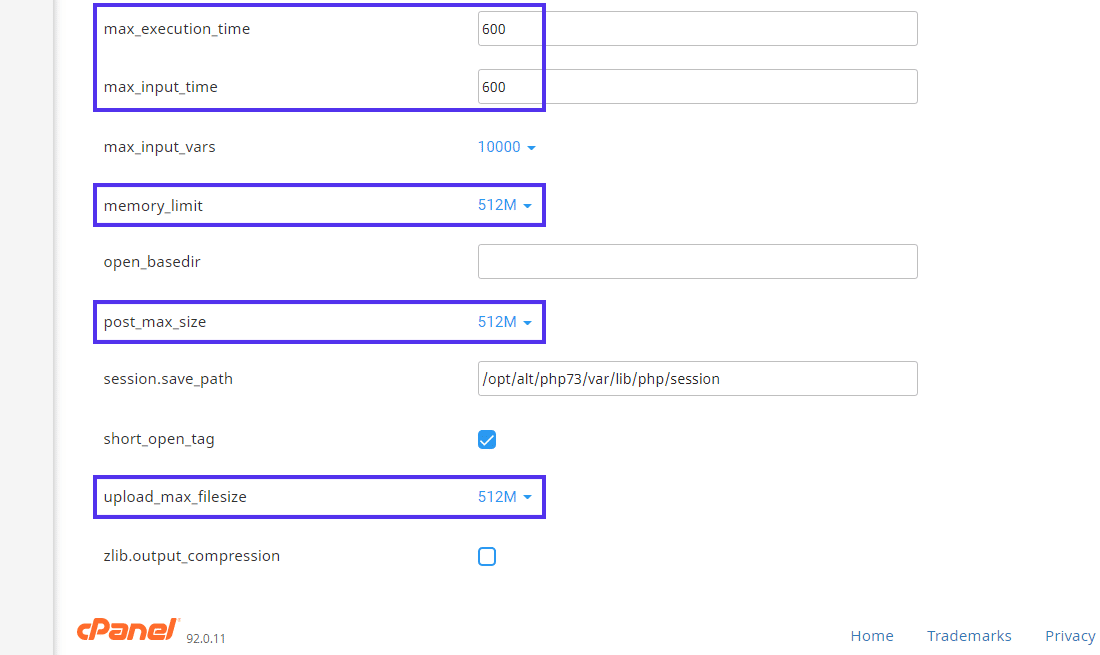
- Modify PHP Directives: As you scroll, you’ll spot directives like upload_max_filesize, post_max_size, memory_limit, max_execution_time, and max_input_time. You can tweak these as per your requirements. Remember, the maximum values you can input here depend on your hosting plan.
- Save Changes: Modern cPanel dashboards are smart and save changes instantaneously. However, if you’re on an older version, remember to hit the ‘Save Changes’ button.
Know: Fix WordPress “Publishing Failed. The Response Is Not A Valid JSON Response.” Issue
Use a WordPress Plugin
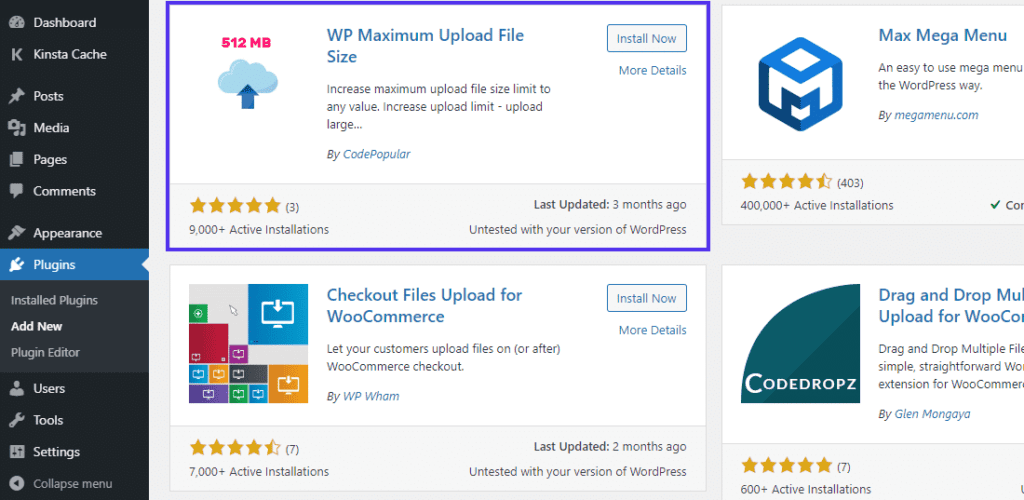
If you need help with diving into code, WordPress plugins offer a more straightforward solution. The WP Maximum Upload File Size plugin is a top choice for adjusting file size limits.
Steps to Use the Plugin:
- Install and Activate: Find ‘WP Max Upload Size’ in your WordPress dashboard under ‘Plugins.’ Install and activate it.
- Adjust Settings: Navigate to the plugin’s settings. You’ll see upload limits set by WordPress and your hosting provider.
- Set Desired Limit: Use the dropdown to increase the WordPress file upload limit, provided it doesn’t exceed your hosting provider’s limit.
Remember, to go beyond your host’s set limit, you must contact them directly.]
Learn: Elementor Stuck On Loading Screen? Here’s How To Fix It!
Upload Files via FTP/SFTP
FTP/SFTP is a reliable way to upload large files when traditional methods falter.
Quick Steps:
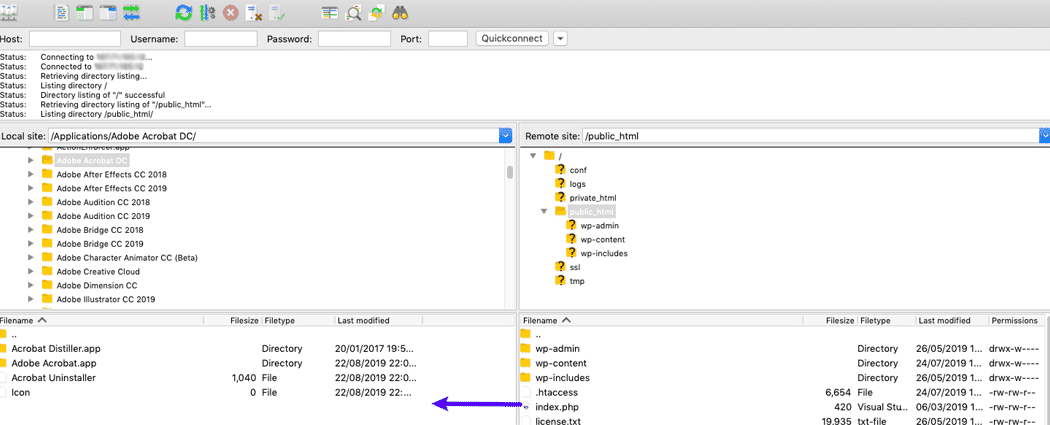
- FTP/SFTP: Use these protocols to transfer large files directly to your server. Consider our tutorial on bulk uploading to the WordPress media library if you are unfamiliar with it.
- WordPress Recognition: WordPress might not detect FTP/SFTP uploads. The solution? The free Add From Server plugin imports these files into WordPress.
- WP-CLI: For those versed in the command line, the wp media import command in WP-CLI lets you attach files from local sources or URLs.
This method ensures your files reach your website without the standard size restrictions.
Read: How To Fix The 500 Internal Server Error In WordPress
Add Code to Your .htaccess File
When you want to adjust server settings like the max upload file size, the .htaccess file in your WordPress setup is handy. Before diving in, remember to back up your current .htaccess files. Access the file in your website’s root directory using an FTP client or your hosting cPanel’s File Manager. To modify upload limits, append the file with code like:
php_value upload_max_filesize 64M
php_value post_max_size 64M
Adjust the values as needed, then save and close. After making changes, check your WordPress site to ensure they take effect. If in doubt, consider reaching out to a web expert.
Read: Fix ‘Links Do Not Have A Discernible Name’ Error
Conclusion
Managing your WordPress site requires a mix of simple tools and more technical tweaks. Whether using plugins for straightforward changes or diving into server settings, each approach has its place. It’s always a good idea to back up before making changes and feel free to seek help if you need clarification. You can ensure your site runs smoothly with the proper knowledge and resources.
Looking To Maintain Your WordPress Website?
Connect with us for the best WordPress Maintenance and Care Services for your WordPress site
FAQs
Most hosting services offer a way to modify the maximum upload file size in WordPress through server configurations. If unsure, check your provider’s knowledge base or contact their support team for guidance.
While this adjustment is on the backend, your site speed might be influenced if the uploaded files aren’t optimized. Ensure that files are streamlined and don’t burden users and search engine’s load times. Always prioritize both robust hosting and optimized content for the best user experience.


