


This one is for the designers who struggle with sharing their Figma work. Figma to PDF export is your new best friend. It’s quick, easy, and makes your designs look pro. No more messy screenshots or complicated workarounds. Just a few clicks and you’re done.
It saves time. Looks great. Impresses clients. And keeps your team happy. Want to export a single artboard? No problem. A whole WordPress development project? You got it. Figma keeps your design quality intact.
It’s a small skill to learn, with big impact. Here is how Figma to PDF transfers make life easy:
- Quick sharing with clients and team
- Keeps design quality intact
- Works for single artboards or whole projects
- No need for screenshots or complex methods
In this article, we’ll walk through the Figma to PDF process step-by-step. You’ll learn how to export, maintain quality, and apply tricks for the best results.
Discover More: Figma to Shopify: The Ultimate Design-to-Store Guide
Method 1: Using Figma’s Built-In Export Feature
Designers often need to share specific parts of their work without presenting the entire project. Figma’s layer export feature addresses this need, allowing for precise control over what gets exported to PDF. This method is particularly useful when you’re working on complex designs but only need to showcase or review certain elements.

By exporting individual layers, you can create focused, lightweight PDFs that highlight exactly what you want others to see. This approach is not just about selective sharing; it’s about streamlining communication and workflow efficiency. Whether you’re isolating icons for a developer, sharing button designs with a client, or extracting specific UI components for a presentation, layer-specific PDF export in Figma has you covered.
Also Read: Figma to WordPress – 5 Best Methods to Convert Your Design into a Pixel-Perfect Website
Process:
- Open your Figma file
- Select the layers you want to export
- Right-click on the selected layers
- Choose “Export” from the context menu
- In the export settings, select PDF as the format
- Adjust resolution and other settings if necessary
- Click the “Export” button
- Choose where to save the PDF on your computer
- After saving, open and verify the exported PDF
Eager to Take Your Pixel-perfect Figma Designs Onto Your Website?
Leave the transferring hurdles to the pros! Get Figma designs flawlessly spread across your website, for just $499, billed at a time.
Key Advantages:
- Precise Control: Export only the layers you need, giving you full control over the output. This is especially useful for large, complex designs where you want to focus on specific elements.
- Manageable File Sizes: By selecting specific layers, you create smaller, more shareable PDFs. This is crucial when sending files via email or uploading to project management tools with file size limits.
- Focused Presentation: Ideal for showcasing particular design components or sections. It allows you to create PDFs that get straight to the point, perfect for client presentations or team reviews.
- Customization Options: Adjust export settings for each layer based on specific requirements. This flexibility lets you tailor the output for different purposes or recipients.
- Efficient Updates: Easily export modified layers without redoing the entire design. This is a time-saver when you’re making iterative changes to specific elements.
Useful Resource: 15 Best Consulting Website Design Examples to Inspire You
Potential Drawbacks:
- Time Intensive: Exporting multiple individual layers can be time-consuming, especially for designs with many components.
- Context Loss: Exported layers may lack the context of the full design, which could be an issue if the overall layout is important.
- Learning Curve: Requires practice to master the selection and export process, particularly for complex, multi-layered designs.
Suitable Users:
- Designers: For exporting specific UI components or design elements, useful in creating design systems or component libraries.
- Project Managers: To review and provide feedback on particular design aspects without getting overwhelmed by the entire project.
- Developers: For obtaining detailed exports of specific layers for implementation, ensuring they have exactly what they need for coding.
- Freelancers: To showcase individual elements of their work to clients, allowing for focused discussions on specific design choices.
- Marketing Teams: For extracting specific assets for promotional materials, ensuring brand consistency across different platforms.
Not Impressed with Run-of-the-Mill Templates?
Break out of the mould with custom designed websites from our creative developers! Get thoughtfully designed custom homepages and subpages for just $999.
Method 2: Using Third-Party Tools
Exporting entire frames from Figma to PDF offers a comprehensive approach to sharing complete design views. This method is crucial when preserving the full context and layout of your design is essential. It captures all elements within a frame, providing a holistic representation of your work.

Process:
- Open your Figma file
- Navigate to the frame(s) you want to export
- Select the frame(s) by clicking on them
- Right-click on the selected frame(s)
- Choose “Export” from the context menu
- Set the format to PDF in the export settings
- Adjust resolution and compression if needed
- Click “Export”
- Choose where to save the PDF
- Review the exported PDF for accuracy
Key Advantages:
- Complete Design Capture: Exports the entire frame, ensuring all elements and layouts are included in the PDF. This provides a full view of the design, maintaining its integrity and structure.
- Consistency in Presentation: Preserves the design’s layout and relationships between elements, crucial for understanding the overall user interface or experience flow.
- High-Quality Output: Produces professional-grade PDFs suitable for presentations, client reviews, or detailed documentation of the entire design.
- Simplified Export Process: Streamlines the export by treating the frame as a single unit, eliminating the need to select individual layers.
- Context Preservation: Offers a comprehensive overview of the project, making it easier to understand the design’s context and flow.
Also Read: How to Migrate from Webflow to WordPress: 6 Steps
Potential Drawbacks:
- Large File Sizes: Exporting entire frames can result in larger PDF files, especially for complex designs with many elements.
- Less Flexibility: Doesn’t allow for selective export of specific elements within the frame, which might be necessary for certain situations.
- Potential for Overwhelming Detail: The comprehensive nature of frame exports might provide more information than needed for some audiences.
Suitable Users:
- UI/UX Designers: For presenting complete user interfaces or experience flows to stakeholders or clients.
- Clients and Stakeholders: To review and approve entire design projects with a comprehensive view.
- Design Teams: For collaborative work, ensuring all team members have a consistent and complete view of the design frames.
- Educators and Students: In teaching design principles or submitting complete design projects and portfolios.
- Product Managers: To understand and communicate the full scope of a design to development teams and other departments.
More Resources: Best UI/UX Portfolio Websites & Builders
Method 3: Choosing Professional Services
Transferring designs from Figma to PDF can be a critical task for ensuring your design projects are shared and presented effectively. While there are various methods to accomplish this, opting for professional services can provide a seamless and high-quality conversion.
In this section, we will explore the process involved in utilizing professional services for Figma to PDF transfers and highlight the key advantages of this method.
Process:
- Research and Selection: Begin by researching reputable service providers specializing in Figma to PDF conversions. Look for companies or freelancers with positive reviews, proven expertise, and a portfolio of successful projects.
- Initial Consultation: Once you have selected a service provider, schedule an initial consultation. Discuss your project requirements, timelines, and any specific details you need included in the PDF.
- Quotation and Agreement: After understanding your needs, the service provider will offer a quotation. Upon agreement, ensure to have a clear contract that outlines the scope of work, deadlines, and payment terms.
- Design Handover: Share your Figma files with the service provider. Ensure that all elements, fonts, and images are properly organized and accessible.
- Conversion Process: The service provider will begin the conversion process. This typically involves using advanced tools and techniques to ensure that the PDF retains the design integrity, resolution, and interactive elements of the original Figma file.
- Review and Feedback: Once the initial conversion is completed, you will receive a draft of the PDF. Review the document thoroughly and provide feedback on any necessary adjustments or corrections.
- Final Delivery: After incorporating your feedback, the service provider will finalize the PDF. The final document is delivered, ready for distribution or presentation.
Key Advantages:
Quality Assurance: Professional services ensure that the converted PDF maintains high quality, with accurate representation of colors, fonts, and layout.
Time Efficiency: By outsourcing the conversion process, you save valuable time that can be redirected towards other critical aspects of your project.
Expertise and Precision: Professionals possess the expertise to handle complex design elements and ensure that all interactive features and links function correctly in the PDF.
Customization and Flexibility: Service providers can offer customized solutions tailored to your specific needs, including adding watermarks, security features, or specific formatting.
Support and Revisions: Most professional services include support and revision rounds, ensuring that the final product meets your expectations and requirements.
Tips and Best Practices for Seamless Figma to PDF Transfers
Exporting from Figma to PDF can be a smooth process when you follow certain best practices. These tips will help you maintain design integrity, optimize your workflow, and ensure your PDFs look as good as your Figma designs. Whether you’re exporting layers or entire frames, these strategies will enhance your export process and final output.
- Organize Your Figma File: Before exporting, ensure your Figma file is well-structured. Group related elements, name layers clearly, and use a logical frame hierarchy. This organization not only makes your Figma file more manageable but also translates to cleaner, more predictable PDF exports.
- Check Your Typography: Fonts can sometimes behave unexpectedly when exported to PDF. Double-check that all text elements are using the correct fonts and that they’re properly sized. If you’re using custom fonts, consider outlining them to prevent any potential rendering issues in the PDF.
Also Read: 3 Step Guide For Brand Typography
- Mind Your Colors: Ensure your color settings in Figma match your intended output. Be aware that screen colors (RGB) may look different when printed (CMYK). If your PDF is intended for print, consider adjusting your colors accordingly or including a note about potential color variations.
- Optimize Images: Large image files can significantly increase your PDF size. Before exporting, compress images where possible without sacrificing quality. This will result in more manageable PDF files that are easier to share and open.
- Use Vector Shapes When Possible: Vector shapes scale infinitely without losing quality. Whenever feasible, use vector shapes instead of raster images. This practice ensures your PDF looks crisp at any zoom level and keeps file sizes smaller.
- Set Appropriate Export Settings: Adjust your export settings based on the PDF’s intended use. For web viewing, a lower resolution might suffice, while print-ready PDFs require higher resolution. Balance quality and file size to suit your needs.
- Test Different Frame Sizes: Experiment with different frame sizes to find what works best for your design when exported to PDF. Some layouts might benefit from a specific aspect ratio or page size to look their best in PDF format.
- Create PDF-Specific Artboards: For designs intended primarily for PDF export, consider creating dedicated artboards that are optimized for PDF viewing. This might include adjusting layouts, font sizes, or color schemes to ensure they translate well to the PDF format.
- Use Constraints Wisely: Properly set constraints on your Figma elements to ensure they behave as expected when exported to different PDF page sizes. This is particularly important if your PDF might be viewed on various devices or printed in different formats.
- Include Relevant Metadata: When exporting, don’t forget to include relevant metadata such as project name, version, and any necessary copyright information. This helps in organizing and identifying your PDFs after export.
How to Optimize PDF Exports?
PDF exports from Figma can sometimes result in large file sizes if your design has many vector assets and high-resolution images. Here are some tips to optimize your PDF exports:
Use TinyImage Compressor Plugin: One way to reduce the size of your PDF files is by using the TinyImage Compressor in Figma. This plugin compresses your images without losing much quality and makes your PDF exports smaller and more manageable. It’s like a magic trick for your file sizes!
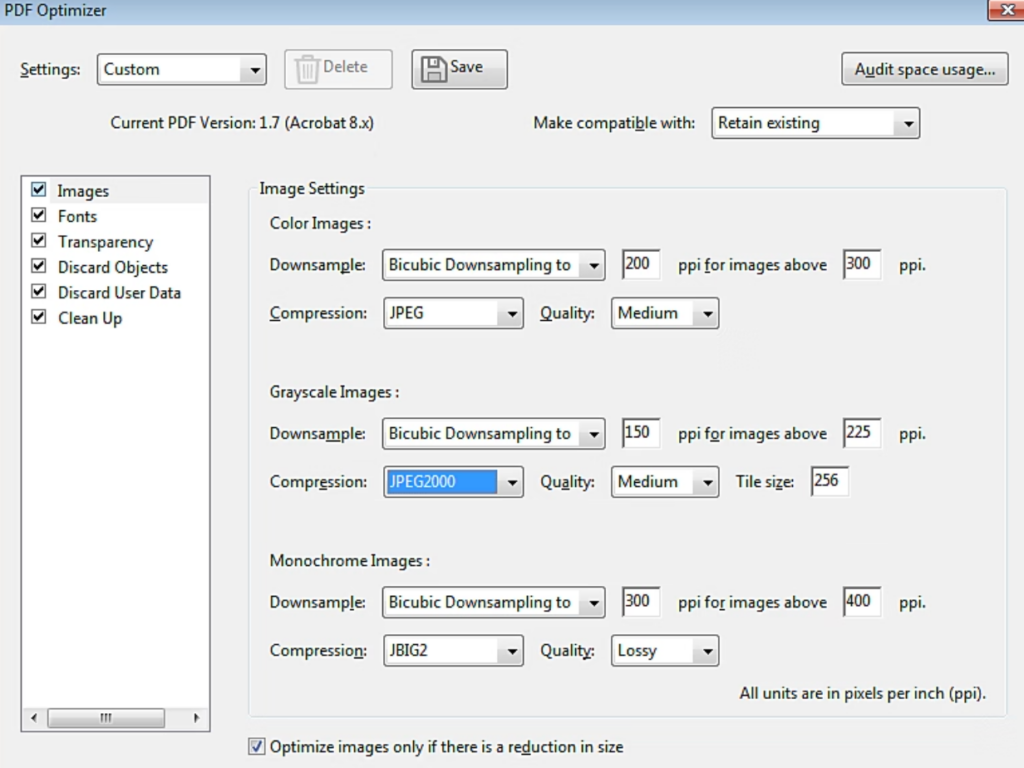
Optimize with Adobe Acrobat and Distiller: For more optimization, follow these steps:
- Open the Exported PDF in Adobe Acrobat: Once you have exported your PDF from Figma, open it in Adobe Acrobat. This software has powerful tools to manage and optimize PDF files.
- Save as PostScript (.ps) File: In Adobe Acrobat save your PDF as PostScript (.ps) file. This step might sound technical but it’s easy and necessary for the next step of optimization.
- Open in Adobe Distiller: Open the PostScript file in Adobe Distiller. In Distiller, select the “Smallest File Size” option to compress the PDF further. This option will slightly reduce the image quality but will keep it looking good.
Suggested Figma Guides:
By following these steps, you can keep your PDF files lean and mean. It’s like giving your PDFs a workout, trimming down the extra data, and keeping them looking good for sharing and storage. Happy exporting!
Suggested read: Convert Figma to Divi: An In-Depth Walkthrough
Figma’s Precise PDF Exporter

Figma’s PDF export is a WordPress designer’s best friend if you need your work to look perfect in any format. Here’s what makes Figma’s PDF exporter special:
Custom Built PDF Library: Figma didn’t settle for any PDF export tool. They built their own PDF library from scratch. So, your exported PDFs are not only accurate but also preserve the integrity of your original design. Figma’s team designed this tool with you in mind so you get the best results every time.
Customizable Export: Whether you need to export a single element or a whole page, Figma has you covered. You can choose what you want to include in your PDF so you can create exactly the document you need. It’s like having a personal export assistant!
Accurate Complex Elements: Designs can be complex with shadows, blurs, gradients, and more. Figma’s PDF exporter handles these complex elements with ease. Your PDFs will render every detail of your design so you can be sure what you see on screen is what you’ll see in the PDF.
Now, you can sleep peacefully, knowing your designs will look good in any format. It’s like having a perfectionist friend who makes sure everything is just right before you share your work with the world.
Another Figma Guide: Figma to Gutenberg: Comprehensive WordPress Conversion
Troubleshooting Common Issues
Even with careful preparation, you may encounter issues when exporting from Figma to PDF. Here are some common problems and their potential solutions:
- Blurry or Pixelated Images in the Exported PDF: This often occurs when raster images are scaled up or when export resolution is set too low. Ensure your images are high quality and appropriately sized in Figma. Increase the export resolution in the PDF settings if needed. For vector graphics, check that they remain in vector format during export.
- Unexpectedly Large PDF File Size: Large PDFs can be difficult to share and slow to open. This issue usually stems from high-resolution images or unnecessary hidden layers. Compress images before importing them into Figma, delete unused layers, and consider lowering the export resolution if the PDF is for screen viewing only.

- Text Appearing Different in the PDF Compared to Figma: Font inconsistencies can occur if the PDF viewer doesn’t have the necessary fonts installed. To avoid this, consider outlining text in Figma before export, or embed fonts in the PDF if your export settings allow it. Be aware that some fonts may not support embedding due to licensing restrictions.
Check This: Figma to Framer: Helping Streamline Your UX Design Workflow
- Colors Looking Different in the Exported PDF: Color discrepancies often result from RGB to CMYK conversion or screen calibration issues. If your PDF is for print, use CMYK colors in Figma. For digital use, stick with RGB but be aware that colors may appear slightly different across various screens and devices.
- Layers or Elements Missing in the PDF: This can happen if layers are hidden or if there are issues with grouping and nesting in Figma. Double-check that all necessary layers are visible and properly grouped before exporting. Ensure no elements extend beyond frame boundaries, as they may be cut off in the PDF.
- PDF Failing to Open or Displaying Errors: Corruption during the export process can lead to unreadable PDFs. Try exporting again, and if the problem persists, export in smaller batches or individual frames. Updating your Figma app or trying a different PDF viewer might also resolve the issue.
Discover More: White Label Figma to WordPress Conversion: Streamline Your Agency Workflow
- Interactive Elements Not Working in the PDF: Remember that PDFs are static documents. Any interactive elements like hover states or animations in Figma won’t translate to the PDF. Consider creating separate frames to showcase different states of interactive elements if needed.
- Inconsistent Page Sizes in Multi-Page PDFs: When exporting multiple frames, inconsistent frame sizes in Figma can lead to varying page sizes in the PDF. Standardize your frame sizes in Figma before export, or consider using a PDF editor to adjust page sizes post-export if necessary.
Find Out More: Figma to Beaver Builder: Optimizing Design Transfer for Efficient Website Building
Parting Thoughts
Mastering the Figma to PDF export process is a valuable skill for any designer. It streamlines your workflow, enhances communication with clients and team members, and ensures your designs are presented professionally. By following the methods, tips, and troubleshooting advice outlined in this article, you can confidently create high-quality PDFs that maintain the integrity of your Figma designs. Remember, practice makes perfect – the more you use these techniques, the more efficient and effective your design-to-document process will become.