Every click, every visitor matters. Yet, a ‘Not secure’ warning can erode trust swiftly. With Google Chrome and other major browsers waving red flags over missing SSL certificates, it’s time to take action. This guide will show you how to force HTTPS on your WordPress site to secure visitor data and bolster your online reputation.
Contents
ToggleUnderstanding the Importance of HTTPS
Before diving into the methods to force HTTPS on your WordPress site, it’s essential to grasp why this is important. When a website uses HTTP, it lacks encryption, making it vulnerable to data breaches and cyberattacks.
In contrast, HTTPS encrypts the data transmitted between a user’s browser and the website, safeguarding sensitive information like passwords and payment details.
Furthermore, popular web browsers like Google Chrome have marked HTTP sites as “Not secure” since January 2017. This labeling aims to protect users while promoting secure browsing. As a website owner, you should prioritize the security and trustworthiness of your site by adopting HTTPS.
Make Your WordPress Site Safer and Secure with HTTPS
Our experts can help you add HTTPS to your website, strengthening your site’s security. Get in touch today!
Prerequisite: Install an SSL Certificate
The first step in forcing HTTPS on your WordPress site is to install an SSL certificate. Most WordPress hosting providers include an SSL certificate in their hosting plans, so contacting your host to establish it is often straightforward. However, if your hosting plan doesn’t offer this feature, you can obtain a free SSL certificate from a certificate authority like Let’s Encrypt.
Methods to Force HTTPS on Your WordPress Site
Once your SSL certificate is in place, it’s time to configure your WordPress website to use HTTPS. There are three primary methods to achieve this:
Method 1: Use WordPress Plugins to Force HTTPS
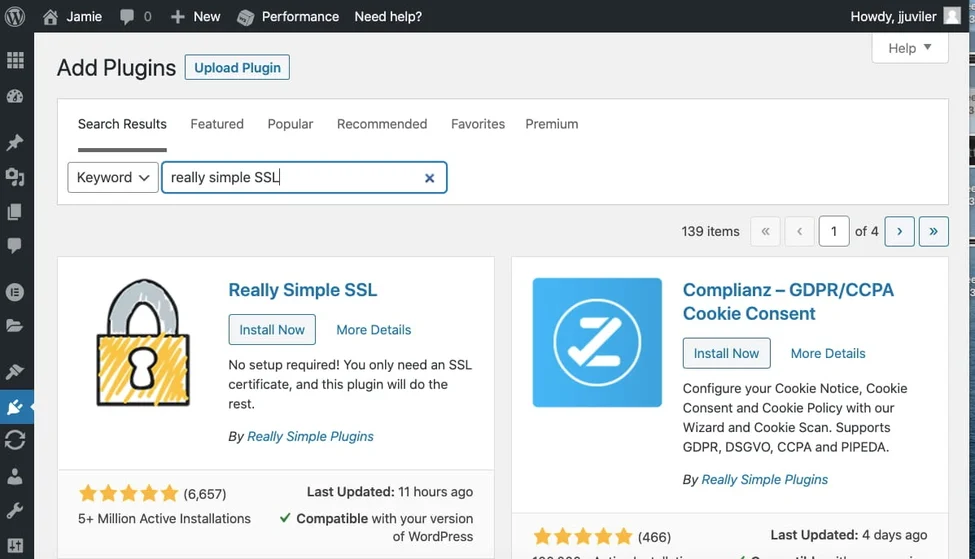
For beginners with limited coding experience, a WordPress plugin is a user-friendly way to force your site to load securely over HTTPS. Several plugins are designed for this purpose, with Really Simple SSL being a highly-rated and widely-used option. Here’s how to use it:

- Log into your WordPress dashboard and navigate to Plugins ⟶ Add New.
- Search for the Really Simple SSL plugin and install it.
- Activate the plugin by clicking the Install Now and Activate buttons.
- Click the “Go ahead, activate SSL!” button in the plugin settings.
This process will activate SSL on your site. While this method is quick and straightforward, it’s a temporary solution as it doesn’t update the URLs with HTTP in your WordPress database.
Method 2: Force HTTPS Using .htaccess on WordPress
You can force HTTPS by editing your .htaccess file for a more permanent and effective solution. Although this method is more complex and may require some technical expertise, it offers lasting results. Follow these steps:
Step 1: Update General Settings

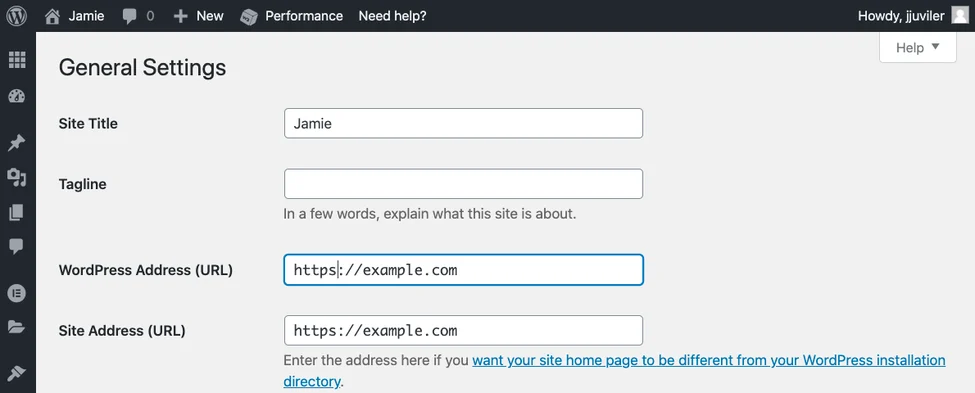
- Log into your WordPress dashboard and navigate to Settings ⟶ General.
- In the “WordPress Address (URL)” and “Site Address (URL)” fields, replace
HTTPwithHTTPS. - Click the “Save Changes” button at the bottom of the page. You’ll be automatically logged out and need to log back in.
Read: HTTP Vs. HTTPS: Why Having An SSL Is Important
Step 2: Set Up 301 Redirects in .htaccess
Next, you’ll set up 301 redirects to ensure all HTTP requests are automatically redirected to HTTPS. This prevents the “WordPress HTTP not working” error. Follow these steps:
- Access your hosting account’s control panel.
- Open the File Manager and navigate to the
public_htmlfolder, then theWordPressfolder. - Find the .htaccess file and right-click to edit it.
Add the following code before the line that reads “# BEGIN WordPress”:
RewriteEngine On
RewriteCond %{HTTPS} !=on
RewriteRule ^(.*)$ https://%{HTTP_HOST}%{REQUEST_URI} [L,R=301,NE]
Header always set Content-Security-Policy “upgrade-insecure-requests;”
Step 3: Resolve the Mixed Content Error
By completing the previous steps, your website will be set up to use HTTPS. However, you must fix mixed content errors when specific files (e.g., images, scripts) still load over HTTP. Here’s how to resolve it:
- Install and activate the Better Search Replace plugin.
- Navigate to Tools ⟶ Better Search Replace.
- In the “Search” field, enter your domain name with HTTP.
- In the “Replace” field, enter your domain name with HTTPS.
- Select all your database tables and uncheck the “Run as dry run?” option.
- Click the “Run Search/Replace” button to initiate the process.
Learn: How To Transfer A Domain?
The plugin will search your WordPress database for HTTP URLs and replace them with HTTPS URLs. The duration of this process depends on your database size.
If you encounter mixed content errors even after completing these steps, the issue may be related to your WordPress theme or plugins. Use your browser’s Inspect Tool to identify and manually replace HTTP URLs within your theme files or contact plugin authors for resolution.
Read: How To Improve Your Website’s Domain Authority?
Method 3: Force HTTPS on WordPress without Plugin
While similar to Option 2 in this list, if you want to enforce HTTPS on your WordPress website without relying on a plugin, follow these steps:
- Update Site Address: Go to Settings ⟶ General in your WordPress admin dashboard. Once there, check to see if both the WordPress Address (URL) and Site Address (URL) start with
https://instead ofhttp://. If not, make the required changes – replace http with https – and click Save. - Update .htaccess File: Access your website files via FTP or cPanel File Manager. Locate the .htaccess file in the root directory of your WP installation and add the following code at the beginning of the file:
RewriteEngine OnRewriteCond %{HTTPS} offRewriteRule ^ https://%{HTTP_HOST}%{REQUEST_URI} [L,R=301]- Update wp-config.php: Add the following line to your wp-config.php file to define WordPress HTTPS:
define('FORCE_SSL', true);Also, ensure all internal links, images, scripts, and stylesheets use HTTPS. After making these changes, test your website to ensure HTTPS is forced correctly and all your pages load securely with HTTPS.
Add Your HTTPS Website to Google Search Console
Add your domain with HTTPS as a new property in Google Search Console to complete the process of forcing HTTPS on your WordPress website. This step, combined with the 301 redirects set up earlier, ensures that Google transfers your search rankings to the HTTPS version of your site. Follow these steps:
- Log into your Google Search Console account.
- Click the “Add a Property” button at the bottom of the menu.
- Select “Website” from the dropdown menu and enter your domain name with HTTPS.
- Choose your preferred verification method (e.g., domain name provider or Google Analytics) and follow the instructions.
Once your site is verified, you can access reports for your site’s HTTP and HTTPS versions in your Google Search Console account.
Know: Fastest WordPress Hosting Companies
Looking for the Best Website Maintenance Services?
Connect with us for the best Maintenance Services and get a fully functional and secured website.
To Sum Up: Enhancing Online Security & User Trust
As search engines and online consumers increasingly favor HTTPS sites, installing an SSL certificate on your WordPress website is essential.
Following either of the methods outlined above to redirect visitors from HTTP to HTTPS enhances your website’s security and contributes to a safer internet for all users. Secure your site, gain user trust, and join the growing encrypted website community.
Force HTTPS on WordPress Website FAQs
How to make a WordPress site use HTTPS?
To ensure your WordPress website uses HTTPS, you need to update your WordPress site’s URL settings to start with “https://” instead of “http://” in Settings ⟶ General. Also, ensure that the SSL certificate is installed and activated on your hosting server.
How do I force HTTPS on my website?
You can force HTTPS on your WordPress website by editing your site’s .htaccess file and adding code to redirect HTTP traffic to HTTPS. Additionally, make sure to update your site’s internal links and resources to HTTPS.
How do I permanently redirect HTTP to HTTPS in WordPress?
To permanently redirect HTTP to HTTPs in WordPress, edit your .htaccess file or use a plugin like Really Simple SSL. The Really Simple SSL plugin will enable automatic redirection from HTTP to HTTPS. Plus, ensure that your SSL certificate is properly configured.
Why isn’t my WordPress website HTTPS?
A few possible reasons your WordPress website isn’t HTTPS include an improperly configured SSL certificate, mixed content issues (some resources still loading over HTTP), or incorrect URL settings in WordPress. To rectify this, check your site’s SSL installation and update your URL settings to start with “https://.”
How to force HTTPS on WordPress website?
A simple way to force HTTPS on WordPress websites is to use a plugin like Really Simple SSL. If you have technical expertise, you can edit the .htaccess file to redirect HTTP traffic to HTTPS.
How do I force all traffic to HTTPS in WordPress?
To force all traffic to HTTPS in WordPress, you need to edit the website’s .htaccess file and add code to redirect all HTTP traffic to HTTPS. Additionally, ensure your WordPress settings and internal links are configured to use HTTPS.


