A resource page is a collection of curated tools, links, and references that are relevant to your website’s audience. It is a one-stop resource hub for users to find useful information, enhancing their experience and providing additional value.
Creating a resource page on your WordPress website can improve user engagement, boost SEO, and establish your site as an authority in your specific niche. Thus, let’s check out the four easy steps to build an effective resource page for your WordPress website right away!
Contents
ToggleImportance of a Resource Page for WordPress Websites
A resource page is essential for WordPress websites as it enhances user experience by providing a centralized hub of valuable information. It helps visitors find useful tools, articles, and links quickly, which can increase their engagement and time spent on your site.
Additionally, a well-organized resource page can improve your site’s SEO by increasing internal linking and attracting backlinks from other sites. This can help boost your site’s rankings and establish your site as an authoritative source in your niche.
Learn: Best White Label Website Design Agencies
Here’s an example of Seahawk’s Resource Page

Advantages and Disadvantages of a Resource Page on WordPress
This table outlines the advantages and disadvantages of creating a resource page. It highlights the benefits of improved user experience and SEO, as well as the challenges of maintenance and organization.
| Advantages of a Resource Page | Disadvantages of a Resource Page |
| It enhances user experience by providing a centralized location for information, thereby making it easy for site visitors to find resources quickly. | It requires regular updates to ensure the information remains current and relevant, which can be time-consuming. |
| It improves SEO and internal linking by creating more opportunities for search engines to crawl and index your site. | It can become cluttered if not well-organized, making it difficult for users to find what they need. |
| It can help you establish site authority and credibility by showcasing your expertise and providing high-quality, reliable resources, which can build trust with your audience. | It can be time-consuming to create and maintain a comprehensive list of resources, as compiling and organizing one requires significant effort. |
| It helps increase user engagement by offering valuable content that encourages visitors to spend more time on your site. | It may require design customization skills to create an attractive and user-friendly layout for the resource page. |
| It provides value to your audience by sharing beneficial tools, articles, and links, enhancing their overall experience on your site. | It has the potential for broken links over time, which can frustrate users and harm your site’s credibility if not monitored and fixed promptly. |
Need Help Maintaining and Optimizing Your Resource Page?
Check out our content writing services to learn how we can help keep your resource page up-to-date, well-organized, and optimized for SEO.
Steps to Make a Resource Page for Your WordPress Website
Follow these simple steps to build an effective and organized resource page that your visitors will love
Step 1: Set Up a Resource Page
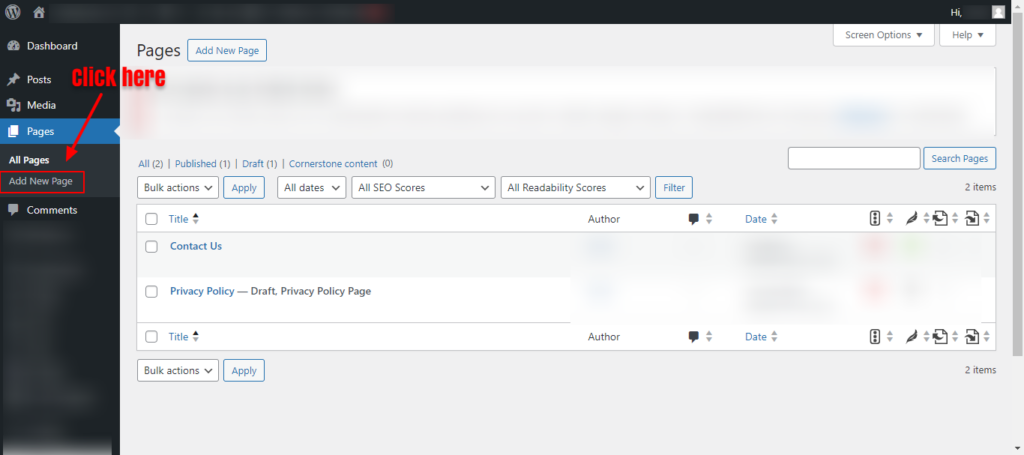
To start creating your resource page, log in to your WordPress admin dashboard. Next, click on Pages ⟶ Add New. This will open a new blank page where you can start building your resource page.
Title Your Page as “Resources” or “Resource Library”
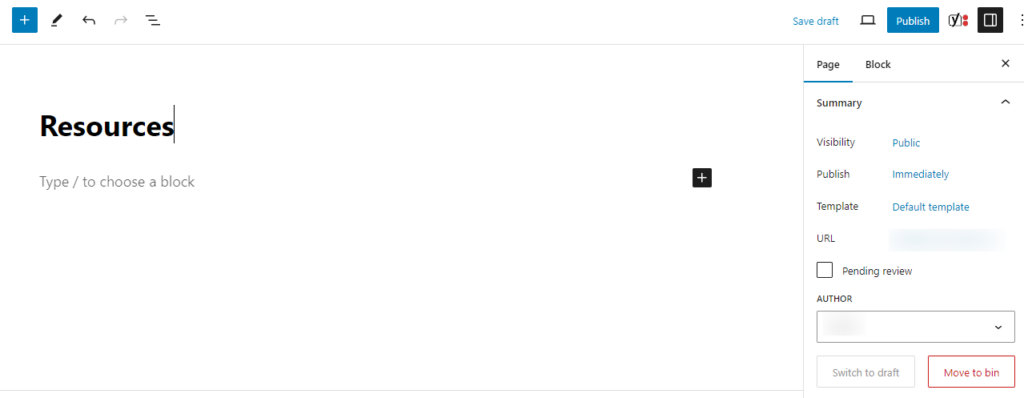
In the title field at the top, enter a clear and concise title such as “Resources” or “Resource Library.” This title will appear at the top of your page and in your website’s navigation menus, so ensure it’s easily understandable for your visitors.
Customize Page Settings and Layout
Customize the settings and layout of your page to fit your needs. You can use the Gutenberg editor or any page builder plugin (such as SeedProd, Elementor, or Beaver Builder). Here are some customization tips:
- Select a layout: Choose a full-width layout to give you more space to organize your resources.
- Add sections: Create different sections for various types of resources, such as articles, tools, and links. This helps organize the content and makes it easier for users to navigate.
- Use headings: Use clear headings for each section to improve readability and user experience.
- Include descriptions: Add brief descriptions for each resource to provide context and explain its value.
After customizing the initial settings and layout, click the “Save Draft” button. This saves your progress and allows you to continue editing and adding content later without publishing the page until it’s ready.
Step 2: Gather or Create Your Resources
To provide maximum value to your audience, gathering or creating relevant and useful resources is essential. Here are different types of resources you can consider:
| Resource Type | Description | Examples |
| Articles and Blog Posts | Curate insightful and informative articles, either from your site or other reputable sources. | How-to guides, case studies, expert opinions. |
| Tools and Software | Recommend tools and software that your audience can use to improve their tasks or projects. | SEO tools, graphic design software, analytics and website audit tools. |
| eBooks and Whitepapers | Provide in-depth knowledge and research on topics relevant to your audience. | Industry reports, comprehensive guides. |
| Videos and Tutorials | Share video content that educates or entertains your audience. | Webinar recordings, instructional videos, and even video podcasts. |
| Templates and Checklists | Offer downloadable resources that help your audience complete tasks more efficiently. | Project management templates, checklists for tasks |
| Online Courses and Webinars | Direct your audience to educational courses and webinars that can help them gain new skills. | Online classes, recorded webinars |
| Infographics and Visuals | Use visuals to present information in an engaging and easily digestible format. | Data visualizations, infographic summaries |
| External Links and Resources | Link to external websites and resources that provide access to additional value and information. | Industry blogs, official guides |
Remember, the resources you gather must align with your website’s niche or focus. This ensures that the content is relevant to your audience and enhances your site’s authority within your specific domain.
Step 3: Plan Your Site Structure
To create an intuitive and user-friendly resource page, start by determining the hierarchy of your categories and subcategories. This structure will serve as the backbone of your resource page.
- Main Categories: Identify your audience’s primary areas of interest. These will be your main categories. For instance, if your website focuses on digital marketing, your main categories might include “SEO,” “Content Marketing,” “Social Media,” and “Analytics.”
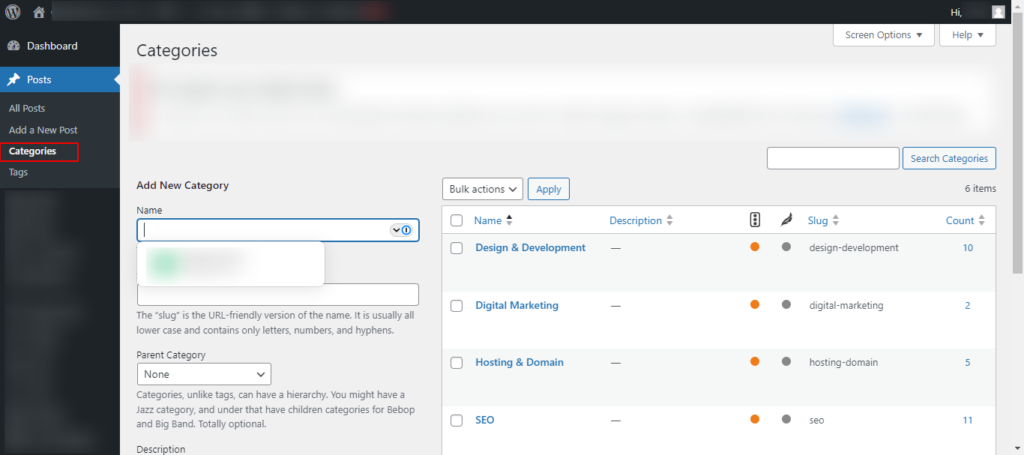
- Subcategories: For each main category, break it down into more specific topics. For example, under “SEO,” you could have subcategories like “On-Page SEO,” “Off-Page SEO,” and “Technical SEO.”
Also, ensure that each category and subcategory is distinct and doesn’t overlap. This clarity will help users find what they need without confusion.
Create a Logical Navigation System for Users to Find Resources
A logical navigation system is crucial for user experience. Here’s how to create one:
- Menu Structure: Design a menu that reflects your categories and subcategories. To keep the main menu clean and straightforward, use a drop-down menu for subcategories.
- Breadcrumbs: Implement breadcrumb navigation to help users understand their current location on your site and easily backtrack if necessary.
- Sidebar Navigation: Consider adding a sidebar with links to your categories and subcategories. This sidebar can stay visible as users scroll through the page, making navigation easier.
Consider Implementing Filters or Tags for Advanced Sorting
Filters and tags can significantly enhance the usability of your resource page, especially if you have a large amount of content.
- Filters: Implement filters that allow users to narrow down resources based on specific criteria, such as “Date Published,” “Popularity,” or “Format” (e.g., articles, videos, tools).
- Tags: Use tags to label resources with keywords that describe their content. Tags can include terms like “Beginner,” “Advanced,” “Free,” “Paid,” etc. This helps users find resources that match their specific needs.
- Search Functionality: Add a search bar that allows users to search for specific resources quickly. Ensure the search results are relevant and sorted logically.
Step 4: Publish Your Resources Page
Before publishing, ensure all the content on your resource page is complete and polished
- Write Descriptions: Ensure each resource has a concise, informative description that explains its value and relevance to your audience.
- Proofread: Carefully proofread all the text to eliminate spelling or grammatical errors.
- Check Relevance: Confirm that all resources are up-to-date and relevant. Remove or replace any outdated resources to maintain the page’s usefulness.
Add Visual Elements such as Images or Icons for Visual Appeal
Enhance the visual appeal of your resource page with appropriate visual elements.
- Images: Use high-quality, relevant images for resources. For example, include screenshots of tools or thumbnails of videos.
- Icons: Incorporate icons to represent different categories or types of resources. This makes the page more visually engaging and helps users quickly identify different sections.
- Consistent Style: Maintain a consistent style for all visual elements to give the page a cohesive and professional look.
Double-Check Links and Ensure They Are Working
Broken links can frustrate users and damage your site’s credibility, so ensuring all links are working is essential.
- Test Links: Click on every link on your resource page to verify that it leads to the correct destination and that the pages load properly.
- Update Broken Links: Fix or remove any broken links. If a resource is unavailable, find an alternative or update the information.
- Internal Links: Ensure that internal links (links to other pages on your site) are correctly formatted and functional.
Preview Page to Ensure Layout and Formatting are Intact
Before making your page live, preview it to check the overall layout and formatting.
- Preview Mode: Use the preview mode in WordPress to see how the page will appear to website visitors. Look for layout issues, such as misaligned elements or incorrect spacing.
- Responsive Design: Check the page on different devices (desktop, tablet, mobile) to ensure it is responsive.
- Readability: Make sure the text is easy to read, with appropriate font sizes, line spacing, and contrast. Headings and subheadings should also be clear and well-organized.
Once you’ve finalized all the content, visual elements, and links and confirmed that the layout & formatting are intact, you’re ready to publish your resource page. After publishing, announce the new resource page to your audience through your blog, email newsletter, and social media channels.
Set Up a Subdomain for Your Resource Page (Optional)
Setting up a subdomain for your resource page can help create a distinct identity for your resources and make them easily accessible to your audience. However, this step is optional and may not be necessary depending on your website’s structure and requirements.
Register a Subdomain with Your Hosting Provider
Log in to your hosting’s control panel and navigate to the domain management section. Locate the option to add a subdomain and follow the prompts to register your desired subdomain, such as “resources.yourwebsite.com.”
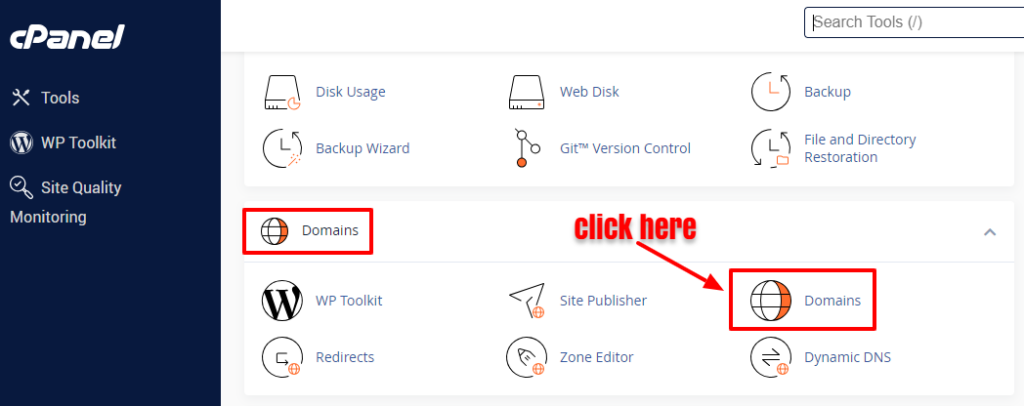
Point the Subdomain to Your Resource Page’s URL
Once the subdomain is registered, locate the DNS settings for your domain. Add a new DNS record (usually a CNAME record) pointing the subdomain to the URL of your resource page. This tells the internet where to find your resource page when someone visits the subdomain.

Configure DNS Settings to Ensure Proper Functionality
Double-check the DNS settings to ensure they are configured correctly. DNS changes can take some time to propagate, so be patient while waiting for the changes to take effect. The subdomain may take a few minutes to several hours to fully function.
Test Subdomain Access to Confirm Everything Works as Expected
Once the DNS changes have propagated, test access to the subdomain by entering the subdomain URL (e.g., “resources.yourwebsite.com”) into your web browser. Verify that the subdomain correctly redirects visitors to your resource page without errors or issues.
Struggling with the Technicalities of Creating a Subdomain?
Our experts are here to assist you. Contact us today to set up your subdomain quickly and hassle-free.
Tips for Promoting Your WordPress Resource Page
Promoting your WordPress resource page is crucial to maximizing its impact and reaching your target audience. Here are some effective tips to help you increase visibility, drive traffic, and encourage engagement with your valuable resources.
Implement SEO Best Practices
Optimize your resource page for search engines by conducting keyword research and incorporating relevant keywords into your page content. Next,
- Optimize meta titles & descriptions and headings.
- Use descriptive file names and alt text for images.
- Ensure fast page loading speed and mobile responsiveness.
- Build quality backlinks from reputable websites.
Use Social Media Channels
Promote your resource page on popular social media platforms by sharing engaging posts with links to your resource page. Use relevant hashtags to increase visibility and encourage your followers to share your content with their networks. You can also respond to comments and messages to engage with your audience.
Leverage Email Marketing
Utilize email marketing to promote your resource page by sending targeted emails to your subscribers with links to your resource page. Ensure that you:
- Create compelling email content that highlights the value of your resources.
- Segment your email list based on interests or behavior to deliver personalized content.
- Include calls-to-action (CTAs) in your emails to drive traffic to your resource page.
Offer Exclusive Promotions or Discounts
Incentivize visitors to your resource page discounts by creating limited-time offers or special deals. You can promote these offers through your website, email marketing, and social media channels. Also, highlighting the value they’ll receive will motivate users to take advantage of the promotion. Lastly, track the effectiveness of your promotions and adjust your strategy based on results.
Guest Blogging and Cross-Promotion Opportunities
Collaborate with other bloggers or businesses in your niche for guest blogging and cross-promotion opportunities. To start with this:
- Write guest posts for high-authority, relevant websites and include links to your resource page in your author bio or within the content.
- Partner with complementary businesses to cross-promote each other’s resources to your respective audiences.
- Participate in joint webinars, events, or promotions to expand your reach and attract new site visitors to your resource page.
Utilize Paid Advertising Strategies
Paid advertising is another useful method for promoting a resource page. You can run targeted ads on search engines or social media platforms to reach your ideal audience. Also, test different ad formats and messages to optimize performance. Plus, monitor and analyze ad metrics to measure ROI and adjust your strategy accordingly.
Conclusion
Creating a resource page for your WordPress website is a fairly simple, yet powerful way to enhance user experience. By following the four easy steps outlined above, you can provide valuable content to your audience in an organized and accessible format. Furthermore, remember to regularly update and promote your resource page to ensure it remains relevant and continues to drive engagement.


