If you’ve ever felt limited by the default post types available in WordPress, you’re in the right place. In this guide, we’ll walk you through everything you need to know about custom post types in WordPress development – from understanding the basics to implementing them effectively on your WordPress site.
Custom post types can revolutionize the way you organize and present content in WordPress design. By the end of this guide, you’ll have the knowledge and skills to create custom post types tailored to your specific needs, allowing you to showcase your content in a way that’s both intuitive and visually appealing.
Contents
ToggleDifference Between Default Post Types and Custom Post Type
Custom post types are a powerful feature in WordPress that allow you to create and manage different types of content beyond the traditional blog posts and pages. Essentially, they enable you to define your own content structures, each with its own set of unique attributes and behaviors.
Now, let’s break down the key differences between custom post types and default post types:
Default Post Types
In WordPress, the default post types include “Posts” and “Pages.”
Posts: These are typically used for blog entries and are displayed in reverse chronological order on your site’s blog page.
Learn: What Is A Blog Hop And How Does It Work?
Pages: Pages are static, standalone pieces of content such as About Us, Contact, or Services pages. They are often used for timeless content that doesn’t need to be updated frequently.
Custom Post Types
Custom post types, on the other hand, are entirely customizable and can represent any type of content you can imagine.
Examples of Custom Post Types: Imagine you’re running a recipe website. You could create a custom post type called “Recipes” to store and display your recipes separately from your regular blog posts. Each recipe could have its own fields for ingredients, cooking instructions, and more.
Flexibility: The beauty of custom post types lies in their flexibility. You can tailor them to suit your specific needs, whether you’re managing events, portfolios, testimonials, products, or any other type of content.
Read More: Top B2B Web Design Agencies
While default post types serve their purposes well, custom post types empower you to break free from the constraints of the built-in options and design your content management system exactly the way you want it. They open up a world of possibilities for organizing and presenting your content in a way that best serves your website’s goals and audience.
Why Use Custom Post Types in WordPress
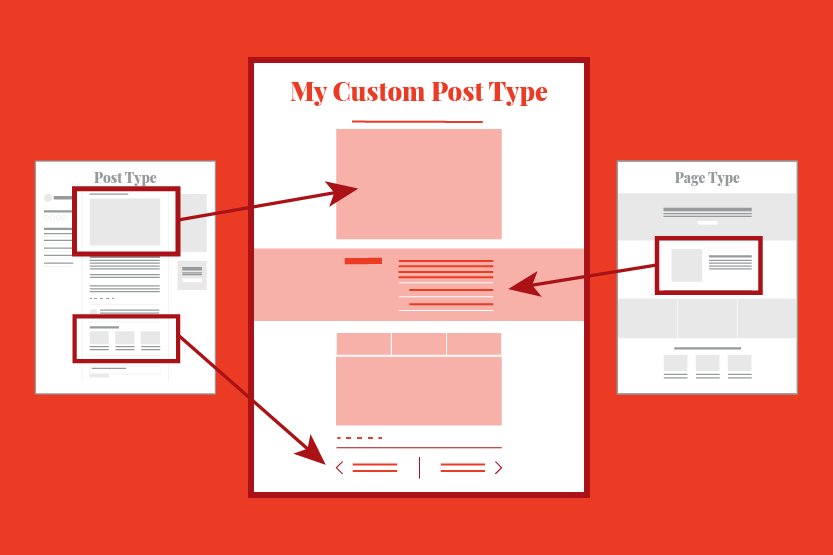
Custom post types offer several compelling advantages that make them worth incorporating into your WordPress website.
Custom post types allow you to categorize and manage different types of content more efficiently. By separating content into distinct post types, you can maintain a cleaner and more organized backend interface, making it easier to navigate and manage your content.
Tailoring your content management system with custom post types enhances the user experience for both administrators and visitors. Users can find relevant content more easily, and administrators can streamline content creation and management workflows.
With custom post types, you’re not limited to the predefined structures of blog posts and pages. You can create custom content structures that align perfectly with your website’s objectives and target audience.
Custom post types also come with custom fields, taxonomies, and other attributes that extend the functionality of your website.
For example, a custom post type for “Events” might include fields for date, time, location, and RSVP link, providing visitors with all the information they need in one convenient location.
Additionally, custom post types can help you create more targeted and relevant content, which can lead to higher rankings in search results.
Transform Your Website with Custom Post Types
Our expert developers create pixel-perfect websites seamlessly integrating custom post types to showcase your content in a unique and engaging way.
Creating Custom Post Types in WordPress
Let’s explore two methods for creating custom post types: one using a plugin for a beginner-friendly approach, and the other involving manual code implementation for more advanced users.
Method 1: Create a Custom Post via Plugin
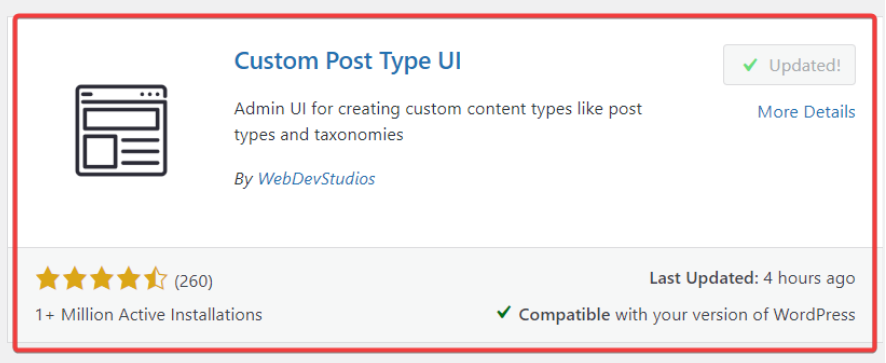
Install and Activate the Plugin
- Start by navigating to the “Plugins” section in your WordPress dashboard. Click on “Add New” and search for “Custom Post Type UI.” Once you’ve found it, click “Install Now” and then “Activate” to enable the plugin.
- After activation, you’ll notice a new menu item labeled “CPT UI” in your WordPress dashboard. Click on this menu item to access the Custom Post Type UI plugin.
- Within the Custom Post Type UI interface, click on “Add/Edit Post Types” to begin creating your custom post type.
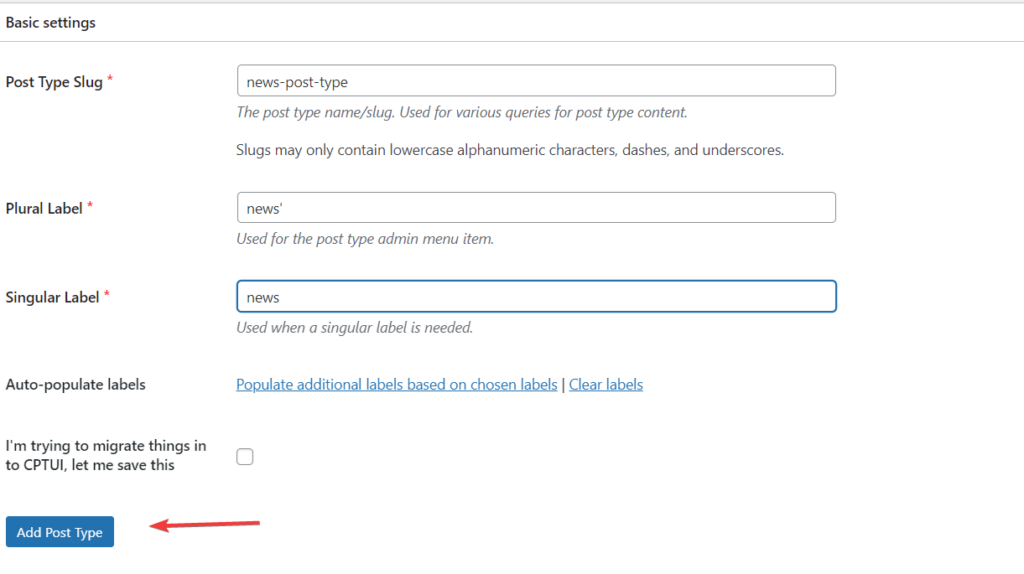
Fill in Post Type Details
- Post type slug is a required field and must be unique. It’s typically a lowercase string with no spaces, such as “portfolio” or “testimonial.”
- Provide names for your custom post type that will appear in the WordPress dashboard, both in singular and plural forms.
- Once you’ve filled in the necessary details, click on the “Add post type” button to create your custom post type.
- Your newly created custom post type should now be visible in the WordPress dashboard. You can start adding new content to it by clicking on the corresponding menu item.
Customizing Your Custom Post Type
To add content to your custom post type, navigate to “Add New” under the custom post type menu. Here, you can input the relevant details for your content.

To add some more elements, for example, if you want to include a quote or a contact form on your custom post type page:
- Click on the “+” (plus) sign to add a new block.
- Select “Pull Quote” or “Contact Form 7” from the available blocks.
- Customize the content as needed.
- Click on the “Publish” button to save your changes.
Method 2: Create WordPress Custom Post Manually
This method involves adding code to your theme’s functions.php file, which may not be suitable for beginners. Here we will use WPCode plugin to add custom code to WordPress website easily.
Install and Activate WPCode Plugin
- Navigate to the “Plugins” section in your WordPress dashboard, click on “Add New,” and then search for “WPCode.”
- Once found, click on “Install Now” and then “Activate” to enable the plugin.
- After activating the plugin, you’ll find a new menu item labeled “Code Snippets” in your WordPress dashboard. Click on this menu item to access the WPCode plugin.
Adding a New Snippet
- Hover over “Add Your Custom Code (New Snippet)” and click on “Use Snippet.”
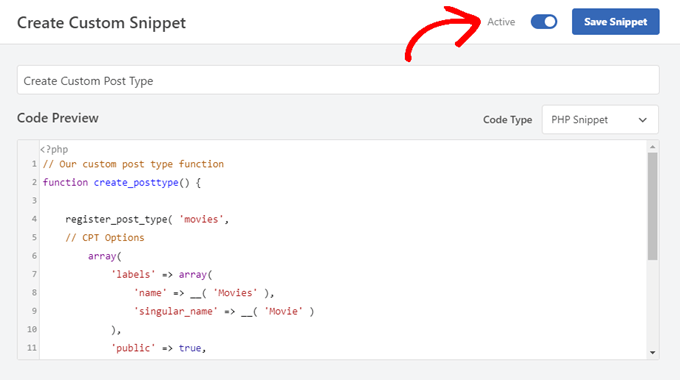
- You’ll be directed to the “Create Custom Snippet” screen.
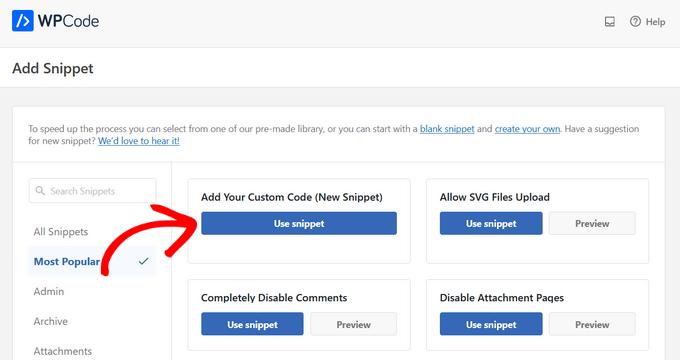
Creating Your Snippet
- Give your code snippet a title for easy reference.
- Toggle the switch to “Active” to enable the snippet.
Inserting Custom Code
In the “Code Preview” area, paste the following code snippet:
// Our custom post type function
function create_posttype() {
register_post_type( ‘movies’,
// CPT Options
array(
‘labels’ => array(
‘name’ => __( ‘Movies’ ),
‘singular_name’ => __( ‘Movie’ )
),
‘public’ => true,
‘has_archive’ => true,
‘rewrite’ => array(‘slug’ => ‘movies’),
‘show_in_rest’ => true,
)
);
}
// Hooking up our function to theme setup
add_action( ‘init’, ‘create_posttype’ );
Now, if you want to create a custom post type other than movies, replace “movies” with your desired slug and “Movies” with your desired name.
After customizing the code snippet, click the “Update” button to save your changes.
This method gives you complete control over the customization of your post type, but it’s important to exercise caution when modifying your theme’s functions.php file.
Displaying Custom Post Types
Once you’ve created custom post types to organize your content, the next step is to showcase them on your WordPress website for visitors to see. Here we’ll walk you through the process of displaying your custom post types using various methods, making it easy for you to highlight your unique content in a user-friendly way.
Using Default Archive Template
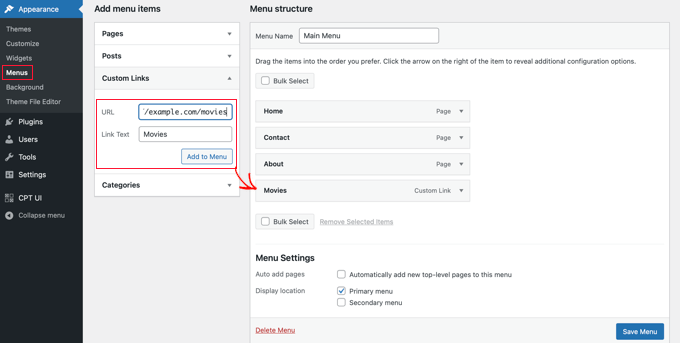
To show your custom post types on your site, follow these steps:
Add Custom Link to Menu: Go to “Appearance” » “Menus” in your WordPress dashboard. Add a custom link to your menu, using your custom post type’s URL. For example, if your custom post type is “Movies,” the URL would be something like http://example.com/movies. Don’t forget to replace “example.com” with your domain name.
Save and View: Save your menu, then visit your site’s front end. You’ll see the new menu item you added. Click on it to view your custom post type’s archive page, which uses the archive.php template from your theme.
Creating Custom Post Type Templates
If you’re not satisfied with the appearance of your custom post type’s archive page, you can create a dedicated template:
In your theme directory, create a new file named archive-movies.php (replace “movies” with your custom post type name).
Copy the contents of your theme’s archive.php file into archive-movies.php, then customize it as needed.
Now, whenever someone accesses the archive page for your custom post type, WordPress will use this template to display it.
Displaying Custom Post Types in Widgets
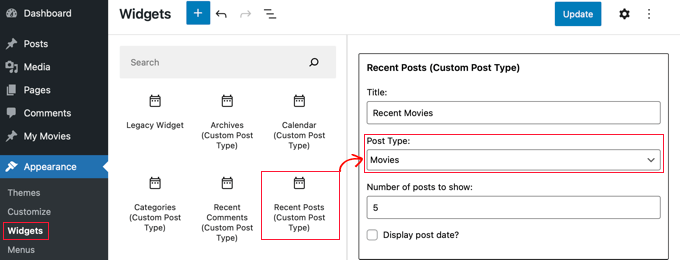
You can also showcase your custom post types in widgets using the Custom Post Type Widgets plugin:
Install and activate the Custom Post Type Widgets plugin.
Go to “Appearance” » “Widgets” in your dashboard. Drag and drop the “Recent Posts (Custom Post Type)” widget to a sidebar.
Choose your custom post type from the “Post Type” dropdown and select your desired options.
Click “Update” and then visit your website to see the widget in action, displaying recent entries from your custom post type.
With these methods, you can effectively display your custom post types on your WordPress site, giving your visitors easy access to your specialized content.
Summary
So, in this guide, we’ve delved into the world of custom post types in WordPress, exploring how they empower you to organize and present your content in a way that best suits your website’s needs.
Next, we discussed two methods for creating custom post types: using plugins for a beginner-friendly approach and manually adding code for more advanced users. Whether you opt for the simplicity of a plugin or the flexibility of manual implementation, you have the power to tailor your content management system to your exact specifications.
Once you’ve created your custom post types, we explored various methods for displaying them on your WordPress site. From using default archive templates to creating custom post type templates and incorporating them into widgets, you have a range of options to showcase your content in a visually appealing and user-friendly manner.
Custom post types aren’t just about organizing content—they’re about enhancing the overall user experience on your website.
In conclusion, mastering custom post types in WordPress opens up endless possibilities for content creation and presentation.


