Hiding the author’s name from WordPress blog posts offers a multifaceted approach to online content creation. It underscores the significance of safeguarding personal privacy in an interconnected world, as bloggers balance sharing valuable insights with protecting individual identities.
As a WordPress user, you may want to disguise your identity for various reasons, such as protecting your privacy or maintaining a professional brand. Fortunately, WordPress makes this task easy. You can easily hide the author’s name from WordPress blog posts with a few simple steps, including the publishing date.
At the core of this – how to hide the author in WordPress – guide is a simple concept: separating the WordPress user account from the one associated with your blog posts. This way, no one can trace the posts back to you. To do this, you’ll need to create a new username for your blog posts and then hide the author name from the post itself.
Contents
ToggleWhy Hide Author’s Name in WordPress Blog Posts?
Hiding the author’s name from WordPress posts can serve several purposes. Here are the main reasons behind this practice:
Privacy Concerns and the Need to Protect Personal Information
One of the primary reasons for hiding the author’s name in WordPress posts is to address privacy concerns and protect personal information. Not all bloggers may be comfortable sharing their full names publicly due to potential privacy risks.

Revealing real names can expose authors to unwanted attention, unsolicited communications, or even potential identity theft. By keeping author names hidden, bloggers can maintain a level of anonymity and safeguard their personal data from being easily accessible to a wide online audience.
Read: How To Delete Invisible WordPress Admin Users
Maintaining a Brand-Neutral or Team-Based Blog Identity
Some WordPress blogs aim to create a brand-neutral or team-based identity, where the focus is on the content rather than the individual authors. This approach is common in blogs that cover diverse topics and want to present a cohesive image.

By concealing individual authors’ names, the content becomes more about the collective knowledge and expertise of the blog rather than the identity of a single person. This can help establish a consistent and unified voice, which is particularly useful for collaborative or organizational blogs.
Avoiding Bias or Prejudice Based on the Author’s Identity
Hiding author names in WordPress blog posts can also help mitigate bias or prejudice that might arise based on the author’s identity. Readers often form opinions or judgments about content based on the perceived background, gender, ethnicity, or other characteristics of the author.

Keeping author names anonymous shifts the focus entirely to the content if you have multiple staff members. This approach encourages readers to engage with the presented ideas rather than making assumptions or forming opinions based on the author’s personal traits.
Related: How To Add New Users To Your WordPress Website
How to Hide the Author in WordPress: Step-by-Step Guide
By following these steps, you can make an informed decision about hiding author names on your WordPress posts.
Utilizing a Pseudonym or Alias for the Author’s Name
Utilizing a pseudonym or alias for the author’s name in WordPress can provide a balance between privacy and maintaining a personal connection with readers. Here’s how you can achieve this:
WordPress Plugin Method for Managing Pseudonyms

Start by researching and selecting a suitable WordPress plugin that allows you to manage pseudonyms or aliases for post authors. There are several hide author plugins like Simple Author Box and PublishPress Authors available that offer this functionality. Look for ones with positive reviews, recent updates, and features that align with your needs.
Configuring the Plugin and Setting up an Alias for the Author
For instance, if you have chosen the Simple Author Box plugin, here are the steps for configuring this plugin to set up an alias for the author on your WordPress blog.

Step 1: Install and Activate the Plugin
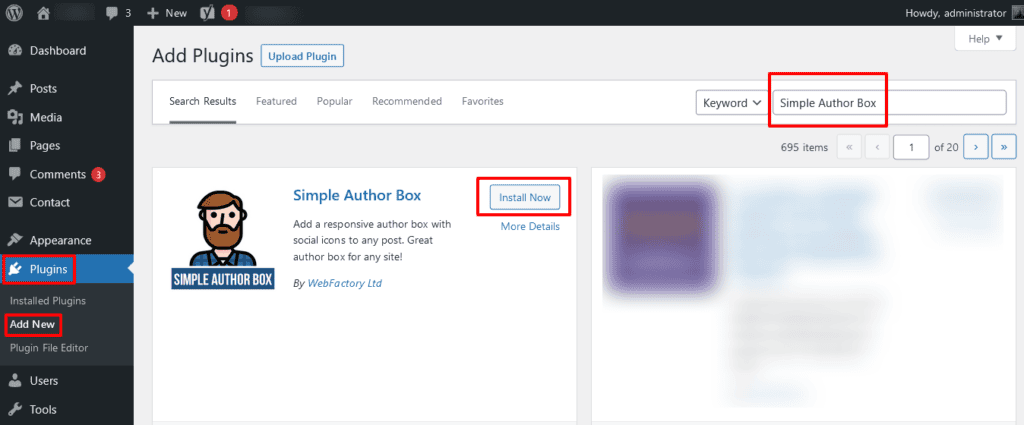
Log in to your WordPress dashboard. Navigate to Plugins > Add New. Search for “Simple Author Box” using the search bar. Install and activate the plugin.
Step 2: Access Plugin Settings
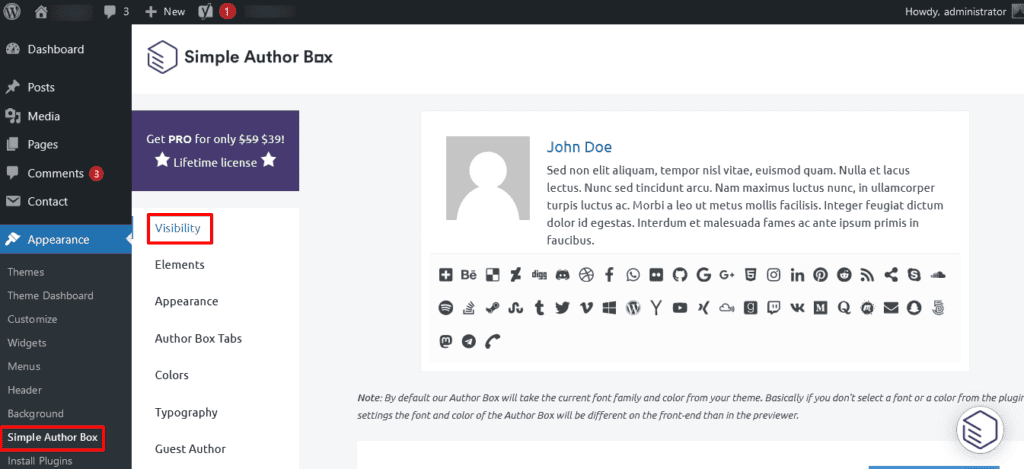
After activating the plugin, click “Settings,” look for “Simple Author Box” in the dropdown menu and click on it.
Step 3: Configure Pseudonym Options
In the plugin settings, you’ll find various options for customizing the author box’s appearance, including the pseudonym. Find the ‘Visibility’ section related to the author’s name and pseudonym.
Step 4: Setting Up an Alias
Turn on the “Manually insert the Simple Author Box” to enter the desired alias for the author. Once you’ve entered the generic name, save your changes by clicking on ‘Save Settings.’

Step 5: Check Post Display
Go to a blog post where you want the generic name or pseudonym to appear. In the post editor, ensure the generic name or alias is correctly displayed as the author’s name.
Depending on the plugin version and settings, you can customize the author’s bio alongside the post. Look for options to add a bio, avatar, and other relevant information. Also, preview the blog post to see how the author’s pseudonym and bio appear to readers. If necessary, go back to the plugin settings to make any adjustments to the generic name or bio.
Read: Best WordPress AI Plugins
Advanced Methods to Hide Author Name From WordPress Posts
If you want to take an advanced approach to hide the author name from WordPress posts, you can utilize the custom CSS method. This method involves adding custom code to your WordPress theme files to control the display of author names. Here’s how you can do it.
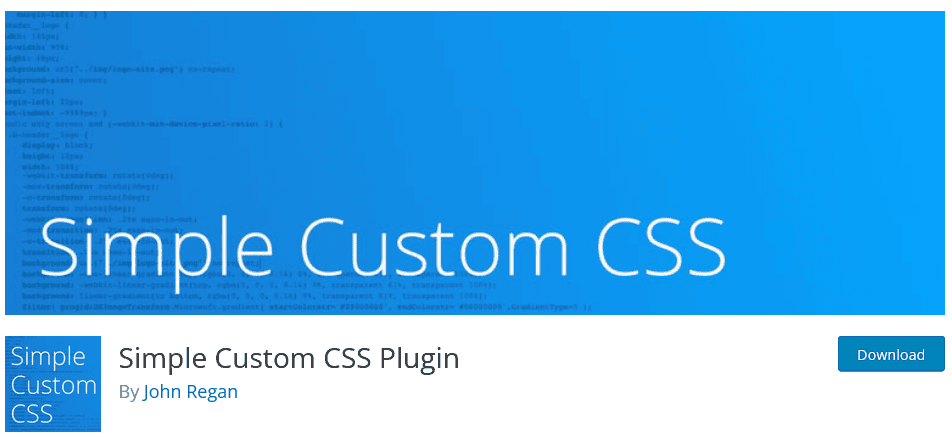
Use a Simple Custom CSS Plugin
By using a custom CSS plugin to hide the author’s name, you have more control over the visual elements of your blog. However, remember that changes made through custom CSS might not be theme-proof and could be affected by future theme updates or changes. So, always monitor your site’s appearance after making such modifications.
Step 1: Install and Activate a Custom CSS Plugin
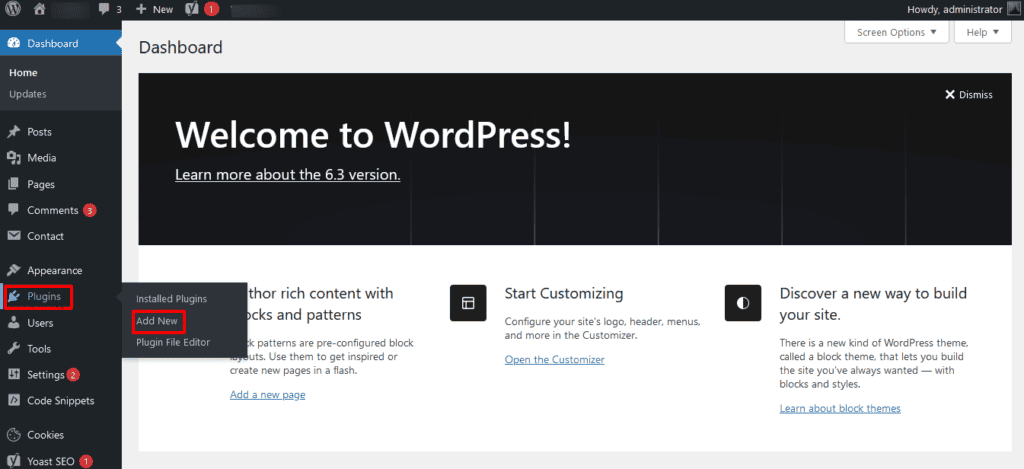
Log in to your WordPress dashboard. Navigate to Plugins > Add New. Search for “Simple Custom CSS,” install and activate the plugin.
Step 2: Access Custom CSS Settings
After activating the plugin, you’ll typically find a new menu option in your dashboard, often labeled as “Custom CSS” or similar. Click on this option to access the custom CSS settings.
Step 3: Enter Custom CSS Code
You’ll have a text area to enter your custom CSS code in the custom CSS settings. Write CSS code that targets the author name element and hides it. The exact code will depend on your theme’s HTML structure.
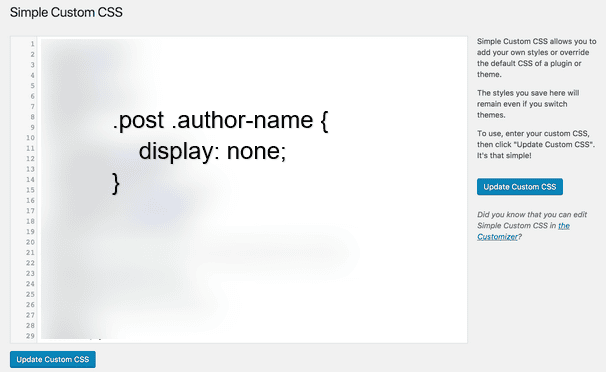
Here’s a general example:
.post .author-name {
display: none;
}
Replace .post .author-name with the appropriate CSS selector for your WordPress theme. You might need to inspect the HTML code of your posts to identify the correct selector.
Step 4: Save Changes and Check Post Display
After entering the custom CSS code, save your changes using the “Save” or “Update” button. Go to a blog post where you want to hide the author’s name. Check whether the author’s name is hidden when viewing the post.
If necessary, return to the custom CSS settings to adjust the code. Also, preview the changes and ensure they’re applied consistently across all your posts.
Note: Advanced methods like using custom CSS require a basic understanding of CSS coding and how it affects the appearance of your WordPress website. Always backup your website and test changes in a safe environment before applying them to your live site.
Read: How To Add Custom CSS In Elementor
Add Custom CSS to Hide Author’s Name in Blog Post
Customizing your website’s appearance through custom CSS gives you precise control over various design elements, including hiding the author’s name. Follow these steps to manually remove a particular author from WordPress post:
Step 1: Access Your WordPress Dashboard
Log in to your WordPress dashboard. Go to Appearance > Customize. This will open the WordPress Customizer tool.
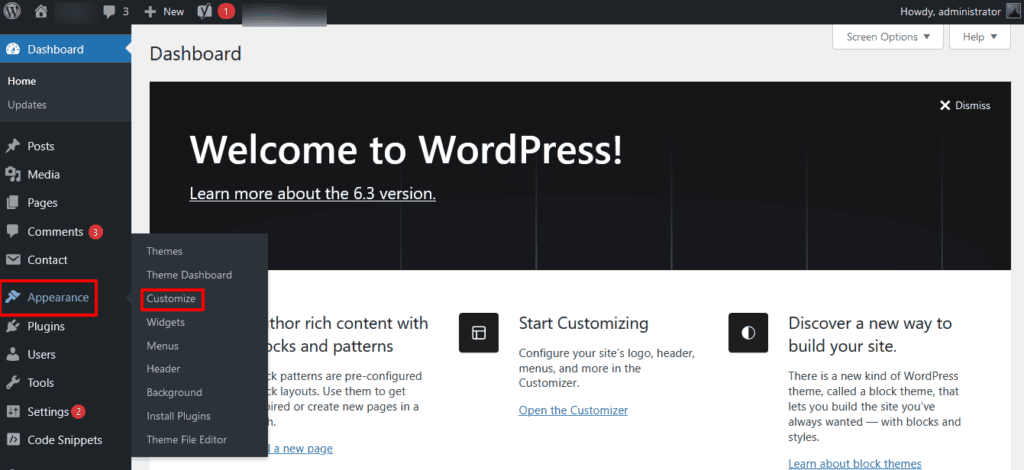
Step 2: Open Additional CSS Section
Inside the Customizer, look for the “Additional CSS” option. This is where you can add your custom CSS code. In the “Additional CSS” section, you’ll find a text box to enter your custom CSS code. Write CSS code that targets the element containing the author’s name.

Here’s a general example:
.post .author-name {
display: none;
}
Replace .post .author-name with the appropriate CSS selector for your theme. You might need to inspect the HTML structure of your posts to identify the correct selector.
Step 3: Preview and Save Changes
After entering the CSS code, click the “Preview” button to see how it affects your website’s appearance. If you’re satisfied with the preview, click the “Save” button to apply the changes.
Go to a blog post to see if the author’s name is now hidden. The author’s name should no longer be visible if the CSS code is correct.
If needed, return to the “Additional CSS” section to make adjustments to the code. You can fine-tune the CSS to ensure consistent results across your posts. Keep in mind that custom CSS changes could potentially affect other elements of your site. Regularly check your website’s appearance to ensure the desired changes are applied correctly.
Read: How To Remove Unused CSS In WordPress
How to Replace the Author’s Name in All WordPress Posts?
You’ll likely need to use a combination of database updates and potentially a custom function to replace the author’s name from WordPress posts. Here are the steps to replace the author’s name with a generic name.
Backup Your Website

Before making any changes, create a complete website backup, including the database. This ensures you can restore your site if anything goes wrong. One of the best plugins to take a WordPress backup is UpdraftPlus.
Access Your Database
Use a tool like phpMyAdmin (usually accessible through your web hosting control panel) to access your WordPress database. Identify the tables that contain the author’s name. The main table is likely to be named wp_posts.
Run SQL Query
Run a SQL query to update the author’s name in all blog posts. The exact query will depend on your database structure and the desired changes. A sample query might look like this:
UPDATE wp_posts
SET post_author = NEW_AUTHOR_ID
WHERE post_type = 'post';
Replace NEW_AUTHOR_ID with the user ID of the new author you want to assign to all posts.
Update Author Information
If you want to change the author’s name displayed in blog posts, you might need to use custom functions and hooks to dynamically replace the author’s name. This would involve modifying your theme’s functions.php file.
Here’s a simplified example to get you started:
function replace_author_name($display_name) {
return 'New Author Name'; // Replace with the new author's name
}
add_filter('the_author', 'replace_author_name');
This code snippet changes the display name of the author in post content. You can modify this to suit your needs.
Test Extensively
After making these changes, thoroughly test your website to ensure everything works as expected. Check various posts and pages to ensure the author’s name replacement is consistent.
Note: Modifying your WordPress database directly can be risky and may lead to unintended consequences if not done correctly. It’s strongly recommended to back up your site before proceeding and consider seeking assistance from a WordPress developer.
Conclusion
When creating content, the choice to hide the author’s name from WordPress blog posts signifies a commitment to exploring new avenues without compromising personal integrity. As privacy concerns grow, concealing author names prompts us to evaluate the trade-offs between transparency and anonymity critically. It also reinforces the need to find innovative ways to engage audiences while upholding ethical standards.
Whether achieved through the hide author plugins, CSS customization, or alternative authorship methods, hiding the author name from WordPress posts emphasizes that digital landscapes can be shaped to suit unique objectives while respecting privacy boundaries.
Require assistance to hide the author’s name from WordPress blog posts? Our expert WordPress development services cover all your WordPress-related needs. Let us help you implement this feature seamlessly, ensuring your content maintains a professional and polished appearance. Connect with us today to explore how we can elevate your website’s privacy while enhancing user experience.


