


It’s easy to use Google Fonts in WordPress. It’s a free directory of over 800 web fonts you can use on your website. The Google Fonts service is a top-rated free service used by millions of WordPress websites to enhance their website appearance and usability. Here’s how to use Google fonts on WordPress without compromising site performance & improving your PageSpeed scores.
Method 1: Host Google Fonts on your WordPress Server
Step 1: Choose A Google Font
Using fewer Google Fonts will reduce requests (fewer fonts = fewer requests).
Select Font Weights Carefully – The number of font weights you use will also affect the speed at which your page loads. To ensure that Google Fonts only load the weights you need, uncheck the others so that only the consequences you need are packed.
Step 2: Download The Font
Downloading the font is the second step in the process. It is important to note that Google will automatically download all font weights, so selecting font weights is not required at this stage. Instead, the selection of font weights is needed for step three.
Step 3: Convert Fonts To Web Fonts
Click the Add Fonts button on their site, select only fonts you will use on your website, and upload them. It is a roboto-regular.ttf file and a roboto-bold.ttf file, so both weights are included. As WOFF and WOFF2 cover all significant browsers, leave the settings as they are. Click the Convert button to begin the conversion process.
Step 4: Download Converted Font Files
As soon as the fonts have been converted, you can download them. Since two fonts have been downloaded to our computer, we will have a total of 4 font files in the zip file (since we downloaded two fonts, we will have four font files in the zip file).
Step 5: Upload Font Files To WordPress Files
Please ensure the web font files are uploaded via FTP or cPanel, ideally in the wp-content/uploads folder, to avoid being overwritten by theme and core updates. We uploaded the fonts to a “fonts” folder (so they would be separated from other files). You should be able to download the fonts after you open the links in your browser, so you can confirm they were successfully uploaded.
Step 6: Add Custom Font To CSS
After downloading the zip file, we will add the stylesheet.css CSS in the file. The CSS code below connects your fonts to your existing CSS and makes them available.
You can place the CSS code in functions.php or start your style.css file. An external CSS file or WordPress’ wp_enqueue_style function can be used in the CSS code. In the default style.css file of the theme, we’ll paste it. Replace any relative URLs with absolute URLs by copying/pasting the code into the stylesheet.
Theme default URLs in stylesheet.css:
src: url(‘Roboto-Bold.woff2’) format(‘woff2’),
url(‘Roboto-Bold.woff’) format(‘woff’);
Change to:
src: url(‘https://demo.com/wp-content/uploads/fonts/Roboto-Regular.woff2’) format(‘woff2’),
url(‘https://demo.com/wp-content/uploads/fonts/Roboto-Regular.woff’) format(‘woff’);
To easily use the font in the current HTML, create a custom class. CSS Classes roboto_font and roboto_bold_font.
.roboto_font {
font-family: “Roboto”, “Arial”, sans-serif; }
.roboto_bold_font {
font-family: “Roboto”, “Arial”, sans-serif;
font-weight: bold;
}
Step 7: Set The Default Font
To make this font the default font on your website, you must include the CSS code in your style.css file.
You may have to debug or edit the font to replace existing font-family properties.
The next step is to upload the stylesheet.css file you have obtained inside your file named stylesheet.css and add the CSS. The CSS code below will make your fonts work with your existing CSS and be ready to be used as soon as you enter it. You can use an external stylesheet or the WordPress function wp_enqueue_style to enqueue stylesheets.
Method 2: Preload Web Fonts – Above the Fold Optimization
If you’re using Google Fonts, you may need to refer to the style sheet that was prepared by Google and sent to your WordPress website from Google’s servers. When you use the developer tool offered by Google Chrome to inspect your website, you may get a glimpse of the process behind the scenes. There is a possibility that you may see two entries for Google Fonts inside Source.
Please see the picture that has been attached here.
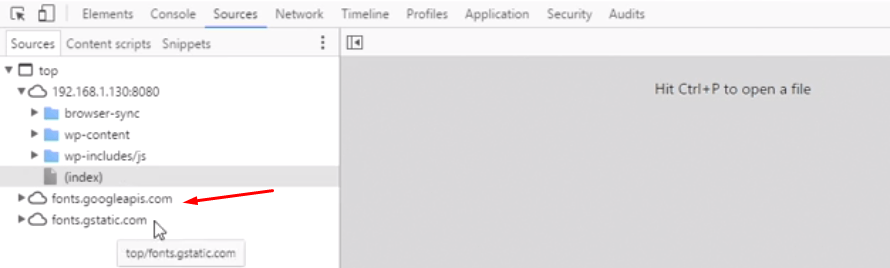
When you click on the fonts.googleapis link, you will learn that the stylesheet for which you produced the URL is shown on the open page. In addition, a call is made to the specific font file for every font-face declaration.

This indicates that the user has to visit fonts.gstatic.com to get the necessary weight for the font if a different font-weight is used. This step may lengthen the time it takes for your WordPress page to load.
Therefore, access the functions.php file for your current theme, and enter the following PHP code within the function that is responsible for managing fonts.
function twentyeleven_resource_hints( $urls, $relation_type ) {
if ( wp_style_is( ‘rumi-fonts’, ‘queue’ ) && ‘preconnect’ === $relation_type ) {
$urls[] = array(
‘href’ => ‘https://fonts.gstatic.com’,
‘crossorigin,’
);
}
return $urls;
}
add_filter( ‘wp_resource_hints’, ‘twentyeleven_resource_hints’, 10, 2 );
Method 3: Optimize Google Fonts WordPress Using Plugin
Plugins, as is the case with most WordPress-related tasks, make it much simpler to optimize Google Fonts. In addition, they will take care of the software aspect for you, so you won’t have to be concerned about where the code should go in the system.
If you have Google Fonts installed on your WordPress website and run a performance test using PageSpeed Insights or GTmettrix, you will get the following error message: fonts.googleapis.com.
It occurs because Google Fonts are not compatible with the WordPress platform. It indicates that your WordPress site needs to have its Google Fonts optimized.
A free plugin can be used for the fixation of the same. It is – OMGF | Host Google Fonts Locally
After completing the installation, the plugin will immediately begin switching the WordPress wp en queue script()Google Fonts method to the wp head() function. This plugin does everything on its own.
Find more such articles at Seahawk Media.

