


How can you ensure your visitors can load your links instantly? You need a technology called link loading. It automatically preloads your links so your visitor can see the content as soon as they click on them. The purpose of this post is to provide instructions on how to add preload links to WordPress blogs.
The purpose of this post is to provide a detailed explanation of how to preload links in WordPress.
Why Preload Links in WordPress?
It is possible to set the browser to preload the link in the background to speed up loading times. The visitor finds the link already loaded when clicking on the link. Whenever a visitor finds everything quickly on your website, he is likely to stay on it. Therefore, you will receive considerable benefits in terms of SEO as a result of this.
If your internal pages are preloaded, you are more likely to have visitors stay on your website for a more extended period and view more pages due to your website being a faster site. Therefore, you can improve your WordPress SEO by increasing your website’s speed.
While there are many things you can do to make your WordPress website faster, link preloading is one of the easiest things you can do, and it can be a big help for your website’s speed.
However, if you are going to set up preloading in the right way, you’ll need to make sure you avoid some common errors. For example, having too aggressive settings and preloading all your internal links could have the opposite effect and even cause your server to crash.
How to Preload Links in WordPress: Using Flying Pages Plugin
The first thing to do is to download the plugin Flying Pages and install it in your WordPress dashboard.

Now from your WordPress dashboard, navigate to Settings -> Flying Pages and select the Flying Pages option. Please check the plugin configuration under the settings tab, and if changes need to be made, please do so.
The first option you are presented with is ‘Delay to start preloading.’ As a default, this option has a value of 0, but you do have the option to change it, but we suggest keeping it as it is. Increasing the number will cause a delay in the start of the process if you grow it.
As a result, you need to choose the maximum number of requests per second since the lower the number, the less impact this will have on your server. The default value is acceptable as long as you don’t have an extensive website with a large number of visitors at once.
It is up to you whether to keep the other settings as they are or to change them according to your requirements. Don’t forget to hit the Save Changes button at the end of the process so that your changes are saved.
How To Preload Key Requests: Fonts, JS & CSS
Preloading resources is a technique that can be used to improve the performance of your web page. By preloading key requests, you can ensure that the necessary resources are available when the user needs them. CSS, JS, and fonts are all examples of resources that can be preloaded. To preload CSS, you can use the @font-face rule. For JavaScript, you can use the PreloadJS library. And for fonts, you can use Font Awesome or Google Fonts.

How to Preload CSS
Here is a syntax to preload key requests of CSS files:
<link rel=”preload” href=”style.css” as=”style”>
Preload JS
This is a syntax to preload key requests of JavaScript files:
<link rel=”preload” href=”main.js” as=”script”>
Preload Fonts
The syntax to preload key requests of font files will be like this:
<link rel=”preload” href=”font.woff2″ as=”font” type=”font/woff2″ crossorigin>
Google Fonts
Below is a syntax to preload key requests of Google font:
<link rel=”preload” href=”https://fonts.googleapis.com/css2?family=Roboto&display=swap” as=”style” crossorigin>
Font Awesome
This is a syntax to preload key requests of Font Awesome:
<link rel=”preload” href=”/wp-content/theme/fonts/fontawesome-Webfont.woff2” as=”font” crossorigin>
These are the most common types of files which you will notice in the preload key requests warning of Google PageSpeed Insights.
The above methods can help fix the preload key requests warning of Google PageSpeed Insights. You can apply these methods to any website.
Summary: Preloading fonts
<link rel=’preload’ href=’/image.png’ as=’image’>
<link rel=’preload’ href=’/style.css’ as=’style’>
<link rel=’preload’ href=’/script.js’ as=’script’>
<link rel=’preload’ href=’/font.woff2′ as=’font’ crossorigin>
Preload Key Requests Using WordPress Plugins
You can preload key requests in WordPress by using preload key requests WordPress plugins like the Pre* Party Resource Hints, Autoptimize, WP Rocket, and Asset CleanUp etc. These Plugins will help fix the preload key requests WordPress warning.
Here are the most popular plugins with the preload key requests feature.
Pre* Party Resource Hints
Pre* Party Resource Hints is one of the best plugins that gives you plenty of controls and the ability to add critical resources that you want to be preloaded visually.
Install & activate this plugin on your WordPress site, then go to the Pre* Party menu from your WordPress dashboard. There you will find the following screen.

You will see the Add New Resource Hint box on the plugin settings in the Insert Hints tab. To preload an asset, go to the PageSpeed Insights report to find the preload key requests warning.
WP Rocket
Preload key requests is a great way to improve the performance of your WordPress site. WP Rocket is a popular plugin that can help you with this. It is easy to use and has many features that can help you improve your site’s performance.
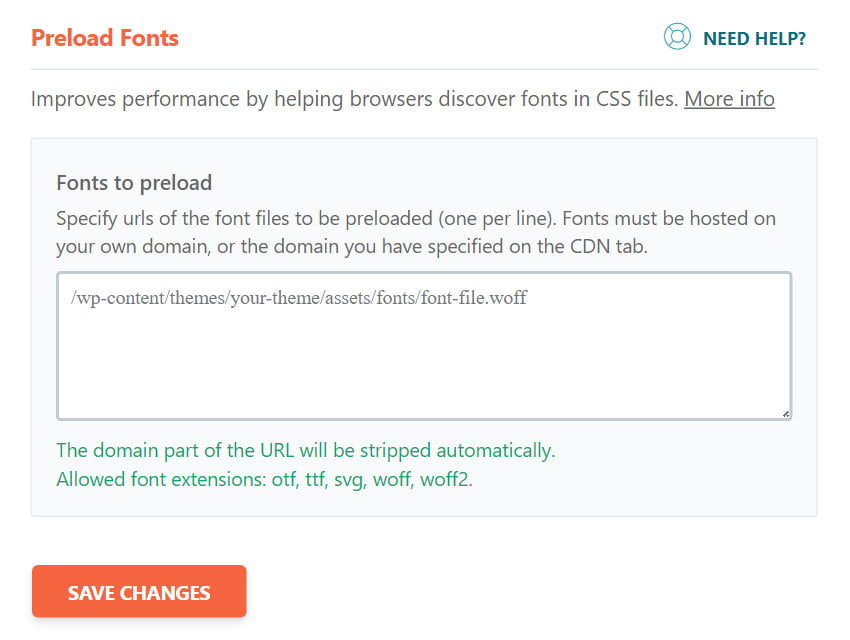
Go to Settings > WP Rocket > Preload from your WordPress dashboard to preload key requests in WordPress using the WP Rocket plugin. Then scroll down to the bottom of the page, where you will see the Preload Fonts section.
Autoptimize
If you’re looking to improve the performance of your WordPress site, one of the first things you should do is install the Autoptimize plugin. Autoptimize speeds up your website by optimizing your CSS and JavaScript files. It also minifies HTML and caches your pages, loading them faster for repeat visitors. One of the most popular features is its preload key requests option for WordPress sites.

From your WordPress dashboard, go to Settings > Autoptimize > Extra to preload key requests using Autoptimiz. All you need to do is enter the links on tha box which you got from the preload key requests warning in PageSpeed Insights. Ensure that you separate multiple links with commas.
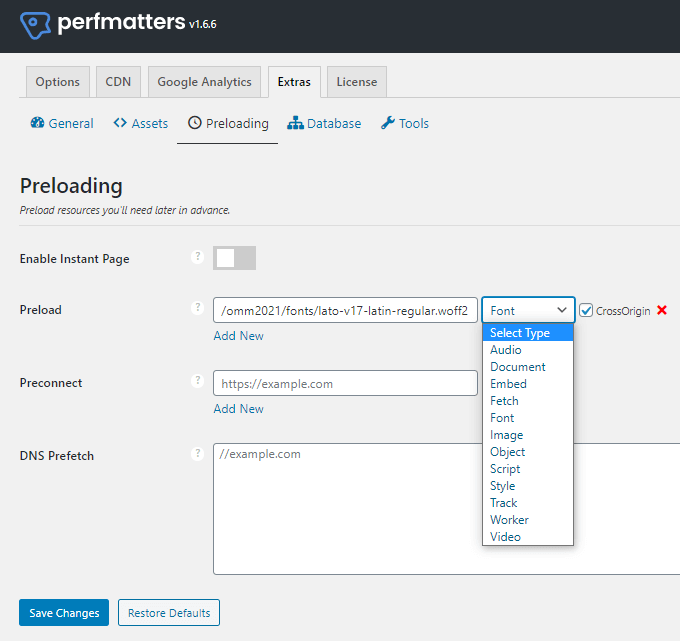
Perfmatters
This premium plugin gives preload, preconnect, and prefetch options. You can check these in the Perfmatters Settings→Extras→Preloading.
The preloading of links & requests on your website has now been successfully enabled.
You can find more articles like this at Seahawk Media.


