Two things keep store owners up at night before a WooCommerce migration: losing customer data and losing search rankings.
Both fears are legitimate. Both are preventable with the right process.
Most migration guides cover one or the other. This one covers both, from the pre-migration audit through the 30-day post-launch monitoring window. Follow this process, and your store arrives at the destination with its data intact, its URLs redirected, and its rankings protected.
The WooCommerce migration process is the structured method of moving a WooCommerce store to a new platform, host, or domain while preserving store data, checkout functionality, and SEO rankings.
A complete migration includes a pre migration audit, full backups, staging setup, data transfer, redirect mapping, payment gateway testing, DNS and SSL verification, search engine resubmission, and post launch monitoring.
Skipping any step can lead to broken checkout flows, lost data, or SEO ranking drops.
What the WooCommerce Migration Process Moves
Before starting, understand exactly what data the migration needs to transfer. Missing a data type in the planning stage means discovering it is missing after go-live.
Data that transfers in a WooCommerce migration:
- Products: name, SKU, description, images, variants, pricing, stock status, categories, and tags
- Customers: name, email, billing and shipping addresses, and account credentials
- Orders: order ID, date, status, line items, totals, tax, shipping, and customer association
- Product reviews: rating, reviewer name, comment, and date
- Coupons: discount type, amount, usage limits, and expiration dates
- SEO metadata: meta titles, meta descriptions, and canonical URLs (requires Yoast SEO or Rank Math on the destination)
- Categories and tags: names, slugs, descriptions, and hierarchy
Data that requires extra planning:
- Customer passwords: encryption differences between platforms may require customers to reset passwords after migration
- Downloadable product files: file paths change when moving hosts and require remapping
- Custom fields and product attributes: non-standard fields built with ACF or custom code need manual mapping
- Subscription data: WooCommerce Subscriptions data, including billing cycles, renewal dates, and payment tokens, requires specialist migration
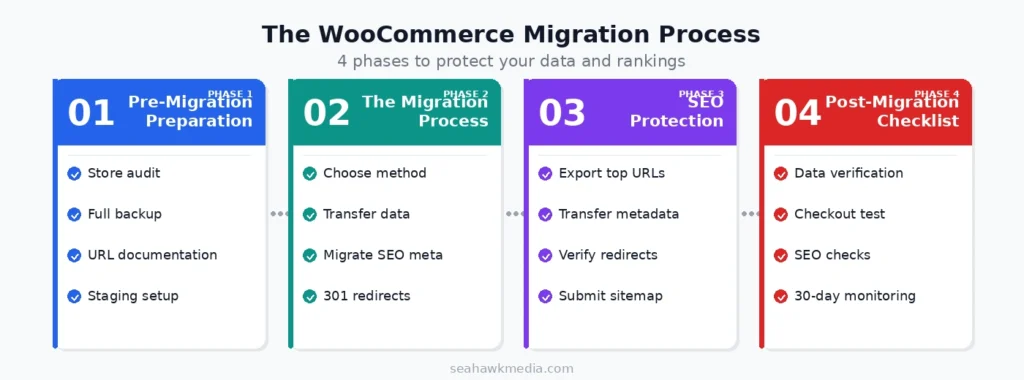
The 4 Phases of the WooCommerce Migration Process
Each phase builds on the one before it. Skipping or reordering them is the most common reason WooCommerce migrations lose data or rankings.
Phase 1: Pre-Migration Preparation
A migration that starts without proper preparation is one that finds problems in production rather than in staging. Every item in this phase should be completed before any data moves.
Run a Full Store Audit
Document your current store state before touching anything. This audit becomes your verification checklist after migration.
Record the following counts from your current store:
- Total products (including variations)
- Total customers
- Total orders (by status)
- Total categories and tags
- Total media files
Export your current SEO baselines from Google Search Console:
- Top 50 URLs by click volume
- Current index coverage report
This baseline is what you compare against in the 30 days after migration. Without it, you cannot know whether a ranking change is a migration issue or a normal fluctuation.
Create a Full Backup
Before any migration step, create a complete backup of your current store. This includes:
- WordPress files (all directories including wp-content)
- MySQL database (full export, not just WooCommerce tables)
- Media library (all uploads)
Store the backup in at least two locations: your local machine and a cloud storage provider separate from your hosting server. A backup stored only on the same server you are migrating from is inaccessible if that server fails.
Document Your Current URL Structure
Every product, category, and page URL in your current store needs to be mapped to its new equivalent. This mapping drives the 301 redirect configuration that protects your SEO.
Export your current sitemap and save it as a reference document. If you are migrating from a non-WooCommerce platform, the differences in URL structure will be significant. If you are moving between hosts or domains on WooCommerce, the difference may be minimal.
Set Up a Staging Environment
Create a staging environment that mirrors your destination hosting setup. Most managed WordPress hosts (Kinsta, WP Engine, Cloudways) include one-click staging. If your host does not, use WP Staging to create a staging copy on a subdomain.
Every migration step, from data transfer to checkout testing, should be completed in staging before it is applied to the live store.
Need Your WooCommerce Migration Done Right?
Seahawk handles the complete WooCommerce migration process: audit, data transfer, redirects, payment gateway testing, and post-launch monitoring. Zero downtime. No data loss. Migration services from $499.
Phase 2: The WooCommerce Migration Process
Done in the right order, this phase takes 2 to 5 hours for most stores. Done out of order, it creates problems that take days to untangle.
Step 1: Choose Your Migration Method
Three methods exist for migrating a WooCommerce store. Your choice depends on store size, technical comfort level, and whether you are migrating between platforms or between hosts.
Automated migration tools (Cart2Cart, LitExtension, All-in-One WP Migration) handle data transfer between stores through a dashboard interface. They work well for standard product and order data and can process thousands of products per hour. They require a connector file installed on both the source and destination stores. Expect to spend 1 to 4 hours on a typical mid-size catalog.
Manual migration via CSV works for small stores with straightforward catalogs. Export products from WooCommerce using the built-in exporter, format the CSV to match the destination’s import template, and import. Repeat for customers and orders using a plugin like Customer/Order/Coupon Export. This approach gives maximum control but requires careful field mapping and becomes impractical above a few hundred products.
Professional migration services handle the complete process, including audit, data mapping, transfer, redirect configuration, payment gateway testing, and post-launch monitoring. Seahawk’s WooCommerce migration service starts at $499 with a zero-downtime guarantee. This is the right choice for stores where downtime or data loss carries direct revenue consequences.
Step 2: Transfer Your Data in the Right Order
Data transfer order matters. Dependencies between data types mean that importing in the wrong sequence can create orphaned records or broken associations.
Follow this sequence:
- Import product categories and tags first
- Import products (they reference categories and tags)
- Import customers (orders reference customer records)
- Import orders (they reference both products and customers)
- Import coupons
- Import product reviews (they reference products and customers)
After each import, compare your import totals against the pre-migration audit counts. A 5% discrepancy in products is acceptable for complex catalogs with unmappable custom fields. A discrepancy in orders is not.
Step 3: Migrate SEO Metadata
SEO metadata migration is the step most commonly skipped by store owners doing their first migration. Skipping it means every product and category page loses its meta title and description on the new store, which directly affects click-through rates from Google, even if rankings are maintained.
Before migrating SEO metadata:
- Install Rank Math on the destination store
- Ensure the plugin is active and configured
Migration tools handle SEO metadata transfer differently. Both LitExtension and Cart2Cart support transferring meta title and meta description. If using CSV migration, export your SEO data separately using a plugin like Rank Math’s export function, then reimport it after the main data migration.
Step 4: Configure 301 Redirects
301 redirects tell Google and every external link that your content has permanently moved. Without them, every old URL returns a 404, every ranking signal associated with that URL is discarded, and every customer who clicks an old link ends up at a dead end.
Set up 301 redirects for:
- Every product page: old URL to new product URL
- Every category page: old URL to new category URL
- Every tag archive: old URL to new tag URL
- Your homepage if the domain has changed
Use the Redirection plugin for WordPress or implement redirects directly in your .htaccess file for better performance. Never redirect old URLs to your homepage. Google treats mass homepage redirects as a soft 404 signal.
Verify every redirect resolves correctly before going live. Use Screaming Frog to crawl your old sitemap and confirm every URL returns a 301 to the correct destination.
Step 5: Re-authenticate Payment Gateways
Payment gateway re-authentication is the most commonly missed step in a WooCommerce migration and the most operationally dangerous to overlook. When your store moves to a new host or domain, the API credentials connecting WooCommerce to Stripe, PayPal, or other gateways must be reverified.
After migration:
- Go to WooCommerce > Settings > Payments
- Reconnect each active payment gateway using its API dashboard
- Run test transactions using test mode credentials
- Confirm the complete checkout flow: add to cart, checkout, payment capture, order confirmation email, order appearing in WooCommerce admin
- Check your payment processor dashboard to confirm that test transactions are registered correctly
A gateway that appears connected in WooCommerce settings but fails silently during payment capture is the worst-case scenario. Test every gateway before removing the maintenance page and opening the store to customers.
Step 6: Update DNS and Verify SSL
If your migration involves a domain change or a host move, update your DNS records to point to the new server and verify that your SSL certificate is active in the new environment.
DNS propagation takes up to 48 hours globally. During propagation, some visitors will reach the old store, and some will reach the new one. Minimize this window by lowering your DNS TTL to 300 seconds 24 hours before migration.
SSL verification is critical for WooCommerce stores. An invalid or expired certificate triggers browser security warnings that immediately block purchases. Confirm the certificate is valid and auto-renewal is configured before going live.
Phase 3: How to Protect SEO During WooCommerce Migration
Protecting search rankings during a WooCommerce migration requires specific actions at each stage. A temporary ranking fluctuation of 2 to 4 weeks is normal after any migration. A permanent decline means one of these steps was missed.
Before Migration
- Export your top 50 URLs by organic traffic from Google Search Console and save them as your monitoring list
- Crawl your current store with Screaming Frog and export all URLs, response codes, and canonical tags
- Screenshot your current search rankings for your top 10 product and category pages
- Set your destination staging site to noindex to prevent Google from indexing duplicate content during testing
During Migration
- Transfer all SEO metadata: meta titles, meta descriptions, and canonical URLs
- Implement 301 redirects for every changed URL before the new store goes live
- Match your WooCommerce permalink structure to your previous store’s structure where possible. Fewer URL changes mean fewer redirects needed
Preserve product schema markup. WooCommerce generates product schema automatically. Verify it is rendering correctly on the new store using Google’s Rich Results Test
After Migration
- Remove the noindex tag and submit your updated XML sitemap to Google Search Console within 24 hours of going live
- Monitor Google Search Console daily for the first two weeks. Watch for spikes in 404 errors, crawl anomalies, and index coverage drops
- Check that all 301 redirects return HTTP 301 status codes and do not create redirect chains or loops. Chains add latency and dilute link equity
- Monitor Core Web Vitals for performance regressions on the new host. A slower server or a missing caching configuration can cause LCP to worsen even if the migration itself was clean
Phase 4: Post-Migration Checklist
Complete every item on this checklist within 48 hours of going live.
Data verification:
- Product count matches pre-migration audit
- Order count matches pre-migration audit
- Customer count matches pre-migration audit
- All product images are loading correctly
- Product variants, pricing, and stock levels are accurate
Functionality:
- Test order completed end-to-end through each payment gateway
- Order confirmation email received
- Customer account login is working with the correct order history
- All active coupons are applying correctly at checkout
- Shipping rates are calculated correctly
SEO:
- XML sitemap submitted to Google Search Console
- All 301 redirects verified with correct status codes
- Meta titles and descriptions are present on product and category pages
- No noindex tags remaining on public pages
- The SSL certificate is valid, and HTTPS is loading on all pages
Performance:
- Caching plugin active and configured
- Core Web Vitals measured and compared to pre-migration baseline
- WP Mail SMTP is configured so transactional emails are delivered to inboxes
Common WooCommerce Migration Mistakes
Migrating directly to production. Every migration should be fully tested on staging before going live. A checkout failure discovered on a live store at 2 am is a preventable emergency.
Skipping 301 redirects. The most common cause of post-migration ranking loss. Every change to a URL without a redirect discards its accumulated SEO equity.
Not testing payment gateways. A gateway that appears configured but fails silently at payment capture can cost hours of lost orders before it is identified.
Forgetting transactional email delivery. After moving hosts, WordPress’s default PHP mail often stops delivering. Install WP Mail SMTP before going live so order confirmation and customer account emails actually reach inboxes.
Redirecting everything to the homepage. Google treats mass homepage redirects as soft 404s. Every old URL should redirect to its closest matching new equivalent.
Not verifying backup recoverability. A backup you have never restored is an assumption. Before starting any migration, test that your backup restores successfully to a staging environment.
Final Thoughts on the WooCommerce Migration Process
Every WooCommerce migration that results in data loss or ranking drops has a common cause: something that should have been planned was discovered after go-live.
The process above eliminates that problem. The pre-migration audit catches discrepancies before they become missing records. The staging environment catches checkout failures before they affect real customers. The 301 redirect configuration catches URL changes before Google discards the ranking signals attached to them.
Follow the phases in sequence. Do not skip staging. Test payment gateways before removing maintenance mode. Submit your sitemap within 24 hours of launch.
If you want the process handled by a team that has completed over 1,000 WooCommerce migrations since 2016, Seahawk’s migration service covers every phase from audit to 30-day post-launch monitoring, with a zero-downtime guarantee and no contracts.
Frequently Asked Questions About the WooCommerce Migration Process
What is the WooCommerce migration process?
The WooCommerce migration process is the structured sequence of steps for moving a WooCommerce store from one platform, host, or domain to another while preserving all store data and search engine rankings. It includes a pre-migration audit, full backup, data transfer, 301 redirect configuration, payment gateway re-authentication, and post-launch monitoring.
How long does a WooCommerce migration take?
Migration time depends on store size and the method used. Automated tools process around 3,000 simple products per hour. A typical small-to-mid-size store completes the data transfer in 1 to 4 hours. Including pre-migration preparation, staging testing, and post-launch verification, a full migration typically takes 1 to 3 business days. Professional migration services from Seahawk complete most store migrations within 2 to 5 business days.
Will a WooCommerce migration affect my SEO rankings?
A temporary ranking fluctuation of 2 to 4 weeks is normal after any migration as Google re-crawls and re-indexes your site. With proper 301 redirects, transferred SEO metadata, and a fast new hosting environment, rankings typically return to baseline and often improve within a month. Permanent ranking losses occur when redirects are missing or SEO metadata is not transferred.
What data can be migrated to WooCommerce?
A WooCommerce migration can transfer products (including variants, images, and pricing), customers, orders, product reviews, coupons, categories, tags, and SEO metadata, including meta titles and meta descriptions. Customer passwords and subscription data require additional steps and, in some cases, specialist migration handling.
Do I need a staging environment for WooCommerce migration?
Yes. Testing your migration on a staging environment before going live is essential. It allows you to verify data accuracy, test the complete checkout flow, confirm payment gateway function, and catch any compatibility issues without affecting your live store or real customers.
What is the most common WooCommerce migration mistake?
The most common mistakes are skipping 301 redirects, not testing payment gateways before going live, and migrating directly to production without staging. Skipping redirects is the primary cause of post-migration ranking loss. Skipping payment gateway testing is the primary cause of post-migration revenue loss.
How much does a WooCommerce migration cost?
DIY migration using free plugins or CSV export costs only time. Automated migration tools like Cart2Cart and LitExtension charge based on the number of records transferred, typically $50 to $200 for a mid-size store. Professional migration services at Seahawk start at $499 and include an audit, data transfer, redirect configuration, payment testing, and 30-day post-launch support.