


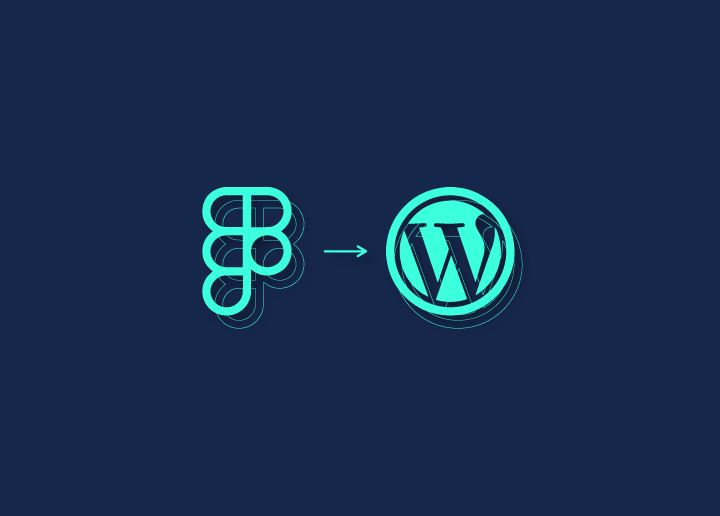
الجمع بين Figma و WordPress هو الأفضل لتصميم وتطوير موقع ويب. القاسم المشترك بين الاثنين هو أن كلاهما برنامج سهل الاستخدام وسهل الاستخدام. ومع ذلك ، في حين أن Figma هي أداة تصميم شائعة ، فستحتاج في النهاية إلى تحويل تصميمات Figma الخاصة بك إلى موقع ويب وظيفي. وهنا يأتي دور WordPress. في هذه المدونة ، سوف نتحقق من أفضل الطرق (المجانية والمدفوعة) لتحويل Figma إلى WordPress.
كيفية تحويل تصميم Figma إلى وورد؟
عندما يتعلق الأمر بتحويل Figma إلى WordPress ، فهناك عدة طرق يمكنك تجربتها. قد يتطلب البعض خبرة في HTML و CSS و PHP ، في حين أن الطرق الأخرى أكثر وضوحا. دعونا نلقي نظرة على بعض الطرق البسيطة هنا.
TL. دكتور -
إذا كنت ترغب في تحويل تصميمات Figma الخاصة بك إلى WordPress ، فإن أفضل رهان لك هو استئجار مزود خدمة محترف في WordPress. بدلا من ذلك ، يعد منشئ الصفحات هو الطريقة التالية الأفضل إذا كنت تستخدم ميزانية. ومع ذلك ، ضع في اعتبارك أن النتائج من استخدام أداة إنشاء الصفحات قد لا تكون مصقولة كما هو الحال مع المحترفين. الطريقتان التاليتان - عملية HTML والموضوع الجاهز - لهما منحنى تعليمي صعب. لذلك ، إذا كان الأمر تقنيا للغاية بالنسبة لك ، فيجب عليك استئجار محترف لتحويل Figma إلى WordPress.
أيضا ، تحقق من الفيديو التوضيحي الخاص بنا على Figma إلى WordPress:
قراءة: كيفية تحويل تصميم Adobe XD إلى موقع WordPress
تقدم Seahawk تحويل Figma إلى WordPress بأسعار ثورية
لا تقلق إذا كان لديك قيود على الميزانية. نحن نقدم تحويلات تصميم Figma مثالية للبكسل بأسعار معقولة.
إيجابيات وسلبيات جميع طرق تحويل Figma إلى WordPress
فيما يلي جدول مفصل يوضح إيجابيات وسلبيات كل طريقة لتحويل تصميم Figma إلى WordPress:
| أساليب | الايجابيات | سلبيات |
| الأسلوب 1: مزود الخدمة | اختيار مزود خدمة لتحويل Figma إلى WordPress يوفر خبرة مهنية وخيارات تخصيص. يمكنهم ضمان نتيجة عالية الجودة مصممة خصيصا لاحتياجاتك الخاصة مع المطورين المهرة. | اعتمادا على المزود ، يمكن أن تكون هذه الطريقة مكلفة وتتطلب فحصا شاملا للعثور على شركة موثوقة وذات سمعة طيبة تتوافق مع ميزانيتك وجدولك الزمني. |
| الطريقة 2: الإضافات Figma &الذكاء الاصطناعي | يوفر استخدام مكونات Figma الإضافية وأدوات الذكاء الاصطناعي للتحويل عملية سريعة وآلية ، مما يوفر الوقت والجهد. يمكن لهذه الأدوات إنشاء كود WordPress بسرعة من تصميمات Figma ، مما يبسط عملية التطوير. | قد توفر خيارات تخصيص محدودة ، وقد لا يتطابق الإخراج دائما تماما مع التصميم الأصلي. يحتاج المستخدمون أيضا إلى ضمان أمان وموثوقية المكونات الإضافية والأدوات المختارة قبل التكامل. |
| الطريقة 3: بناة الصفحات | يوفر استخدام أدوات إنشاء الصفحات لتحويل Figma إلى WordPress مرونة في التصميم والتخطيط ، مما يسمح بالتخصيص السهل من خلال واجهة سهلة الاستخدام. يمكن للمستخدمين إنشاء تصميمات معقدة دون معرفة واسعة بالترميز ، مما يسرع عملية التطوير. | قد يشكل إتقان منشئ الصفحة منحنى تعليمي ، وقد لا تكون النتيجة النهائية خفيفة الوزن أو محسنة مثل الحلول المشفرة يدويا. |
| الطريقة 4: موضوع مسبق الصنع | يوفر تحويل Figma إلى WordPress باستخدام سمات مسبقة الصنع إعدادا سريعا باستخدام قوالب مصممة مسبقا ، مما يوفر الوقت والجهد. غالبا ما تأتي هذه السمات مع وظائف وميزات مضمنة ، مما يقلل من الحاجة إلى التخصيص الشامل. | قد تكون خيارات التخصيص محدودة ، وقد لا يتطابق التصميم تماما مع تصميم Figma الأصلي. يحتاج المستخدمون أيضا إلى تحديد موضوع يتوافق مع متطلبات مشروعهم والجمالية المرغوبة بعناية. |
| الطريقة 5: عملية HTML | تسمح عملية HTML لتحويل تصميمات Figma إلى WordPress بالتحكم الكامل في التصميم والوظائف. من خلال ترميز HTML و CSS يدويا ، يمكن للمطورين ضمان دقة مثالية للبكسل للتصميم الأصلي. | هذه الطريقة تستغرق وقتا طويلا وتتطلب خبرة في الترميز. بالإضافة إلى ذلك ، قد يؤدي دمج كود HTML في WordPress إلى حدوث مشكلات في التوافق ، وقد تتطلب التحديثات تعديلات يدوية ، مما قد يزيد من جهود الصيانة. |
الطريقة 1: اختيار مزود خدمة لتحويل Figma إلى WordPress
يمكنك استئجار وكالة WordPress مثل Seahawk لتحويل Figma إلى WordPress بسلاسة. يمكن أن يساعد ذلك في تبسيط عملية التحويل بأكملها مع تقديم نتائج سريعة.
لدى Seahawk فريق من مطوري WordPress المهرة المكرسين لتقديم نتائج استثنائية. يتجلى التزامنا بالتميز في الميزات التالية:
- دقة مثالية: في Seahawk ، تتجاوز عملية تحويل Figma إلى WordPress الدقة. نحن نضمن تصميما مثاليا للبكسل بدقة مطلقة في كل مرحلة.
- حرفية الترميز: مطورونا هم حرفيون من الكود النظيف والمنظم جيدا. باتباع أفضل الممارسات الصناعية ، نعطي الأولوية للأداء الأمثل لموقع الويب وإمكانية صيانة التعليمات البرمجية بسهولة.
- استجابة سلسة: تتعهد Seahawk بموقع WordPress سريع الاستجابة ، مما يؤدي إلى صياغة تجربة تتكيف بسلاسة عبر الأجهزة وأحجام الشاشات المتنوعة.
- ضمان تناغم المتصفح: من خلال الاختبارات الصارمة ، نقوم بتنسيق موقع الويب الخاص بك للتوافق عبر المتصفحات المختلفة.
- صديقة لكبار المسئولين الاقتصاديين: ينظم Seahawk التحويلات مع عناصر صديقة لكبار المسئولين الاقتصاديين ، وتنسيق موقع الويب الخاص بك للحصول على تصنيفات فعالة لمحرك البحث.
- إعادة تعريف السرعة: إعطاء الأولوية لتحسين الموقع ، نعيد تعريف سرعة موقع WordPress. نحن نضمن أنه يتم تحميله بكفاءة البرق ، مما يضمن تجربة مستخدم غامرة وسريعة.
- التسعير الثوري: تقدم Seahawk نهج تسعير ثوري ، حيث تقدم تحويل Figma إلى WordPress تنافسيا بسعر 499 دولارا.
تتضمن عملية Figma to WordPress المبسطة الخاصة بنا ما يلي:
- إرسال تصميم فيجما: شارك تصاميم Figma الخاصة بك معنا.
- اقتباس: احصل على عرض أسعار مخصص لخدمة التحويل.
- بدء المشروع: عند الموافقة ، يبدأ فريقنا على الفور عملية التحويل.
- موافقة العميل: نحن نشركك في المعالم الرئيسية ، ونسعى للحصول على موافقتك.
- التسليم والدعم الموسع: احصل على موقع WordPress المحول بالكامل في الوقت المحدد ، مدعوما بالتزامنا بالدعم الموسع.
احصل على مشروع Figma الذي تحلم به عبر الإنترنت
اتصل بنا لتجربة أفضل خدمة تحويل من Figma إلى WordPress لعملك!
الطريقة 2: تحويل Figma إلى WordPress باستخدام الأدوات: مكونات Figma الإضافية &الذكاء الاصطناعي
فيما يلي الطرق البديلة لتحويل تصميمات Figma إلى WordPress. كل طريقة لها مزاياها وعيوبها ، لذا فكر بعناية في الخيار الذي يناسب احتياجاتك.
Figma إلى وورد باستخدام الذكاء الاصطناعي الإضافات
الذكاء الاصطناعي المكونات الإضافية على الرغم من قوتها لمهام التصميم داخل بيئة Figma ، فقد لا تكون حلا كاملا لتحويل Figma إلى WordPress المباشر لعدة أسباب:
القيود في وظائف البرنامج المساعد لتحويل Figma إلى WordPress
على الرغم من أنه قد تكون هناك مكونات إضافية أو أدوات تدعي تحويل تصميمات Figma إلى WordPress ، فقد يكون لها قيود في ترجمة التصميمات المعقدة بدقة أو التعامل مع عناصر تصميم محددة. قد لا تغطي هذه الأدوات مجموعة كاملة من اختلافات التصميم وتعقيداته.
بيئات مختلفة
Figma هي أداة تصميم تركز بشكل أساسي على إنشاء نماذج بالأحجام الطبيعية والنماذج الأولية وأصول التصميم. على العكس من ذلك ، WordPress عبارة عن نظام إدارة محتوى ومنصة تطوير الويب. أنها تخدم أغراضا مختلفة في سير عمل تطوير الويب.
قراءة: سير عمل تطوير WordPress: الدليل النهائي
التصميم مقابل الوظائف
تتمحور Figma حول التصميم ، بينما يتضمن WordPress كلا من التصميم والوظائف. لا تترجم تصميمات Figma بطبيعتها إلى مواقع ويب وظيفية وتفاعلية. يتطلب تطوير WordPress ترميزا للمحتوى الديناميكي والتفاعل ووظائف الواجهة الخلفية.
تحديات التصميم المتجاوب
قد لا تأخذ مكونات Figma الإضافية في الاعتبار بطبيعتها مبادئ التصميم سريعة الاستجابة التي تعتبر ضرورية لموقع الويب. غالبا ما توفر سمات وبناة WordPress أدوات تحرير سريعة الاستجابة لتحسين المحتوى للأجهزة المختلفة ، وهي ميزة تفتقر إليها مهام سير العمل التي تركز على Figma.
هيكل المحتوى وتحسين محركات البحث
تم تصميم WordPress لإدارة المحتوى وتقديمه بطريقة منظمة ، مع مراعاة أفضل ممارسات تحسين محركات البحث. كأداة تصميم ، قد لا توفر Figma نفس المستوى من الاعتبار للتسلسل الهرمي للمحتوى والبيانات الوصفية والجوانب الأخرى المتعلقة بتحسين محركات البحث الضرورية لموقع WordPress.
التفاعل وتجربة المستخدم
قد تفتقر تصميمات Figma إلى الميزات التفاعلية واعتبارات تجربة المستخدم المطلوبة لموقع WordPress وظيفي. يتضمن تحويل التصميمات مباشرة إلى WordPress تنفيذ ميزات مثل النماذج وقوائم التنقل والمحتوى الديناميكي ، والتي تتجاوز قدرات تصميم Figma.
تحسين الأداء
قد يؤدي تحويل تصميمات Figma مباشرة إلى WordPress إلى تعليمات برمجية غير فعالة وغير محسنة. يعد تحسين موقع الويب للأداء وأوقات التحميل والجوانب الفنية الأخرى جزءا مهما من تطوير WordPress وقد يتطلب تعديلات يدوية في الكود.
مخاوف أمنية لتحويل Figma إلى WordPress
قد لا يتم إنشاء مكونات Figma الإضافية ، وخاصة المكونات الإضافية المجانية ، للتعامل مع اعتبارات الأمان اللازمة لموقع ويب مباشر. يتضمن WordPress ، كونه CMS ، ما يلي:
- تأمين الموقع ضد نقاط الضعف المحتملة.
- ضمان حماية البيانات.
- التعامل مع مصادقة المستخدم، والتي لا تغطيها مهام سير العمل التي تركز على Figma.
المحتوى الديناميكي وقواعد البيانات
يعتمد WordPress على قواعد البيانات لإدارة المحتوى الديناميكي مثل منشورات المدونة وبيانات المستخدم وغيرها من المعلومات. Figma ، كونها أداة تصميم ، لا يمكنها إدارة قواعد البيانات أو المحتوى الديناميكي ، وهو جانب أساسي من تطوير WordPress.
في حين أن Figma هي أداة ممتازة لتصميم واجهات المستخدم والتجارب ، فإن الانتقال من Figma إلى WordPress ينطوي على اعتبارات تتجاوز التصميم المرئي.
يتطلب الترميز وتنفيذ الوظائف والالتزام بأفضل ممارسات تطوير الويب ، مما يجعل عمليات تحويل Figma إلى WordPress اليدوية أو المهنية أكثر ملاءمة لتحقيق موقع WordPress يعمل بكامل طاقته ومحسن .
الطريقة 3: استخدام أدوات إنشاء الصفحات لتحويل Figma إلى WordPress
منحنى التعلم: متوسط
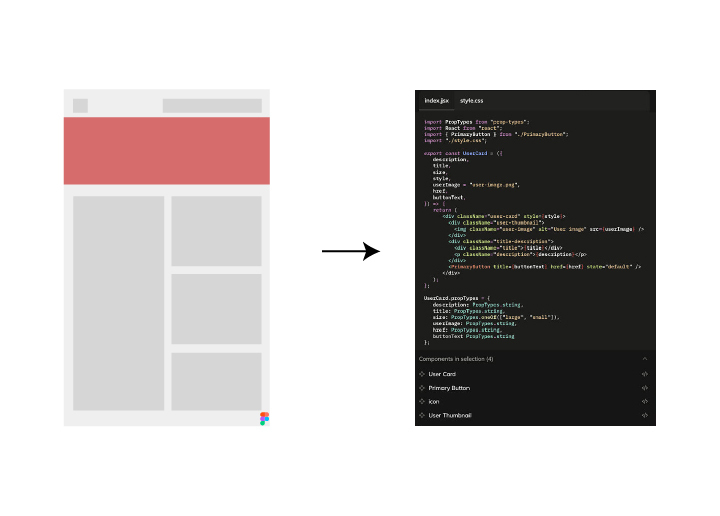
استفد من كفاءة منشئي الصفحات لترجمة تصميمات Figma المصممة بدقة بسلاسة إلى موقع WordPress مذهل. تمكنك هذه الأدوات البديهية من سحب العناصر وإفلاتها ، مما يضمن محاذاة مثالية للبكسل مع رؤية التصميم الخاصة بك.
استخدم Elementor لتحويل Figma إلى WordPress
يعد استخدام أداة إنشاء صفحات مثل Elementor هو الأسهل على الإطلاق عندما يتعلق الأمر بتحويل تصميم Figma الخاص بك إلى WordPress. يستخدم Elementor محرر السحب والإفلات ، مما يجعله طريقة مثالية للمبتدئين.
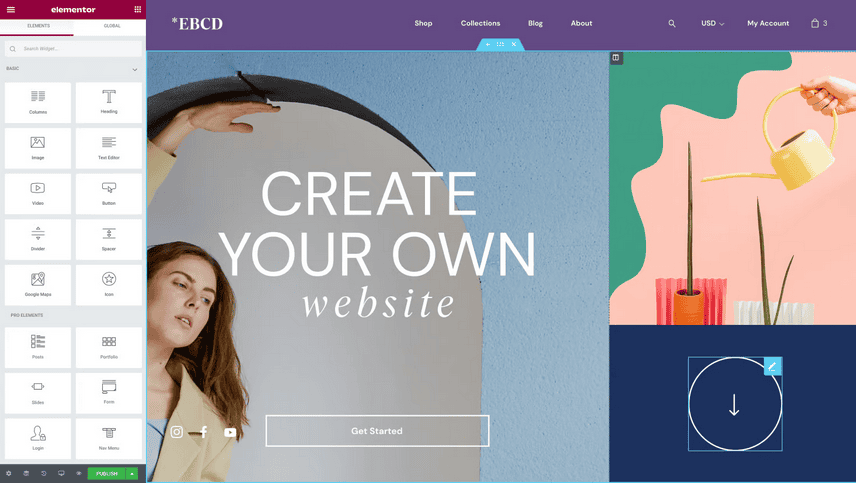
هنا ، لتحويل تصميم Figma إلى WordPress باستخدام Elementor ، يمكنك اتباع هذه الخطوات العامة
قم بإعداد تصميم Figma الخاص بك وإعداد WordPress
تأكد من اكتمال تصميم Figma الخاص بك والانتهاء منه ، بما في ذلك جميع التخطيطات والعناصر والأصول المطلوبة. الآن ، قم بتثبيت WordPress على خادم الويب الخاص بك أو استخدم بيئة تطوير محلية مثل XAMPP أو WAMP.
قم بتثبيت المكون الإضافي وإنشاء صفحة جديدة وتشغيل محرر Elementor
قم بتثبيت وتنشيط المكون الإضافي لمنشئ صفحة Elementor من مستودع WordPress. في لوحة إدارة WordPress ، انتقل إلى "الصفحات" وأنشئ صفحة أو قالبا جديدا لتصميم Figma الخاص بك. في شاشة تحرير الصفحة ، انقر فوق الزر "تحرير باستخدام Elementor" لتشغيل محرر Elementor.
استيراد تصميم Figma إلى Elementor
بمجرد الدخول إلى محرر Elementor ، لديك العديد من الخيارات لاستيراد تصميم Figma الخاص بك. يمكنك إما استخدام خدمة أو أداة تحويل Figma إلى HTML لإنشاء كود HTML / CSS ثم نسخ الكود ولصقه في قسم Elementor أو عنصر واجهة مستخدم.
أو يمكنك استخدام المكون الإضافي Figma to WordPress الذي يسمح بالاستيراد المباشر لتصميمات Figma إلى Elementor. ابحث عن المكونات الإضافية مثل Figma إلى WordPress أو Figma Importer في مستودع البرنامج المساعد WordPress. الخيار الأفضل التالي هو توظيف محترف لتحويل تصميم Figma الخاص بك إلى WordPress.
تخصيص وصقل التصميم
بمجرد استيراد تصميم Figma إلى Elementor ، يمكنك البدء في تخصيصه وتحسينه باستخدام خيارات التصميم والتخطيط المختلفة التي يوفرها Elementor. قم بتعديل التصميم حسب الحاجة ، وضبط الألوان والخطوط والتباعد والعناصر المرئية الأخرى لتتناسب مع تصميم Figma الأصلي.
إضافة محتوى ديناميكي ووظائف
استخدم عناصر واجهة مستخدم Elementor وعمليات التكامل لإضافة محتوى ووظائف ديناميكية إلى تصميمك. قم بدمج ميزات مثل نماذج الاتصال أو أشرطة التمرير أو المعارض أو أي عناصر تفاعلية أخرى يتطلبها تصميمك.
معاينة واختبار
استخدم وظيفة معاينة Elementor لمعرفة كيف يبدو تصميمك ويتصرف في إطارات عرض الأجهزة المختلفة (على سبيل المثال ، سطح المكتب أو الجهاز اللوحي أو الهاتف المحمول). اختبر التفاعل والاستجابة والوظائف العامة للتصميم للتأكد من أنه يلبي متطلباتك.
حفظ ونشر
بمجرد أن تشعر بالرضا عن التصميم ، احفظ تغييراتك في Elementor ، وانشر الصفحة أو القالب لجعله مباشرا على موقع WordPress الخاص بك.
هل لديك استفسارات أو غير قادر على تحويل Figma إلى Elementor؟
احصل على اللمس ودعنا نتحدث عن أفضل خدمة تحويل من Figma إلى WordPress لعملك!
تعلم: كيفية تحويل PSD إلى Shopify بسهولة
تحويل Figma إلى WordPress باستخدام منشئ صفحات Divi

باتباع الخطوات التالية ، يمكنك تسخير إمكانات Divi Page Builder لتحويل تصميم Figma الخاص بك بسلاسة إلى موقع WordPress على الويب.
ملاحظة: الاستيراد المباشر لتصميمات Figma إلى منشئ Divi ليس ميزة أصلية. ومع ذلك ، يمكنك اتباع هذه الخطوات لإعادة إنشاء تصميم Figma يدويا داخل Divi.
تثبيت وتفعيل موضوع Divi
ابدأ بتثبيت سمة Divi على موقع WordPress الخاص بك. بمجرد تفعيلها ، توفر Divi أساسا قويا ومرنا لتحويل تصميم Figma الخاص بك إلى موقع ويب وظيفي.
إنشاء صفحة جديدة
في لوحة معلومات WordPress الخاصة بك ، قم بإنشاء صفحة جديدة حيث تريد تنفيذ تصميم Figma الخاص بك. قم بالوصول إلى Divi Builder لبدء إنشاء صفحتك. داخل محرر الصفحة ، انقر فوق الزر "تمكين Divi Builder". يعمل هذا الإجراء على تنشيط واجهة السحب والإفلات من Divi ، مما يمهد الطريق لتكامل التصميم السلس.
اختر طريقة البناء
تقدم Divi طريقتين للبناء - "البناء من البداية" أو "اختيار تخطيط معد مسبقا". اعتمادا على تصميم Figma الخاص بك ، حدد الطريقة التي تتوافق مع أهداف مشروعك.
تصميم هيكل الشبكة
تتيح لك بنية شبكة Divi تحديد الأقسام والصفوف والأعمدة دون عناء. قم بعكس تخطيط تصميم Figma الخاص بك عن طريق إنشاء بنية الشبكة اللازمة باستخدام عناصر التحكم البديهية في Divi.
إضافة وحدات
استفد من مجموعة وحدات Divi المتنوعة لإعادة إنشاء عناصر Figma. يمكن تخصيص كل وحدة لتتناسب مع تعقيدات تصميم Figma الخاصة بك ، من النصوص والصور إلى الميزات المتقدمة مثل أشرطة التمرير ونماذج الاتصال.
تخصيص التصميم
قم بضبط مظهر عناصر التصميم الخاصة بك عن طريق الوصول إلى خيارات تصميم Divi. اضبط الخطوط والألوان والتباعد ومعلمات النمط الأخرى لضمان تطابق مثالي للبكسل مع نموذج Figma الخاص بك.
الاستفادة من الميزات المتقدمة
استكشف ميزات Divi المتقدمة ، مثل الرسوم المتحركة والانتقالات وفواصل الأشكال ، لتحسين المظهر المرئي لموقع WordPress الخاص بك. سيضمن ذلك توافقه بشكل وثيق مع الجوانب الديناميكية لتصميم Figma الخاص بك.
حفظ ونشر
بمجرد الرضا عن تعديل التصميم ، احفظ تقدمك وانشر الصفحة. توفر إمكانات التحرير في الوقت الفعلي ل Divi ملاحظات فورية ، مما يسمح لك بالتكرار بسرعة وتحقيق النتيجة المرجوة.
تأكد أيضا من أن موقع WordPress الخاص بك يظل مستجيبا باستخدام أدوات التحرير سريعة الاستجابة ل Divi. اختبار وضبط التصميم لمختلف الأجهزة.
استخدم كتل غوتنبرغ لتحويل Figma إلى WordPress
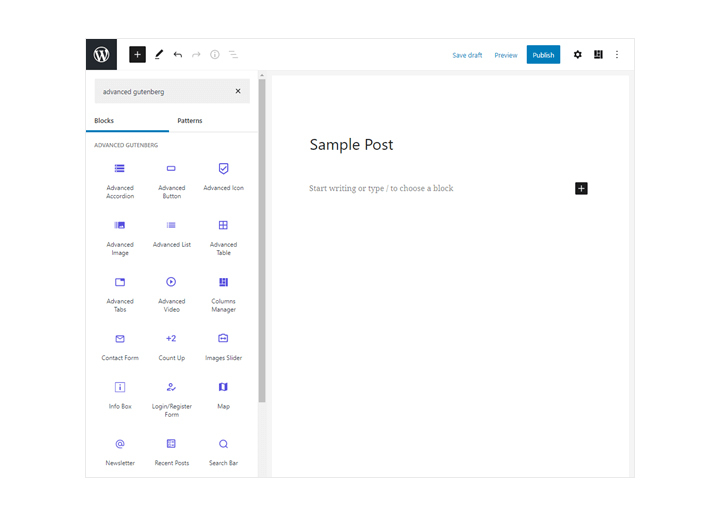
استفد من قوة كتل Gutenberg لتحويل تصميم Figma الخاص بك بسلاسة إلى صفحة WordPress. لمزيد من المعلومات ، راجع وثائق Gutenberg الرسمية و WordPress Block Editor Handbook.
ملاحظة: الاستيراد المباشر لتصميمات Figma إلى كتل Gutenberg ليس ميزة أصلية. يمكنك اتباع الخطوات التالية لإعادة إنشاء تصميم Figma يدويا داخل Gutenberg.
قراءة: غوتنبرغ مقابل العنصر: من يفوز
تثبيت وتفعيل غوتنبرغ
تأكد من تثبيت محرر Gutenberg وتنشيطه على موقع WordPress الخاص بك. يعمل Gutenberg كمحرر كتلة افتراضي وهو جزء لا يتجزأ من عملية تحويل تصميمات Figma إلى صفحات WordPress.
إنشاء صفحة أو منشور جديد
في لوحة معلومات WordPress الخاصة بك ، قم بإنشاء صفحة أو منشور جديد حيث تريد تنفيذ تصميم Figma الخاص بك. سيكون Gutenberg أداة التحرير لبناء الصفحة.
تعرف على كتل Gutenberg ، وهي مكونات البناء لمحتوى WordPress الخاص بك. تخدم كل كتلة غرضا محددا ، من النص إلى الصور والعناصر الأكثر تعقيدا مثل المعارض والأزرار.
اختيار الكتلة
اختر الكتل المناسبة لتكرار هيكل تصميم Figma الخاص بك. يقدم Gutenberg كتلا متنوعة يمكن دمجها لإعادة إنشاء عناصر التخطيط والمحتوى في نموذج Figma الخاص بك.
- بالنسبة لعناصر النص والصورة الأساسية، استخدم كتل النص والصورة، على التوالي. قم بتخصيص النص وتحميل الصور مباشرة داخل المحرر لتتناسب مع محتوى تصميم Figma الخاص بك.
- استخدم كتلة الأعمدة لهيكلة المحتوى الخاص بك في تخطيط يعكس تصميم Figma الخاص بك. اضبط عرض الأعمدة والتباعد لتحقيق المحاذاة المرئية المطلوبة.
الكتل المتقدمة
استكشف المزيد من الكتل المتقدمة مثل كتل المجموعة والزر والوسائط والنص لإعادة إنشاء عناصر تصميم معقدة من Figma. توفر هذه الكتل خيارات تخصيص إضافية لتتناسب مع التفاصيل الدقيقة لتصميمك.
أنماط مخصصة و CSS
لمزيد من التحكم الدقيق في التصميم، استخدم كتلتي HTML المخصص وCSS المخصصين. أدخل التعليمات البرمجية أو الأنماط الخاصة بك لضمان تطابق دقيق بين تصميم Figma الخاص بك وصفحة WordPress.
حفظ المسودات والمعاينة
احفظ تقدمك بانتظام واستخدم ميزة المعاينة لترى كيف تقوم كتل Gutenberg الخاصة بك بترجمة تصميم Figma الخاص بك إلى صفحة WordPress. هذا يسمح بإجراء تعديلات وتحسينات في الوقت الفعلي.
بالإضافة إلى ذلك ، تأكد من أن تصميمك يظل مستجيبا عن طريق اختبار التخطيط وضبطه لأحجام الشاشة المختلفة. يوفر Gutenberg أدوات تحرير سريعة الاستجابة لضمان تجربة مستخدم متسقة عبر الأجهزة.
الطريقة 4: تحويل Figma إلى WordPress باستخدام سمة مسبقة الصنع
منحنى التعلم: صعب
هذه الطريقة أسهل نسبيا من عملية HTML. هنا ، بدلا من إنشاء سمة WordPress من البداية ، يمكنك شراء سمة WordPress وتخصيصها وفقا لاحتياجاتك.
اتبع هذه الخطوات لتحويل تصميم Figma مباشرة إلى WordPress باستخدام سمة WordPress جاهزة للاستخدام.
اختر سمة ووردبريس مناسبة
ابحث عن سمة WordPress التي تتطابق بشكل وثيق مع تصميم وتخطيط تصميم Figma الخاص بك. يمكنك العثور على سمات WordPress في الأسواق المختلفة ، مثل مجموعتنا الخاصة:
مزيد من المعلومات: أفضل سمات العناصر لعام 2024
إعداد تثبيت ووردبريس
قم بتثبيت WordPress على خادم استضافة الويب الخاص بك. يقدم العديد من موفري استضافة الويب عمليات تثبيت WordPress بنقرة واحدة ، أو يمكنك تثبيت WordPress يدويا عن طريق تنزيله من WordPress.org واتباع تعليمات التثبيت.
تثبيت وتفعيل السمة المختارة
بعد إعداد WordPress ، قم بتسجيل الدخول إلى لوحة معلومات WordPress الخاصة بك ، وانتقل إلى المظهر ➔ السمات ، وانقر على زر "إضافة جديد". قم بتحميل وتنشيط المظهر الذي حددته في الخطوة السابقة.
تخصيص السمة
تقدم معظم قوالب WordPress الجاهزة للاستخدام خيارات تخصيص من خلال WordPress Customizer أو لوحة خيارات السمة. استخدم هذه الإعدادات لمطابقة عناصر التصميم والألوان والخطوط وتخطيط تصميم Figma الخاص بك.
قد يتضمن ذلك تحميل شعارات / صور مخصصة وتكوين القوائم وضبط الطباعة والإعدادات المرئية الأخرى.
إنشاء قوالب ووردبريس اللازمة
اعتمادا على مدى تعقيد تصميم Figma الخاص بك ، قد تحتاج إلى إنشاء قوالب WordPress مخصصة لمطابقة تخطيطات أو أنواع صفحات معينة. تتطلب هذه الخطوة معرفة تطوير سمة WordPress و PHP.
يمكنك إنشاء قوالب مخصصة عن طريق تكرار ملفات النسق الموجودة وتعديلها أو باستخدام نسق تابع لتوسيع وظائف النسق.
تحويل عناصر التصميم إلى وورد
ابدأ في تحويل تصميم Figma الخاص بك إلى WordPress عن طريق إعادة إنشاء عناصر التصميم باستخدام نظام إدارة المحتوى المدمج في WordPress. يتضمن ذلك إنشاء صفحات ومنشورات وأنواع منشورات مخصصة وتعبئتها بمحتوى مثل النصوص والصور ومقاطع الفيديو والوسائط الأخرى.
استخدم محرر مكون Gutenberg أو المكونات الإضافية لمنشئ الصفحات مثل Elementor أو Divi أو Beaver Builder لإنشاء تخطيطات معقدة إذا لزم الأمر.
دمج الميزات التفاعلية والديناميكية
إذا كان تصميم Figma الخاص بك يتضمن عناصر تفاعلية مثل النماذج أو أشرطة التمرير أو المعارض أو أي وظائف ديناميكية ، فستحتاج إلى دمج مكونات WordPress الإضافية المناسبة لتحقيق هذه الوظائف. استكشف مستودع المكونات الإضافية ل WordPress أو خيارات المكونات الإضافية المتميزة للعثور على المكونات الإضافية المناسبة للميزات المطلوبة.
تحسين الأداء والاستجابة
تأكد من أن موقع WordPress الخاص بك يعمل بشكل جيد ويتم تحسينه لمختلف الأجهزة وأحجام الشاشات. قم بتحسين الصور وتقليل ملفات CSS و JavaScript وتمكين التخزين المؤقت واستخدام تقنيات التصميم سريعة الاستجابة لجعل موقع الويب الخاص بك يتم تحميله بسرعة وعرضه بشكل صحيح على أجهزة مختلفة.
اختبار وإطلاق موقع WordPress الخاص بك
اختبر موقع الويب الخاص بك بدقة عبر العديد من المتصفحات والأجهزة وأنظمة التشغيل للتأكد من أنه يطابق تصميم Figma الخاص بك ويعمل بشكل صحيح ولديه تجربة مستخدم سلسة. قم بإجراء أي تعديلات وتحسينات ضرورية بناء على ملاحظات المستخدمين ونتائج الاختبار.
بمجرد أن تشعر بالرضا عن التحويل ، انشر موقع WordPress الخاص بك على الخادم المباشر أو بيئة الاستضافة. قم بتحديث إعدادات DNS لنطاقك إذا لزم الأمر للإشارة إلى تثبيت WordPress الجديد.
الطريقة 5: استخدام عملية HTML لتحويل تصميم Figma إلى WordPress
منحنى التعلم: صعب
يتطلب مسار HTML لتحويل Figma إلى WordPress خبرة وفهما سابقين ل HTML. العملية بسيطة للغاية. أولا ، يجب عليك تحويل تصميم Figma الخاص بك إلى HTML ثم كود HTML إلى WordPress. يمكنك القيام بذلك يدويا أو استخدام أداة. يقترح معظم الخبراء عملية يدوية لتجنب الأخطاء.
لهذا ، يمكنك استخدام إطار عمل CSS مثل Bootstrap. وإليك كيف يعمل:
- تسجيل الدخول إلى Figma ، قم بزيارة بوتستراp.com، وقم بتنزيل قالب بداية HTML
- بعد ذلك ، ابدأ العمل على تخطيط التصميم
- من هناك ، يمكنك تحويل تصميمات HTML الخاصة بك إلى سمة WordPress.
فيما يلي دليل تفصيلي حول كيفية تحويل تصميمات HTML الخاصة بك إلى سمة WordPress.
إعداد بيئة التطوير الخاصة بك
قم بتثبيت بيئة تطوير محلية على جهاز الكمبيوتر الخاص بك ، مثل XAMPP أو MAMP ، لتشغيل تثبيت WordPress محلي. يتيح لك ذلك العمل على سمة WordPress دون التأثير على موقع الويب المباشر الخاص بك.
ذات صلة: كيفية تثبيت WordPress على نظام التشغيل Windows 11
إنشاء مجلد نسق جديد
في تثبيت WordPress ، انتقل إلى دليل "wp-content / themes" وأنشئ مجلدا جديدا لموضوعك. أعطه اسما مناسبا ، ويفضل أن يكون مرتبطا بتصميمك.
قم بإنشاء ملفات PHP الضرورية
داخل مجلد النسق الجديد ، قم بإنشاء الملفات الأساسية التالية:
- style.css: يحتوي هذا الملف على البيانات الوصفية للقالب ، بما في ذلك اسم السمة والمؤلف والإصدار وتفاصيل أخرى. يمكنك البدء بقالب أساسي وتحديث المعلومات وفقا لذلك.
- index.php: يعمل هذا الملف كقالب افتراضي وهو مسؤول عن عرض الصفحة الرئيسية لموضوعك.
- header.php: يحتوي هذا الملف على كود HTML لقسم رأس القالب الخاص بك.
- footer.php: يحتوي هذا الملف على كود HTML لقسم تذييل قالبك.
- sidebar.php (اختياري): إذا كان تصميمك يتضمن شريطا جانبيا، فقم بإنشاء هذا الملف للاحتفاظ بشفرة HTML للشريط الجانبي.
كسر تصميم HTML الخاص بك
تحليل تصميم HTML الخاص بك وتقسيمه إلى مكونات معيارية. حدد العناصر المتكررة مثل الرؤوس والتذييلات والأشرطة الجانبية وأقسام المحتوى. قم بتحويل كل مكون من هذه المكونات إلى ملفات PHP منفصلة داخل مجلد السمات الخاص بك.
على سبيل المثال ، إذا كان تصميمك يحتوي على رأس ، فقم بإنشاء ملف يسمى "header.php" وانقل كود HTML ذي الصلة إليه.
تحويل HTML إلى PHP
Open each of your HTML files and convert them to PHP files. Replace the static content with appropriate WordPress template tags and functions. For example, replace static text with <?php bloginfo(‘name’); ?> to display the site name dynamically.
إذا كان تحويل ملفات HTML إلى ملفات PHP تقنيا للغاية بالنسبة لك ، فاتصل بنا وسنساعدك!
دمج علامات ووظائف قالب WordPress
استخدم علامات ووظائف قالب WordPress لجلب المحتوى وعرضه ديناميكيا في جميع أنحاء ملفات PHP الخاصة بك. على سبيل المثال ، يمكنك استخدام the_title () لعرض عنوان المنشور / الصفحة أو the_content () لعرض المحتوى الرئيسي.
قائمة انتظار ملفات CSS وجافا سكريبت
إذا كان تصميمك يتضمن أوراق أنماط CSS مخصصة أو ملفات JavaScript ، فقم بإنشاء الملفات الضرورية داخل مجلد السمة. بعد ذلك ، قم بإدراجها في قائمة الانتظار باستخدام وظائف WordPress مثل wp_enqueue_style () و wp_enqueue_script () في ملفات السمات المناسبة ، مثل "functions.php" أو "header.php".
تنفيذ ميزات ووردبريس
إذا كان تصميم HTML الخاص بك يتضمن ميزات ديناميكية مثل منشورات المدونة أو التعليقات أو القوائم ، فقم بتنفيذ وظائف WordPress المقابلة. استخدم وظائف WordPress والخطافات والمكونات الإضافية لدمج هذه الميزات في المظهر الخاص بك.
اختبار وتحميل وتفعيل السمة
بمجرد اكتمال التكامل ، اختبر قالب WordPress الخاص بك بدقة. تأكد من أن جميع العناصر والأنماط والوظائف تعمل بشكل صحيح. اختبر السمة على الأجهزة والمتصفحات المختلفة لضمان الاستجابة والاتساق.
بمجرد أن تشعر بالرضا عن السمة ، قم بضغط مجلد السمة في ملف ZIP. بعد ذلك ، قم بتحميله على موقع WordPress المباشر الخاص بك. من لوحة معلومات WordPress ، انتقل إلى المظهر ➔ السمات ، وقم بتنشيط المظهر الذي تم تحميله حديثا.
*ملاحظه: يتطلب تحويل تصميمات HTML إلى سمة WordPress فهما قويا لتطوير HTML و CSS و PHP و WordPress. إذا لم تكن معتادا على هذه التقنيات ، ففكر في توظيف مطوري WordPress ذوي الخبرة.
هل تحتاج إلى مساعدة احترافية ل Figma إلى WordPress؟ املأ استفساراتك أدناه واحصل على دعم فوري
لا يمكنك تحويل الليغما بنفسك؟ احصل على مساعدة من الخبراء المحترفين لتحويل Figma إلى WordPress
باتباع الطرق والخطوات المذكورة أعلاه ، يمكنك بسهولة تحويل تصميم Figma الخاص بك إلى موقع WordPress وظيفي عبر HTML أو سمات WordPress الحالية أو باستخدام Elementor كمنشئ للصفحة.
ومع ذلك ، تذكر أن تحويل تصميم من Figma إلى WordPress يتضمن مزيجا من التصميم والتطوير والمعرفة الخاصة ب WordPress. إذا لم تكن معتادا على تطوير WordPress ، فمن الأفضل تعيين خبير WordPress لتحويل Figma إلى WordPress أو استئجار وكالة WordPress لضمان الانتقال السلس من Figma إلى موقع WordPress يعمل بكامل طاقته.
احجز استشارة مجانية واحصل على تصميم Figma الخاص بك عبر الإنترنت
دعنا نتحدث عن أفضل خدمة تحويل من Figma إلى WordPress لعملك!
الأسئلة الشائعة حول Figma to WordPress
هل يمكنني تحويل Figma إلى WordPress؟
نعم ، من الممكن تحويل تصميمات Figma الخاصة بك إلى WordPress. هناك عدة طرق للقيام بذلك ، مثل استخدام أداة إنشاء الصفحات لتحويل Figma إلى WordPress أو تحويل التصميم يدويا باستخدام قوالب HTML و CSS و WordPress.
هل يمكن استخدام تصميمات Figma ل WordPress؟
نعم ، يمكن استخدام تصميمات Figma ل WordPress. يمكنك إما تحويل التصميم إلى WordPress أو استخدام أداة إنشاء صفحات مثل Elementor لاستيراد التصميم مباشرة إلى موقع WordPress الخاص بك.
كيف يمكنني تحويل Figma إلى موقع ويب؟
لتحويل تصميم Figma الخاص بك إلى موقع ويب ، ستحتاج إلى تحويله إلى قوالب HTML و CSS و WordPress. بمجرد تحويل التصميم ، يمكنك تحميله على موقع WordPress الخاص بك وتخصيصه بشكل أكبر لجعله عمليا وسريع الاستجابة.
كيف تعمل فيجما؟
ستبدو واجهة المستخدم مألوفة على الرغم من أنها تعتمد على المتصفح. تعمل العديد من هذه البرامج بشكل مشابه ، لكنها تختلف من حيث ميزات معينة ، مثل ما يأتي مثبتا مسبقا وما يتطلب مكونات إضافية. بالإضافة إلى ذلك ، تختلف طريقة تعاملهم مع مهام مثل النماذج بالأحجام الطبيعية عالية الدقة والنماذج الأولية.
كيف تعمل لوحة الرسم فيجما؟
يتم تمثيل كل لوح رسم في Figma بطبقة تدعم كل شيء في البرنامج. بدلا من التركيز على ملف واحد في كل مرة، قم بالتصغير من لوح الرسم للحصول على رؤية شاملة للمشروع الكامل. على اليمين توجد لوحة معلومات ، وعلى اليسار لوحة للأدوات والطبقات.
لماذا يجب أن تفضل مطور WordPress؟
مطور WordPress لديه المعرفة التي تحتاجها لإنشاء موقع ويب مخصص بالكامل لشركتك. يمكن لهذا الخبير إنشاء سمات ومكونات إضافية جديدة تماما لموقع WordPress الخاص بك. نتيجة لذلك ، لن يكون لديك مظهر عام ، وسيحتوي موقع الويب الخاص بك على جميع الميزات التي يتطلبها النجاح.


